With Azure Mobile Services, developers can quickly create a REST interface to read and write their backend database.
The Azure portal provides a wizard for creating a sample solution built around mobile services in just a few minutes. In this article, I will walk you through the steps to create a new Azure Mobile Service.
Log onto the Azure Portal and select the MOBILE SERVICES icon (Figure 1) in the left menu.
Click the NEW button at the bottom of the screen (Figure 2).
This exposes a menu (Figure 3).
With COMPUTE and MOBILE SERVICES selected (which should already be the case) click the CREATE button.
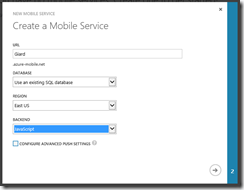
The "Create a Mobile Service" dialog (Figure 4) displays.
Give a name for the service. The full name will be whatever you type in the URL textbox, followed by ".azure-mobile.net" and it must be unique. The portal will let you know if someone else has chosen the same name. Select an existing database or create a new one; then select the Region where the Mobile Service will live. It makes sense to create the service in the same region where the database resides.
Finally, select the language in which to build the backend service. If you select JavaScript, the server-side solution will be hosted in Node.js. If you select .NET, you can create a solution in Visual Studio and deploy it to Azure, where it will be hosted in IIS.
Click the arrow (Figure 5) at the bottom right of the dialog to advance to the next page, where you can specify database information.
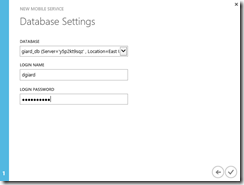
Figure 6 show the page if you elect to connect to an existing database. Select the database connection string; then enter the login name and password with which you will connect to this database.
Click the check button to create the Mobile Service. After a few seconds, the service will show up in the portal as in Figure 7.
In this article, we saw how to create a new Azure Mobile Service. In the next article, we will add a table and allow clients to retrieve and update data in that table, using this service.


