In previous articles, I showed how to set up a new Azure Mobile Service and how to generate a sample application.
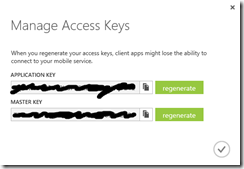
By default, the service allows anyone with the Application Key to access this Mobile Service. This Application Key is generated automatically when the service is created. You can view the key by clicking to the "Manage Keys" icon (Figure 1) at the bottom of the Mobile Service Dashboard to display the "Manage Access Keys" dialog (Figure 2).
In the generated sample application, this access code is automatically passed to the constructor of the MobileServiceClient object that is instantiated in App.xaml.cs (Listing 1)
1: public static MobileServiceClient MobileService = new MobileServiceClient(
2: "https://giard.azure-mobile.net/",
3: "MqJSWTxyZlOTRHdABCGOuDcQcTVqvR41"
4: );
Listing 1
If you have created a table for your Mobile Service, you can click on the service's Data tab and manage the Permissions of that table by selecting the table and clicking the Permissions tab.
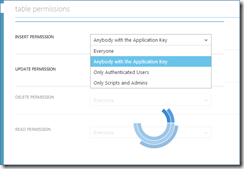
Here, you will see 4 dropdowns (Figure 3) - one for each operation you can perform on the table (INSERT, UPDATE, DELETE, and READ). For each of these operations, you can set one of the following permissions:
- Everyone
- Anybody with the Application Key
- Only Authenticated Users
- Only Scripts and Admins
Below is an explanation of each Permission option
Everyone
The service is not secured. Anyone who knows the URI can access the service operation. Set this on the READ PERMISSION and you will be able to open a browser, navigate to the table's URI and view the data in the table.
Anybody with the Application Key
This is the default permission. Any request must contain the Application Key in the HTTP Header of the request. The format is
X-ZUMO-APPLICATION:key
where key is the Application Key of this Mobile Service.
As described above, the .NET MobileServiceClient class handles this automatically if we pass the Application Key into its constructor.
Only Authenticated Users
An authentication token from a trusted authentication provider must accompany the HTTP request to this REST service. In a future article, I will show you how to set up single sign-on with trusted authentication providers so that this token is added to each request.
Only Scripts and Admins
This allows an operation to be performed only by Administrators logged onto the Azure portal or by PowerShell scripts running directly on the Virtual Machine on which the Mobile Service is running.
You are free to set different permissions for each operation. For example, you could allow anyone to read data in your table; require the Application Key for updates; authenticated sign on for inserts; and only allow Admins and server scripts to delete data from the table.
In reality, you will likely pick a single security mechanism for the table and set all operations to this. You can then write server-side code to handle any differences between the services (allowing a user to only delete his own records, for example).
Conclusion
The permissions are for a given combination of endpoint (which, in this case, points to a table) and action (INSERT, UPDATE, DELETE, and READ). If you like, you could set a different permission for each action on this endpoint. For example, you could declare that anyone can read data; only those with the Application Key can update data; only Authenticated users can Insert a row; and Deleting data is reserved for scripts and Admins. To me, it makes more sense to keep the same permission for each action, unless you have a specific reason for changing it for a given action.
In this article, we showed how to set permissions on each action for a given Azure Mobile Services endpoint.


