Azure Mobile Service, Part 8: Creating and Publishing a .NET Mobile Service
November 29, 2014 14:20 Comments [0]In a previous article, I described how to create an Azure Mobile Service built on top of node.js - with all the server-side code written in JavaScript. You can also create a Mobile Service with server-side code written in C# or Visual Basic. You will probably prefer this method if you are more proficient in .NET than in JavaScript.
This article will walk you through the creation of an Azure Mobile Service, written in C#.
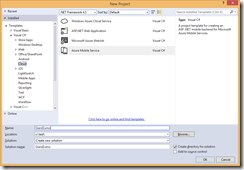
Launch Visual Studio 2013 and select File | New | Project from the menu. The New Project dialog displays, as shown in Figure 1.
Under the Templates list at the left of the dialog, expand either Visual Basic or C#; then, select the Cloud template category. Select "Azure Mobile Service" from the Cloud templates listed at the center of the dialog. Give the project a Name and Location and click the [OK] button.
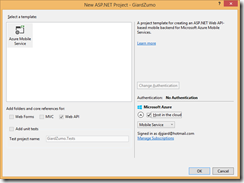
The New ASP.NET Project dialog displays, as shown in Figure 2.
The Azure Mobile Service template should be selected and the "Web API" checkbox should be checked. Leave these selected and check and check the Host in the cloud checkbox; then, click the [OK] button.
Because you elected to host this service in the cloud, the Create Mobile Service dialog displays next, as shown in Figure 3.
Select an Azure subscription to deploy the Mobile Service; enter a name for your Mobile Service (it must be unique); select a Region; select a database; and enter login credentials for that database. Then click the [Create] button. This should create a project on your local machine and an empty Mobile Service in your Azure subscription.
The Mobile Service project is shown in Figure 4.
To publish your Mobile Service, right-click the project in the Solution Explorer and select Publish from the context menu. The "Publish Web" wizard displays with the "Profile" page activated as shown in Figure 5.
Under "Select a publish target", click "Microsoft Azure Mobile Service". The "Select Existing Mobile Service" dialog displays as shown in Figure 6.
From the dropdown, select the Azure Mobile Service you created above and click the [Next] button.
The Profile page of the "Publish Web" wizard displays as shown in Figure 7.
Verify the information on the Profile page is correct and click the [Next] button.
The "Settings" page of the "Publish Web" wizard displays as shown in Figure 8.
Select "Release" from the Configuration dropdown and click the [Next] button.
The "Preview" page of the "Publish Web" wizard displays as shown in Figure 9.
Click the [Publish] button to publish the Mobile Service to your Azure subscription.
Now, you should be able to log onto the portal and view your new mobile service (Figure 10). Its status may be listed as “Creating…” if you go to the portal too quickly; but, within a couple minutes, you will be able to manage the service from the Azure portal.
You can manage this service almost exactly the same way that you managed a JavaScript mobile service. The difference is that the .NET mobile service does not contain a DATA tab. Data configuration in a .NET service is done in the Visual Studio project.
In this article, we showed the steps to create and publish a new Azure Mobile Service with server-side code in a .NET language.


