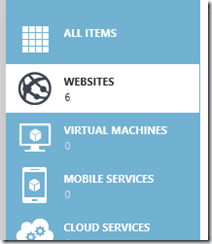
There are three ways to create a new web site from the Azure portal: Quick Create; Custom Create; and From Gallery. To launch any of them, navigate to the Azure management portal and select "Web Sites" from the list of services along the left side of the portal [Fig 1].
Then click the "New" button at the bottom left (Fig 2). 
Fig 2
This displays the New Website menu(Fig 3)
Because we were in the "Web Sites" section when we clicked the "New" button, the categories: "COMPUTE" and "WEBSITE" are selected for us. We need to select from the three ways to create a web site within the Portal. They are: "QUICK CREATE", "CUSTOM CREATE", and "FROM GALLERY". Let’s go through each scenario.
QUICK CREATE
The simplest way to create a web site is with the QUICK CREATE option. With the NEW WEBSITE menu expanded, select QUICK CREATE (Fig 4).
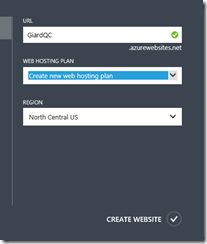
The QUICK CREATE dialogue displays, as shown in Fig 5.
At the URL textbox, enter the name of your site. The full URL to access this new site will be
http://sitename.azurewebsites.net
where sitename is the name you typed into this field.
At the WEB HOSTING plan dropdown, you can either select an existing plan or select "Create new web hosting plan", in which case you will need to select a region in which to create the plan. The Web Hosting plan allows you to configure, manage, and scale a group of sites together.
Click the CREATE WEBSITE check button (![]() ) to create the site. Typically it takes Azure less than a minute to create the site.
) to create the site. Typically it takes Azure less than a minute to create the site.
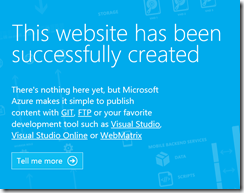
Once the site is created, you can navigate to the site's URL and you will see a default page (hostingstart.html) displayed in your browser, as shown in Fig 6.
This is the only file deployed to your site. You will need to use FTP, set up source control deployment or deploy your site content in some other way in order to get your web application into this web site.
CUSTOM CREATE
The CUSTOM CREATE option is similar to the QUICK CREATE, but it adds a few options on site creation. With the CUSTOM CREATE option, it is possible to associate a database with your site and set up Source Control publishing at the time you create your site.
With the NEW WEBSITE menu expanded, select CUSTOM CREATE. The CUSTOM CREATE dialogue displays, as shown in Fig 7.
At the URL textbox, enter the name of your site. The full URL to access this new site will be
http://
where
At the WEB HOSTING plan, you can either select an existing plan or select "Create new web hosting plan", in which case you will need to select a region in which to create the plan.
Select or create a database to associate with this site. Enter a connection string name and credentials of the SQL Server account used by the web site to connect with the database. This database will appear under the LINKED RESOURCES tab of your website. Linking a database to a website makes it easier to manage them together, such as when you are backing up both your site and the database.
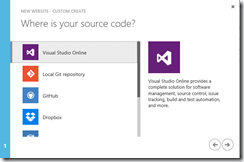
If you want to set up publishing from a source control repository, you can do so during site creation by clicking the "Publish from source control" checkbox (It is possible to skip this step and set up source control publishing later). Checking this checkbox adds a second page to the dialogue. Click the right arrow button (![]() ) to advance to the second page (Fig 8), where you can select the type of source control you are using. For some repositories, you will be prompted for more information.
) to advance to the second page (Fig 8), where you can select the type of source control you are using. For some repositories, you will be prompted for more information.
When you are finished configuring everything, click the right arrow to create your new site.
As with the QUICK CREATE option, only one file (hostingstart.html) is deployed to your site. You can navigate to the site URL to view this file in your browser.
FROM GALLERY
Unlike the QUICK CREATE and CUSTOM CREATE options, the FROM GALLERY option provides more than just a single page in your website. This option tends to be the fastest way to get a fully-functional web site up and running. It is also an excellent option for those without coding or HTML experience.
With the NEW WEBSITE menu expanded, select FROM GALLERY.
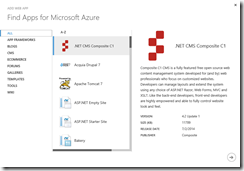
The ADD WEB APP dialogue displays, as shown in Fig 9.
This list displays a list of templates, frameworks, and web site engines from which to choose. Notice that you can filter this list by selecting a category on the left, such as BLOGS, or CMS (Fig 10).
Notice also that many of the options are based on non-Microsoft technologies. WordPress, for example, is written in PHP and stores data in a MySQL database. Select the template, framework, or web site engine on which you want to base your site and click the Right Arrow button.
A configuration dialogue displays that is appropriate for the option you selected. At a minimum, you will need to provide a name for your web site, which will take the default form http://
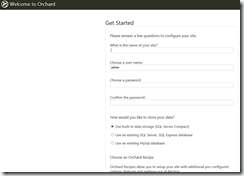
Click the Check button (![]() ) to create your site. This generally takes longer than creating a site with either the QUICK CREATE or CUSTOM CREATE options because Azure will build an entire site for you. For many of the Blog and CMS templates, you will be prompted for some more information, such as a site name and an admin account the first time you navigate to the site. The "Get Started" page launched the first time you connect to a new Orchard CMS site is shown in Fig 11.
) to create your site. This generally takes longer than creating a site with either the QUICK CREATE or CUSTOM CREATE options because Azure will build an entire site for you. For many of the Blog and CMS templates, you will be prompted for some more information, such as a site name and an admin account the first time you navigate to the site. The "Get Started" page launched the first time you connect to a new Orchard CMS site is shown in Fig 11.
CONCLUSION
In this article, we showed the three ways to create a Web Site using the Azure Management Portal and walked you through the steps to create a web site with each method.
