Microsoft Visual Studio Team System 2008 Database Edition (aka “Data Dude”) provides tools for managing and deploying SQL Server databases.
In this article, we will discuss how to migrate data from one database to another. Data Dude provides the Data Compare tool for this purpose.
In order to use the Data Compare tool, the following conditions must be true
1. Data exists in a source table. You want to migrate that data to a table of the same name in a different database.
2. Both tables must have the same structure.
3. Both tables must have a primary key to uniquely identify rows.
Follow the steps below to migrate data with the Data Compare tool.
1. Launch Visual Studio 2008
2. Select Data | Data Compare | New Data Compare. The New Data Comparison dialog displays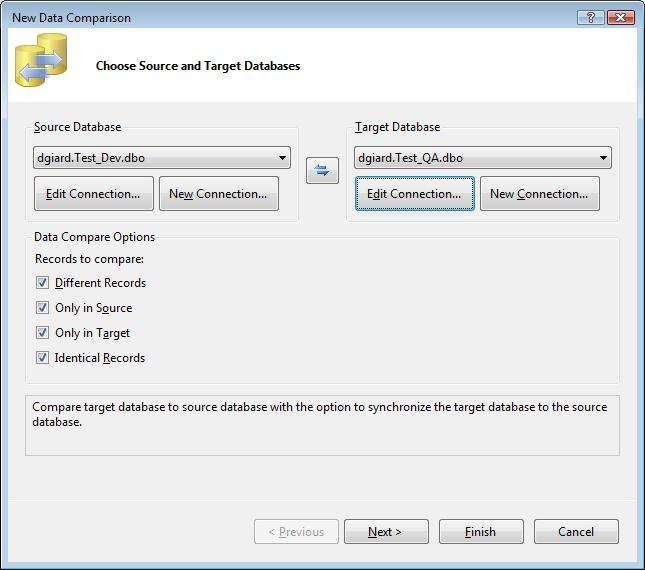
Figure 1
a. When migrating data from a table in one database to another, the database you intend to update is known as the “Target Database”. The other database is known as the “Source Database”. In the New Data Comparison dialog, select the Source Database and Target Database connections. If you have not created a Visual Studio connection to these databases in Visual Studio, you can click the New Connection button to create them.
b. The New Data Comparison dialog contains checkboxes that allow you to specify which rows you want to see and compare. I don’t usually change these (they are all checked by default) but it may speed up the process to clear the Identical Records checkbox.
c. Click the Next button to advance to the second screen of the wizard.
Figure 2
On this screen, you can choose which tables to compare. Usually I am only interested in one or two tables, so I clear the rest of the checkboxes. If I have a million rows in my customer table and I’m not interested in migrating any of those rows, I can save a lot of processing time by un-checking the customer table.
d. Click the Finish button to display the Data Compare window.
3. The Data Compare window consists of two panes: the Object List on top and the Record Details at the bottom.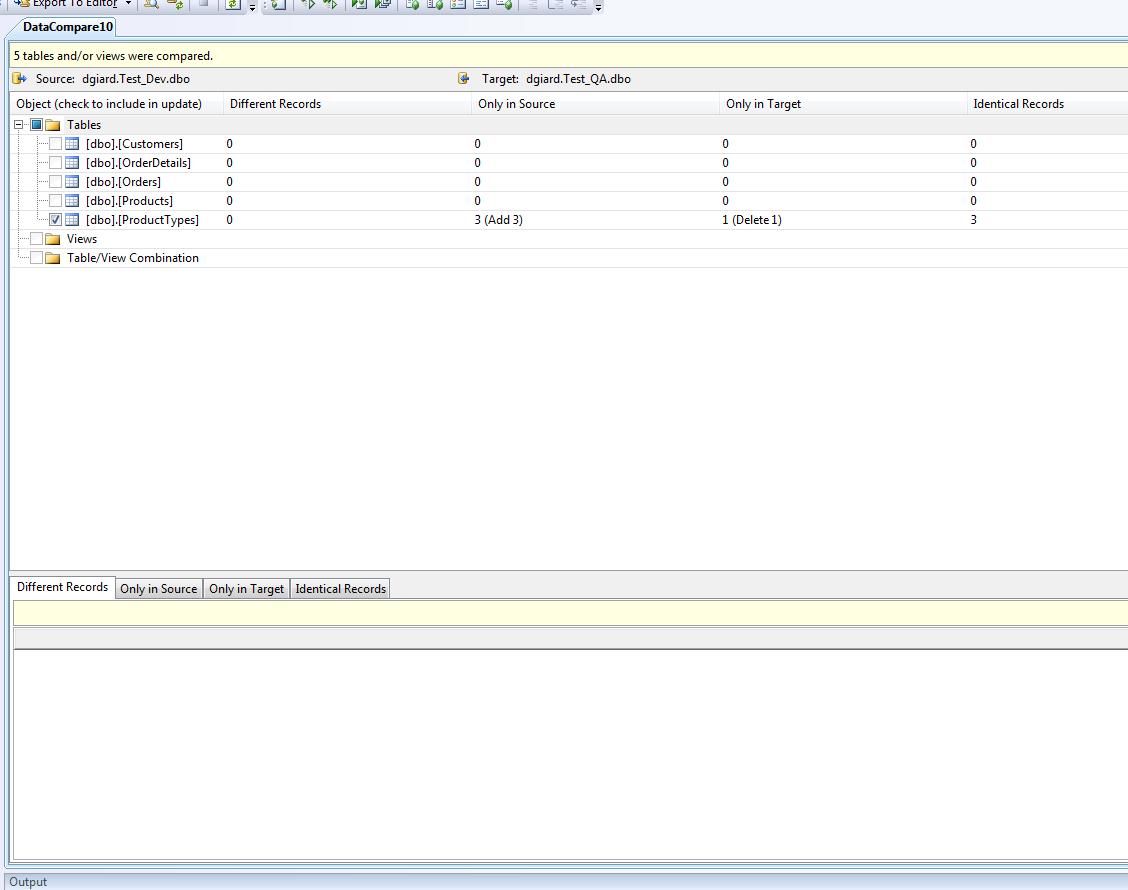
Figure 3
a. The object list displays each table or view as a single row with columns summarizing the number of new, removed, changed and identical rows. Rows are matched on their primary key.
b. Click a row in the object list to display details in the record details pane. Here you can click a tab to view the rows that are new, missing or changed. Checking the checkbox next to a record flags it to the Data Compare tool, meaning you want to update the target database to match the same row in the source database. This may result in an INSERT, UPDATE, or DELETE statement depending on the tab on which the record is listed.
c. For a record to be flagged for update, both the table and the record must be checked.
4. After checking all the rows you wish to update, click the Write Updates toolbar button to commit your changes to the target database.
5. Alternatively, you can click the Export To Editor toolbar button to generate a SQL script that you can run in the SQL Server query editor. This method requires an extra step but has the following advantages
a. You can modify the script before running it.
b. You can send the script to someone else to run.
c. You can view the script to learn what Data Dude is doing. It’s interesting to note that constraints on each table are dropped before copying data, then created after the data is copied. This speeds up the process. Also, note the use of transactions to prevent incomplete data copies. Below is a sample script updating data in one table.
/*
This script was created by Visual Studio on 8/15/2008 at 8:57 AM.
Run this script on dgiard.Test_QA.dbo to make it the same as dgiard.Test_Dev.dbo.
This script performs its actions in the following order:
1. Disable foreign-key constraints.
2. Perform DELETE commands.
3. Perform UPDATE commands.
4. Perform INSERT commands.
5. Re-enable foreign-key constraints.
Please back up your target database before running this script.
*/
SET NUMERIC_ROUNDABORT OFF
GO
SET XACT_ABORT, ANSI_PADDING, ANSI_WARNINGS, CONCAT_NULL_YIELDS_NULL, ARITHABORT, QUOTED_IDENTIFIER, ANSI_NULLS ON
GO
/*Pointer used for text / image updates. This might not be needed, but is declared here just in case*/
DECLARE @pv binary(16)
BEGIN TRANSACTION
ALTER TABLE [dbo].[OrderDetails] DROP CONSTRAINT [FK_OrderDetails_Orders]
ALTER TABLE [dbo].[OrderDetails] DROP CONSTRAINT [FK_OrderDetails_Products]
ALTER TABLE [dbo].[Orders] DROP CONSTRAINT [FK_Orders_Customers]
DELETE FROM [dbo].[ProductTypes] WHERE [ProductTypeID]=N'5646953f-7b89-4862-bcf3-bf53450d28bb'
INSERT INTO [dbo].[ProductTypes] ([ProductTypeID], [ProductTypeName]) VALUES (N'7beb0d99-d034-41b9-bbf7-f9cdcdbedc30', N'Furniture')
INSERT INTO [dbo].[ProductTypes] ([ProductTypeID], [ProductTypeName]) VALUES (N'abc19a14-5968-4c5f-9f0f-4debc034cb90', N'Hardware')
INSERT INTO [dbo].[ProductTypes] ([ProductTypeID], [ProductTypeName]) VALUES (N'b9e446ed-eeb1-4334-b191-c70a55ef1a05', N'Books')
ALTER TABLE [dbo].[OrderDetails] ADD CONSTRAINT [FK_OrderDetails_Orders] FOREIGN KEY ([OrderID]) REFERENCES [dbo].[Orders] ([OrderID])
ALTER TABLE [dbo].[OrderDetails] ADD CONSTRAINT [FK_OrderDetails_Products] FOREIGN KEY ([ProductID]) REFERENCES [dbo].[Products] ([ProductID])
ALTER TABLE [dbo].[Orders] ADD CONSTRAINT [FK_Orders_Customers] FOREIGN KEY ([CustomerID]) REFERENCES [dbo].[Customers] ([CustID])
COMMIT TRANSACTION
The Data Compare tool is a simple tool for accomplishing a useful task. Since I discovered it, it has saved me a lot of time setting up new data environments.