Given an Azure Function, you may wish to change the URL that points to this function. There are several reasons to do this:
- Make the URL simpler
- Make the URL more readable
- Make the URL conform to your organization's standards
To reassign a Function's URL, you will need to know the existing URL. To find this, select the Function and click the "Get function URL" link, as shown in Fig. 1.
The Function URL dialog displays, as shown in Fig. 2.
Click the [Copy] icon to copy this URL to your clipboard. You may wish to paste this into a text document or another safe place for later use.
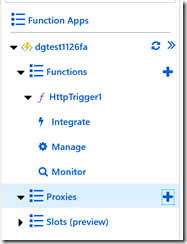
Each Azure Function App contains a "Proxies" section, as shown in Fig. 3.
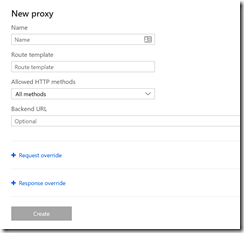
Click the [+] icon to display the "New proxy" blade, as shown in Fig. 4.
At the "Name" field, enter a name to identify this proxy. I like to include the name of the original function in this name, to make it easy to track to its source.
At the "Route template" field, enter a template for the new URL. This is everything after the "https://" and the domain name. If the function accepts parameters, you will need to add these and surround them with curly brackets: "{" and "}".
At the "Allowed HTTP methods" dropdown, select "All methods" or check only those methods you wish your new URL to support.
At the "Backend URL" field, enter the full original URL copied earlier to your clipboard. If the function accepts parameters, you will need to add these and surround them with curly brackets: "{" and "}". The parameter name here must match the parameter name in the "Route template" field.
An example
For example, if I created a Function with an HTTPTrigger and accepted all the defaults (as described here), you will have a function that accepts a querystring parameter of "name" and outputs "Hello, " followed by the value of name.
My original function URL looked similar to the following:
https://dgtestfa.azurewebsites.net/api/HttpTrigger1?code=idLURPj58mZrDdkAh9LkTkkz2JZRmp6/ru/DQ5RbotDpCtg/WY/pRw==
So, I entered the following values into the "New Proxy" blade:
| Name: | HttpTrigger1Proxy |
| Route template: | welcome/{name} |
| Allowed HTTP methods: | All methods |
| Backend URL: | https://dgtestfa.azurewebsites.net/api/HttpTrigger1?code=idLURPj58mZrDdkAh9LkTkkz2JZRmp6/ru/DQ5RbotDpCtg/WY/pRw==&name={name} |
With these settings, I can send a GET or POST request to the following url:
https://dgtestfa.azurewebsites.net/welcome/David
and receive the expected response:
Hello, David
This new URL is much simpler and easier to remember than the original one.
In this article, I showed you how to create a proxy that redirects from a new URL to an existing Azure Function.


