Overview
Azure Application Insights (App Insights) provides a fast, scalable way to collect metrics within an application or service and save that information to a log in Azure for later viewing, querying, reporting, or analysis.
In many cases, you can configure Application Insights without writing any code. However, you want more control of what is logged and when it is logged, you modify code in your application using an SDK. This article shows how to use the Application Insights SDK for .NET Core in an ASP.NET application.
Before you begin
To write anything to Azure Application Insights, you must have an existing Azure Application Insights service. You can configure Application Insights when you create another service. For example, this article describes how to configure App Insights for an Azure Web App. You can also create an App Insights service independent of other services, as described in this article.
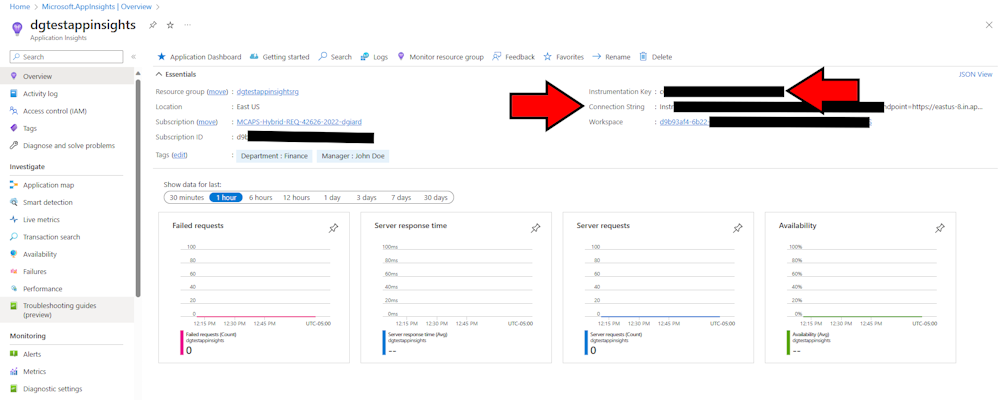
However, you create the App Insights service, you need to retrieve the Instrumentation Key and Connection String from that service. Navigate to the "Overview" blade of the App Insights service and copy the Connection String, as shown in Fig. 1.

Fig. 1
The SDK
To get started with your .NET project, you must add the SDK to your .NET application. This is done by adding the Microsoft.Extensions.Logging.ApplicationInsights NuGet package. In Visual Studio, you can right-click a project, select "Manage NuGet Packages..." and searching for the package. Alternatively, you can install the package in the project's root folder with the following command:
dotnet add package Microsoft.Extensions.Logging.ApplicationInsights --source https://api.nuget.org/v3/index.json
appsettings.json
To use Application Insights in our .NET Core project, we need to configure it using the appsettings.json file. Add the following to this file:
{
  "ApplicationInsights": {
    "InstrumentationKey": "INSTRUMENTATION_KEY_FROM_AZURE_APP_INSIGHTS_OVERVIEW_BLADE","
  },
  "Logging": {
    "LogLevel": {
      "Default": "Information",
      "Microsoft.AspNetCore": "Warning"
    }
  },
  "AllowedHosts": "*"
}
Startup Code
The first thing to do in our code is to tell the program we are using Application Insights logging and configure it appropriately.
Add the following code to the program.cs:
builder.Logging.AddApplicationInsights(
        configureTelemetryConfiguration: (config) =>
            config.ConnectionString = "CONNECTION_STRING_FROM_AZURE_APP_INSIGHTS_OVERVIEW_BLADE",
            configureApplicationInsightsLoggerOptions: (options) => { }
    );

builder.Logging.AddFilter("your-category", LogLevel.Trace);
This lets the engine know that any logging statements should be directed to our Application Insights service. By default, logging statements are only written to the console.
Logging Code
Now, you can write your logging code. This code is the same regardless of the destination of your logs.
Add the following code at the top of each class in which you want to log.
private readonly ILogger _logger;
where NAME_OF_THIS_CLASS is the name of the class in which this code appears.
The ILogger interface contains methods, such as _LogInformation, LogWarning, and LogError that allow you to log different types of messages.
_logger.LogInformation("Demo Info", "This is an info message");
_logger.LogWarning("Demo Warning", "This is a warning message");
_logger.LogError("Demo Error", "This is an error message");
Viewing the Logs
You can view the logs in Application Insights. They are stored in the "traces" table. You can view them with a query like the following:
traces
| order by timestamp desc
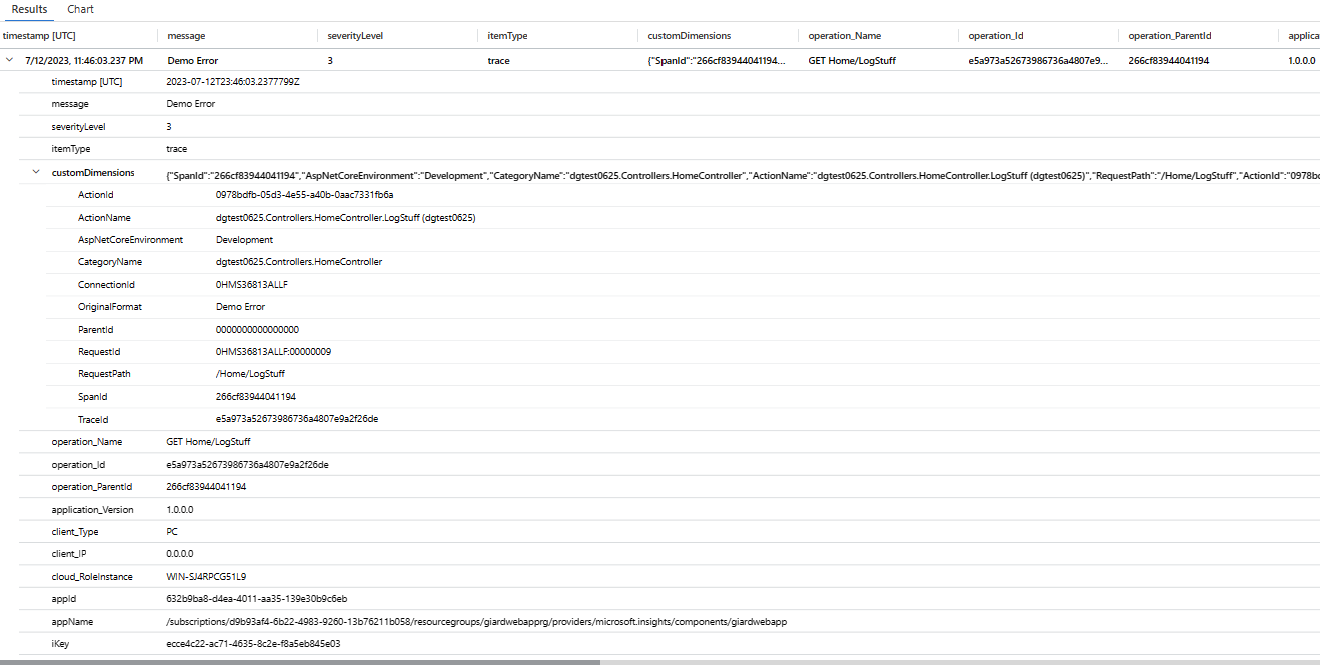
Which yields results like those in Fig. 2.

Fig. 2
Fig. 3 shows details when I expand one of the log entries.

Fig. 3
Conclusion
In this article, I showed you how to log information, warning, and errors from a .NET Core application into Azure Application Insights.