Overview
Identity and Access Management (IAM) is an important part of securing an application - particularly one that is exposed externally. An IAM solution allows users to authenticate, verifying to a system or application who they are; and allows that system to determine the actions each user is authorized to perform.
This article will show how to make a call to the Microsoft Graph (MS Graph) API, including any prerequisites to calling the API.
Fig. 1 illustrates the prerequisites to making a Graph API call.
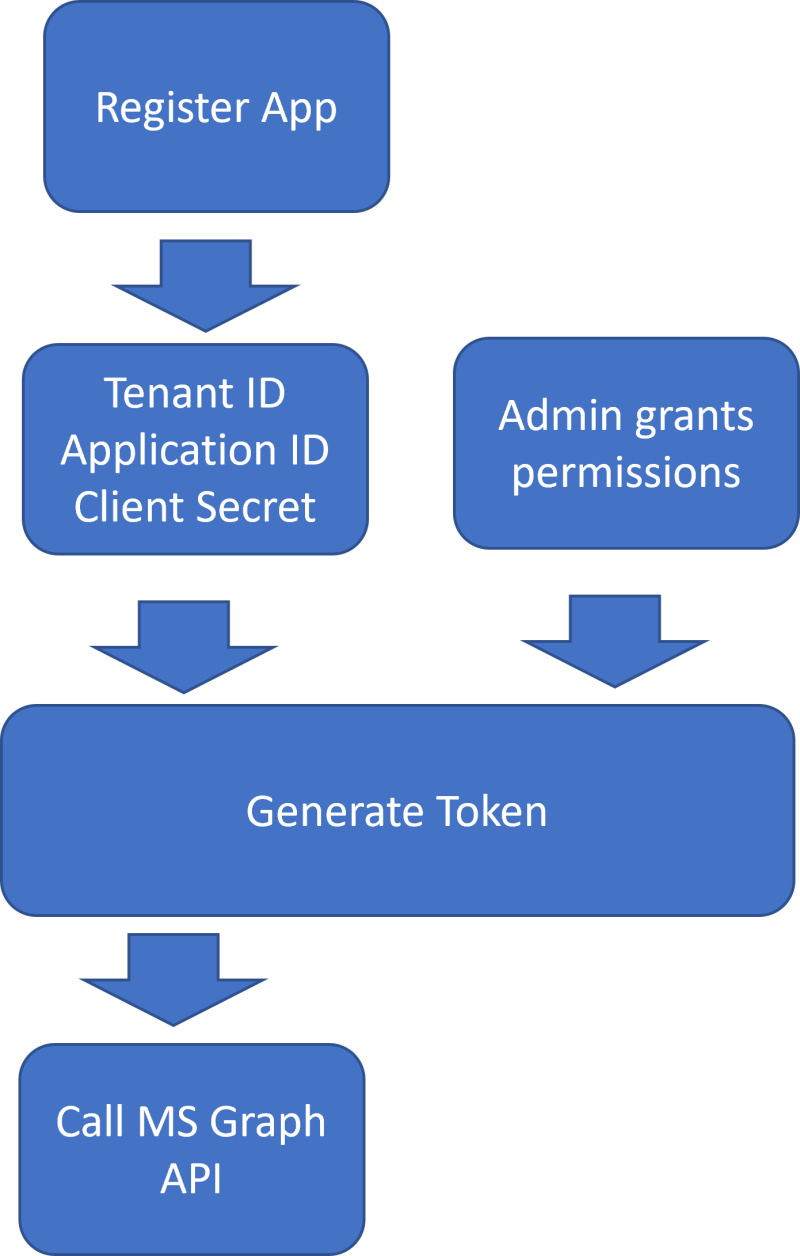
Fig. 1
Microsoft Graph
Microsoft Graph (MS Graph) provides a REST API that allows you to access and manage objects in Microsoft 365, which includes Microsoft Office, Windows, and Active Directory (AD) objects, including information about users and their organizations. Microsoft Graph provides an API that allows you to read and write objects in Azure and Microsoft 365 objects. Examples include accessing and maintaining information on users, calendars, Teams, and devices.
You can call the Graph API by sending a POST, PUT, or GET request to a set of endpoints at https://graph.microsoft.com. As of this writing, MS Graph is on version 1.0, so all the endpoints begin with https://graph.microsoft.com/v1.0/, but that version number at the end may change in the future. These endpoints are documented here.
Some of these requests require sending some data in the HTTP body and all of them require sending data in the HTTP header. One common method of authentication is to send a Bearer Token in the header of each HTTP request. A JSON Web Token (JWT) is a type of Bearer Token issued by an identity provider, such as Azure Active Directory (AAD). It verifies the identity of the person or service making the API call, and it can contain information about that identity.
An API call runs as an account identity. That identity must be authenticated by someone that MS Graph trusts. That identity must have permission to perform actions in the API call
Later in this article, I will walk you through the steps of generating a JWT Bearer Token using Azure Active Directory as the identity provider.
Another requirement of making a call to the Microsoft Graph API is that the caller must have permission to perform the requested actions on the objects specified in the request. For example, in order to read information about a user, the account must have READ permissions on the User object.
Later in this article, I will show you how an AD Administrator can grant permissions on an object to an account.
Bearer Token
A Bearer Token is a token that can be sent with a web request. It is an encrypted string that indicates under which account the request will run, validates the authenticity of that request, and (potentially) contains some information about that account.
You can generate a JWT Bearer Token by POSTing form data to an HTTP endpoint. In order to do this, you will need 3 pieces of information: -Tenant ID -Client ID -Client Secret
You can find the Tenant ID in your Azure subscription's Active Directory tenant.
To get the Client ID and Client Secret, you will need to register your application with Azure Active Directory.
We will return to the Bearer Token generation after I show you how to find these three pieces of information.
Azure Active Directory
To use Azure Active Directory as an Identity Provider, you will need an Azure subscription.
Log into the Azure Portal, search for and select Azure Active Directory (Fig. 2) to display the Azure Active Directory "Overview" blade, as shown in Fig. 3.
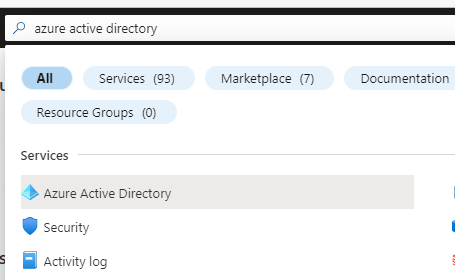
Fig. 2
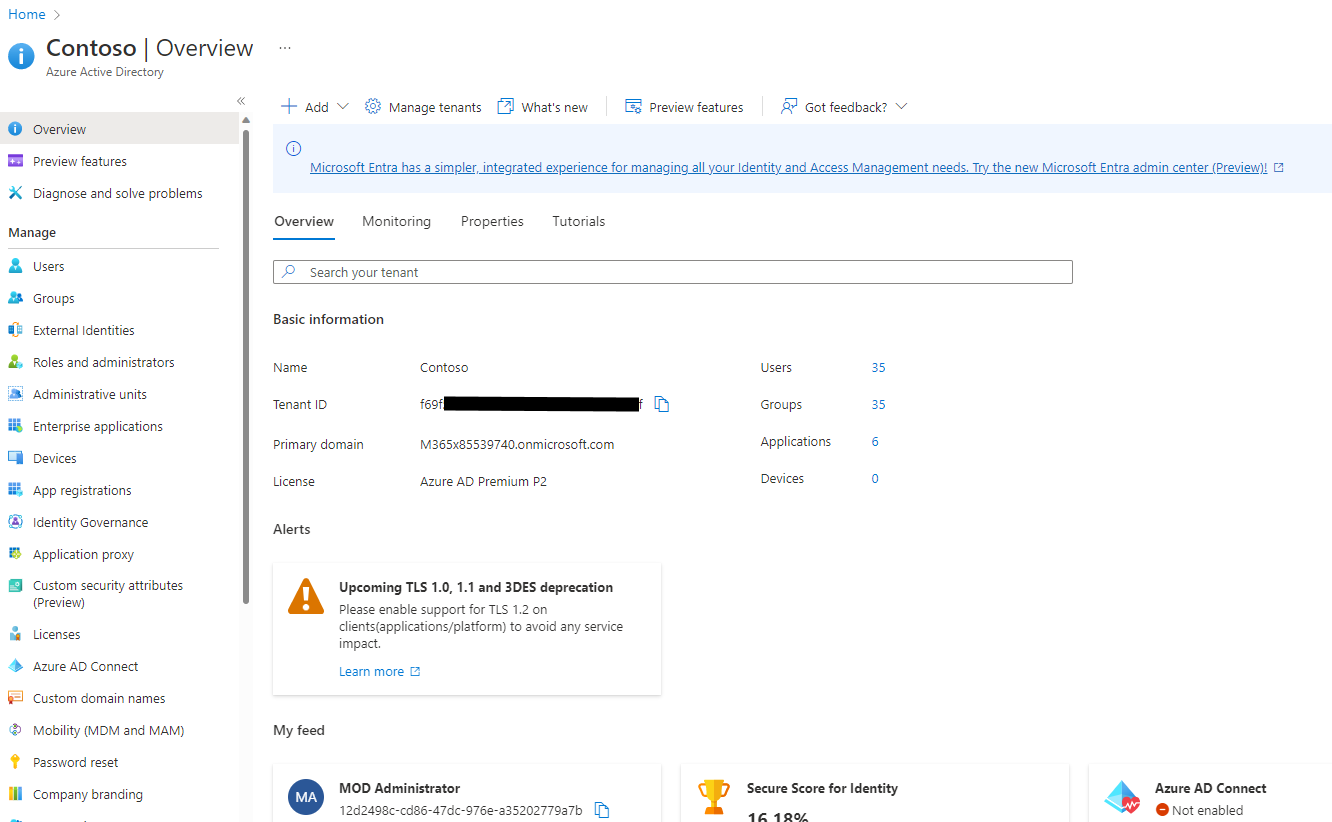
Fig. 3
You can find the Tenant ID for this subscription on the "Overview" blade. Copy and save this value. You will need it later.
Click the [App registrations] button (Fig. 4) in the left menu to display the "App registrations" blade, as shown in Fig. 5.

Fig. 4

Fig. 5
Click the [New registration] button (Fig. 6) to display the "Register an application" dialogue, as shown in Fig. 7.

Fig. 6
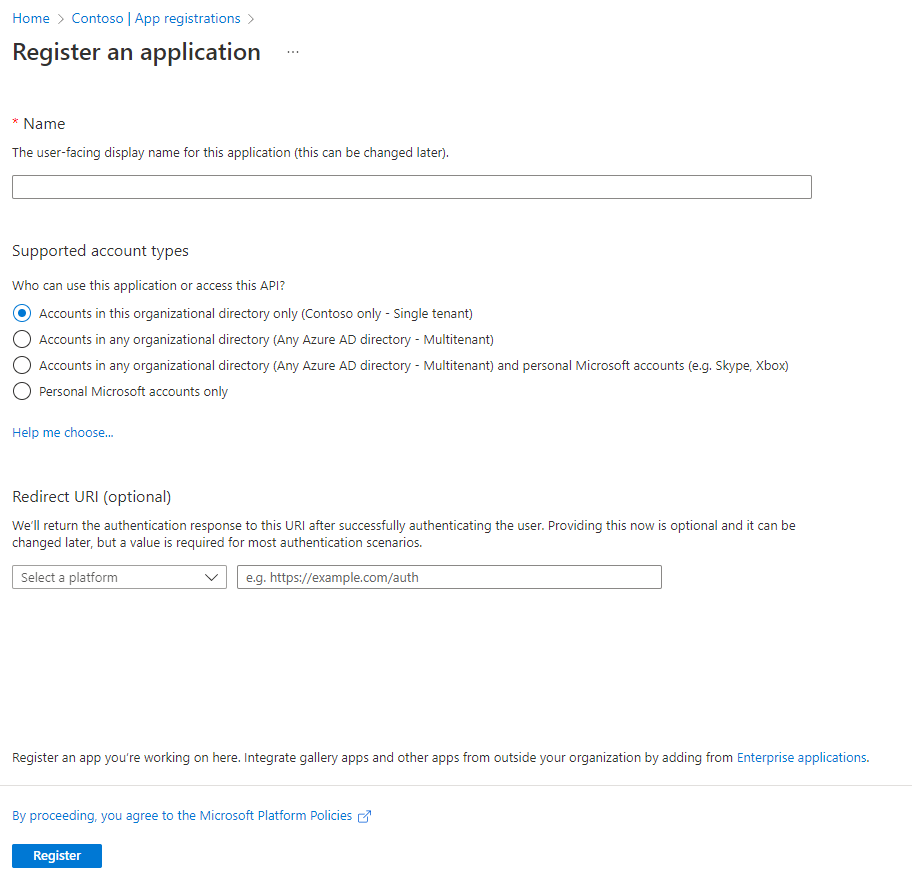
Fig. 7
At the "Name" field, enter a descriptive name for this Application Registration. This will appear in the list of registrations.
At the "Supported account types" radio buttons, select which clients this registration will support. You can specify only the current Active Directory or allow authentication of accounts in other Active Directories or outside AD.
At the "Redirect URI" field, you can select a URI to which a user is directed after they authenticate. This is useful in interactive web applications. After authentication, the user can be returned to the home page or to their profile page via this setting. This information is optional and can be added or changed later.
Click the [Register] button to register the application.
This registers the application with Active Directory and displays the Application Registration Details page, as shown in Fig. 8.
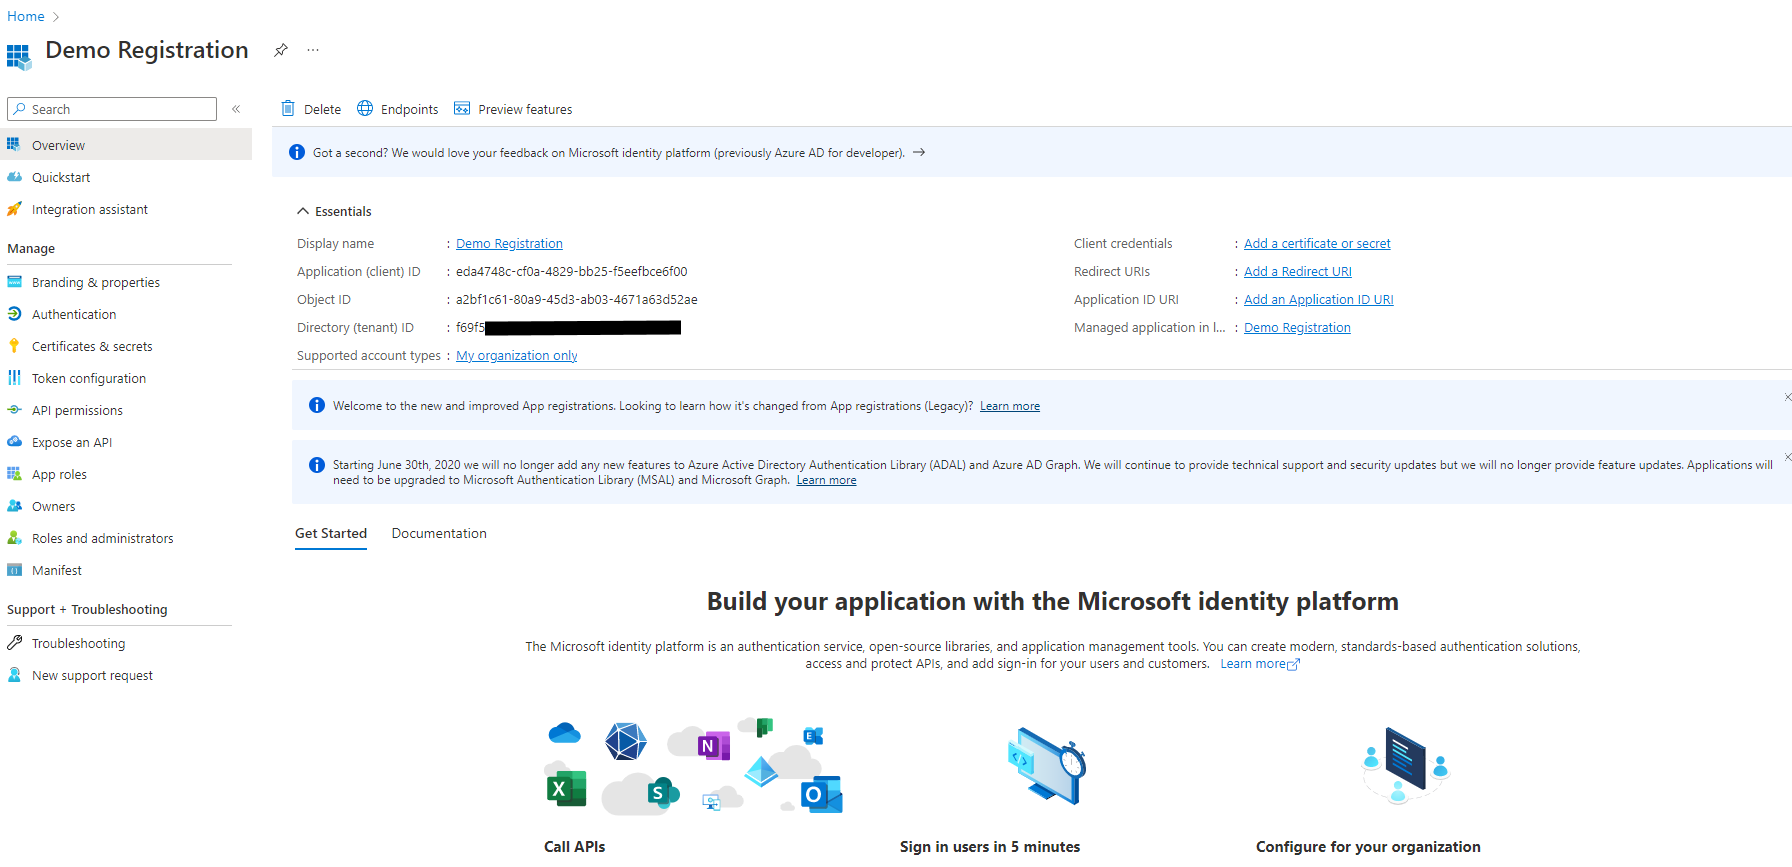
Fig. 8
You can find the Application (client) ID on this page. Copy and save this value. You will need it later.
You will need a Client Secret in order to generate a JWT.
Click the [Certificates & secrets] button (Fig. 9) to display the "Certificates & secrets" blade, as shown in Fig. 10.

Fig. 9
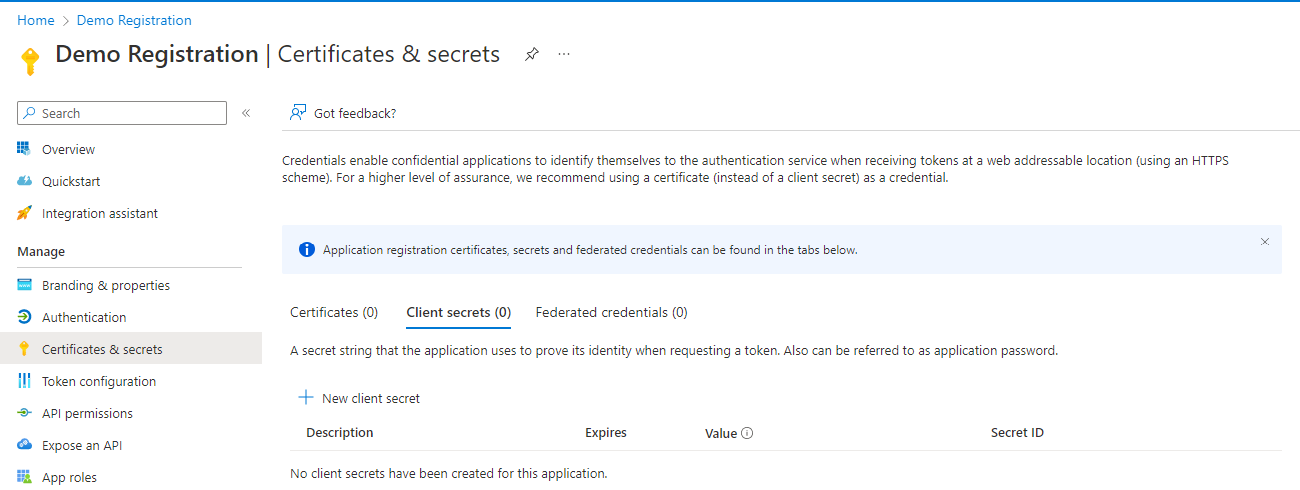
Fig. 10
Select the "Client secrets" tab, if it is not yet selected.
Click the [New client secret] button (Fig. 11) to display the "Add client secret" dialogue, as shown in Fig. 12.

Fig. 11
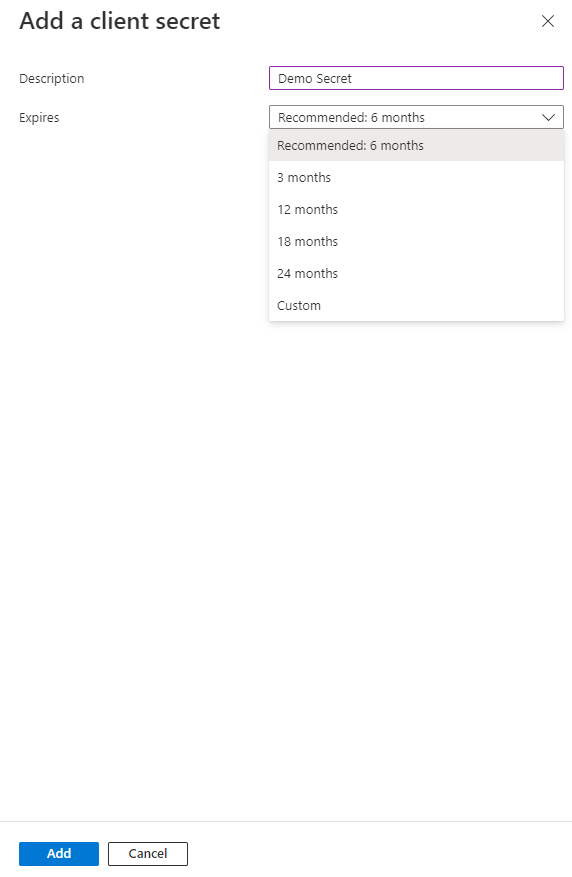
Fig. 12
You can find the Secret Value on this blade. Copy and save the "Value". You will need it later.
IMPORTANT: After you navigate away from this page, there is no way to retrieve the Secret Value. If you do not copy and save it now, you will need to regenerate a Secret.
Granting Permissions in MS Graph
In order for an account to successfully call the Graph API, that account must have permissions to perform the actions specified by that API. A user can grant permissions to some objects associated with themselves. For example, I may give you permission to read my calendar; but, for most objects and actions, an AD Administrator is responsible for granting those permissions. Here are the steps to take while logged into Azure as an AD Administrator for the subscription involved.
At the "AD Application Registration" page (Fig. 13), click the [API permissions] button (Fig. 14) in the left menu to display the "API permissions" blade, as shown in Fig. 15.

Fig. 13

Fig. 14

Fig. 15
Click the [Add a permission] button (Fig. 16) to display the "Request API permissions" dialogue, as shown in Fig. 17.

Fig. 16
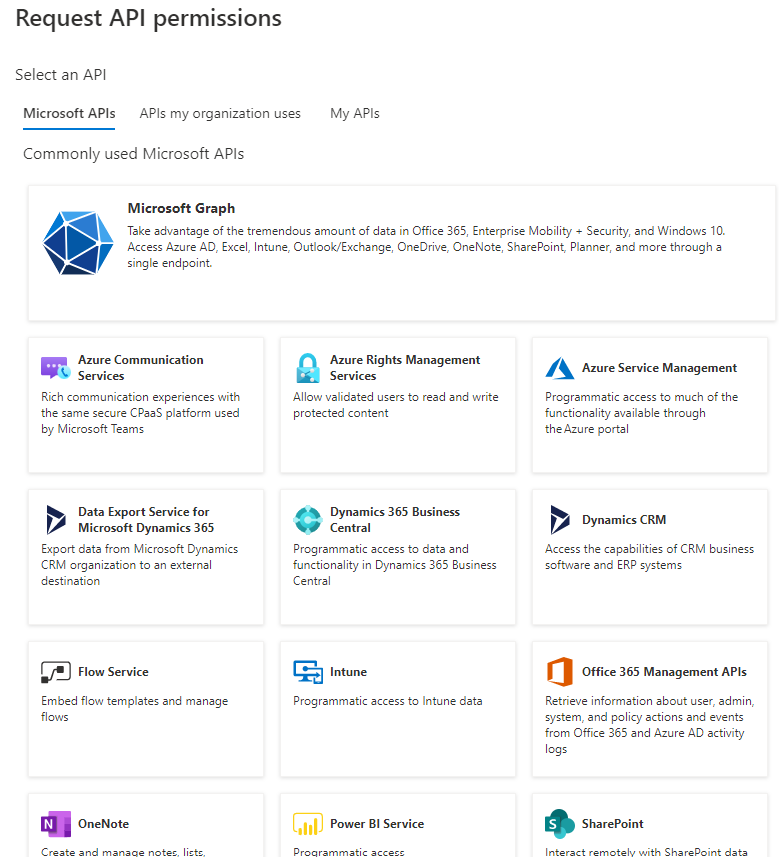
Fig. 17
Click the "Microsoft Graph" button (Fig. 18) to filter the permission request to Microsoft Graph permission types, as shown in Fig. 19.

Fig. 18
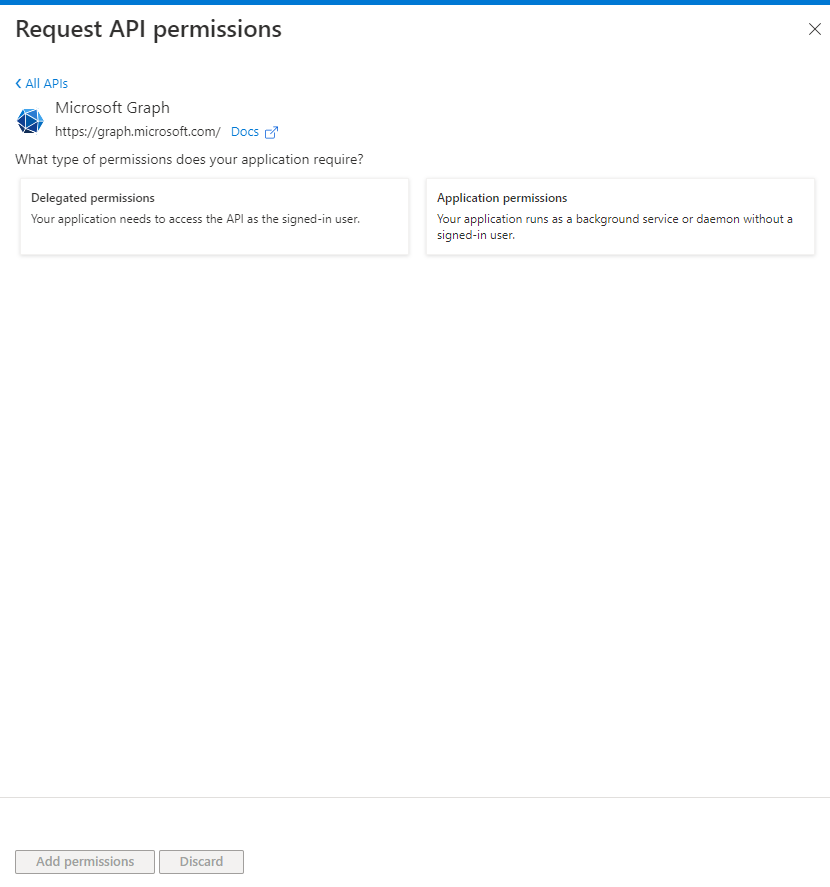
Fig. 19
Click the [Application permissions] button (Fig. 20). This allows the account to make calls, even if it is not explicitly signed in to AD. A list of permission categories displays, as shown in Fig. 21.

Fig. 20
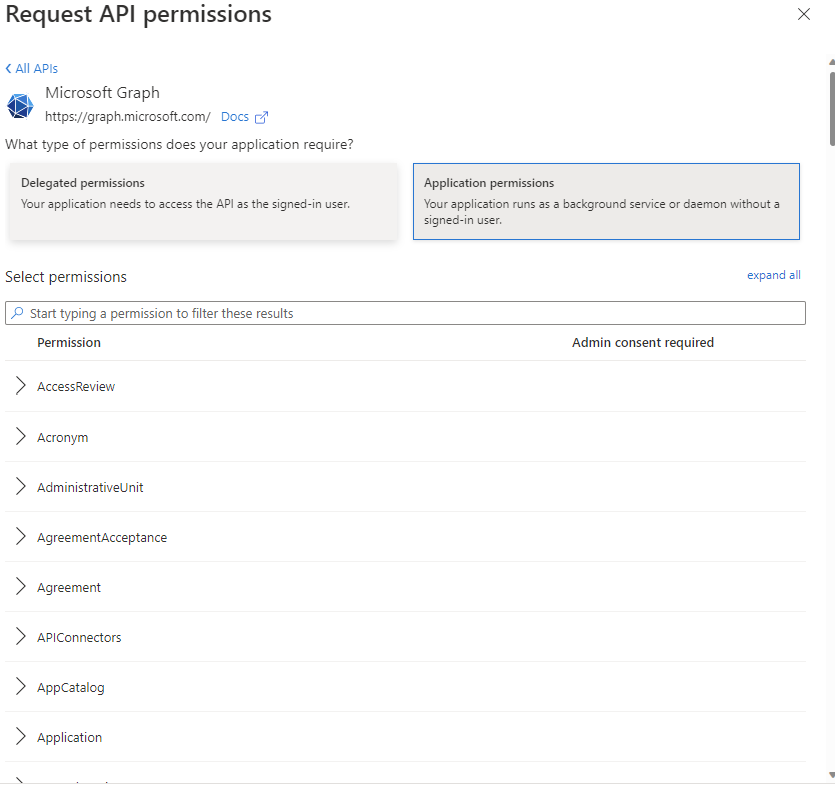
Fig. 21
Here you can expand a category and select the permissions to grant to an account via this Application Registration. Fig. 22 shows the "User" category expanded with the "User.Read", which would allow an account to Read a user's information in the Active Directory, but would not allow them to change, add, or delete user information.
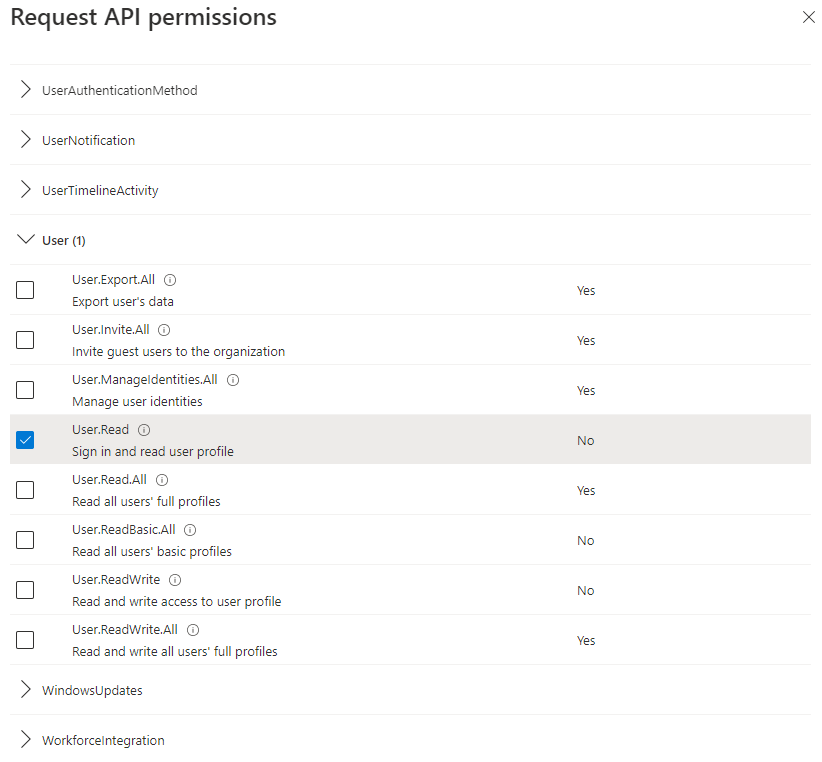
Fig. 22
Click the [Add permissions] button (Fig. 23) to save selected permission changes.

Fig. 23
Generating a Token
After you have Registered an Application with Azure Active Directory, generated a Client Secret, and granted the appropriate Microsoft Graph permissions, you may now generate a JSON Web Token (JWT). This Bearer Token can be passed in Microsoft Graph API requests to authenticate the user.
You will need the following information from the Application Registration step above:
-Tenant ID -Client ID -Client Secret
To generate a new JWT, send an HTTP POST request to https://login.microsoftonline.com/{{TenantID}}/oauth2/v2.0/token
where {{TenantID}} is the Tenant ID of the Azure subscription recorded above.
You can do this in code or using a CURL command or using a tool like Postman, I will demonstrate how to make this API call using Postman.
In Postman, create a new request, select POST from the HTTP Verb dropdown, and enter into the URL textbox "https://login.microsoftonline.com/{{TenantID}}/oauth2/v2.0/token", replacing {{TenantID}} with the Tenant ID recorded above.
This is shown in Fig. 24.

Fig. 24
Select the "Body" tab, select the "x-www-form-urlencoded" radio button, and enter the following Key-Value pairs:
| Key | Value |
|---|---|
| client_id | (the Client ID recorded above) |
| client_secret | (the Client Secret recorded above) |
| scope | https://graph.microsoft.com/.default |
| grant_type | client_credentials |
This is shown in Fig. 25.

Fig. 25
Click the [Send] button to send the HTTP POST request. You should receive a response, similar to the one in Fig. 26.
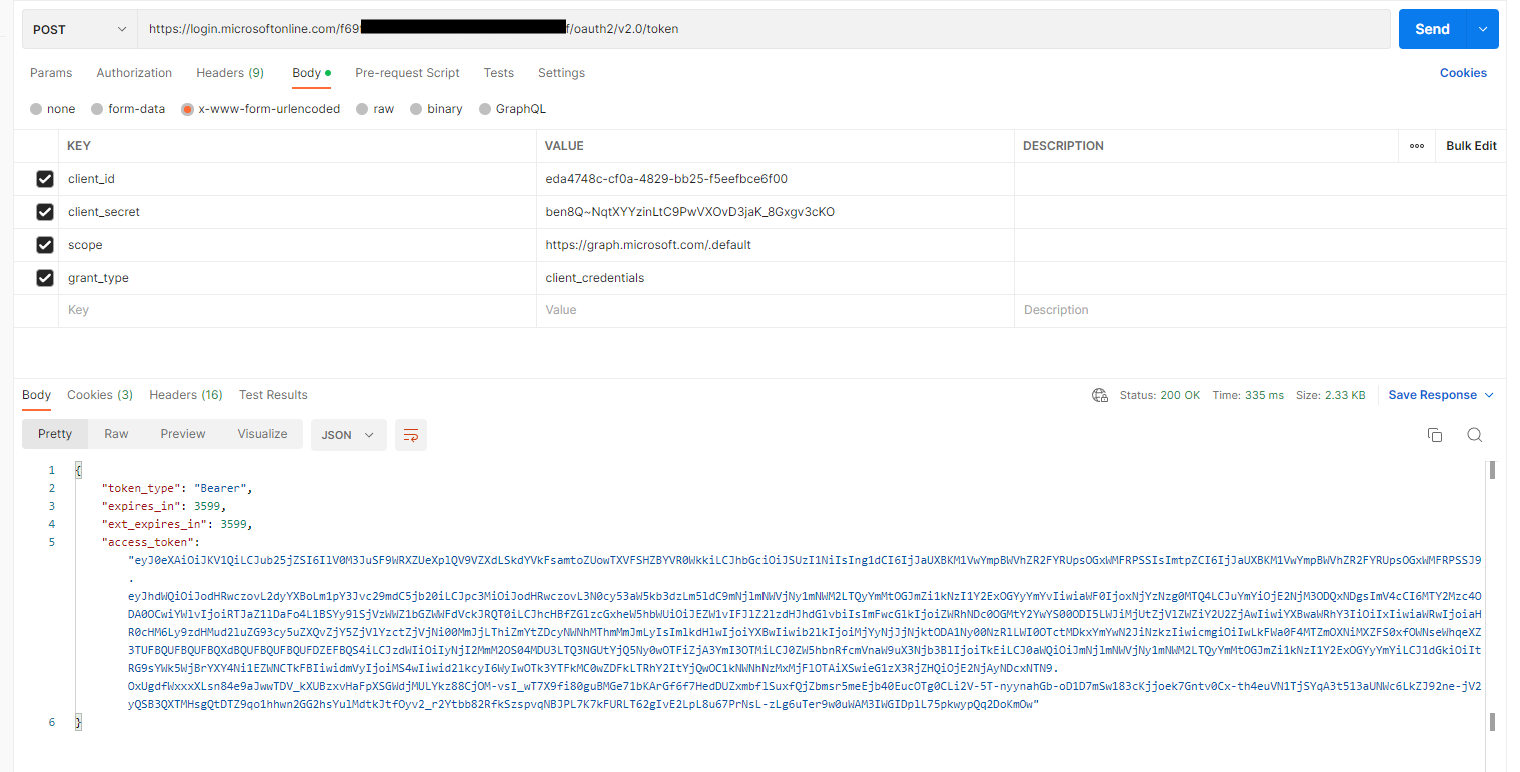
Fig. 26
The resulting JSON includes a node named "access_token". Copy and save this value (without the surrounding quotation marks). You will need it later.
The access token is an encrypted JSON object. You can view this object by pasting it into the form at https://jwt.ms, as shown in Fig. 27.
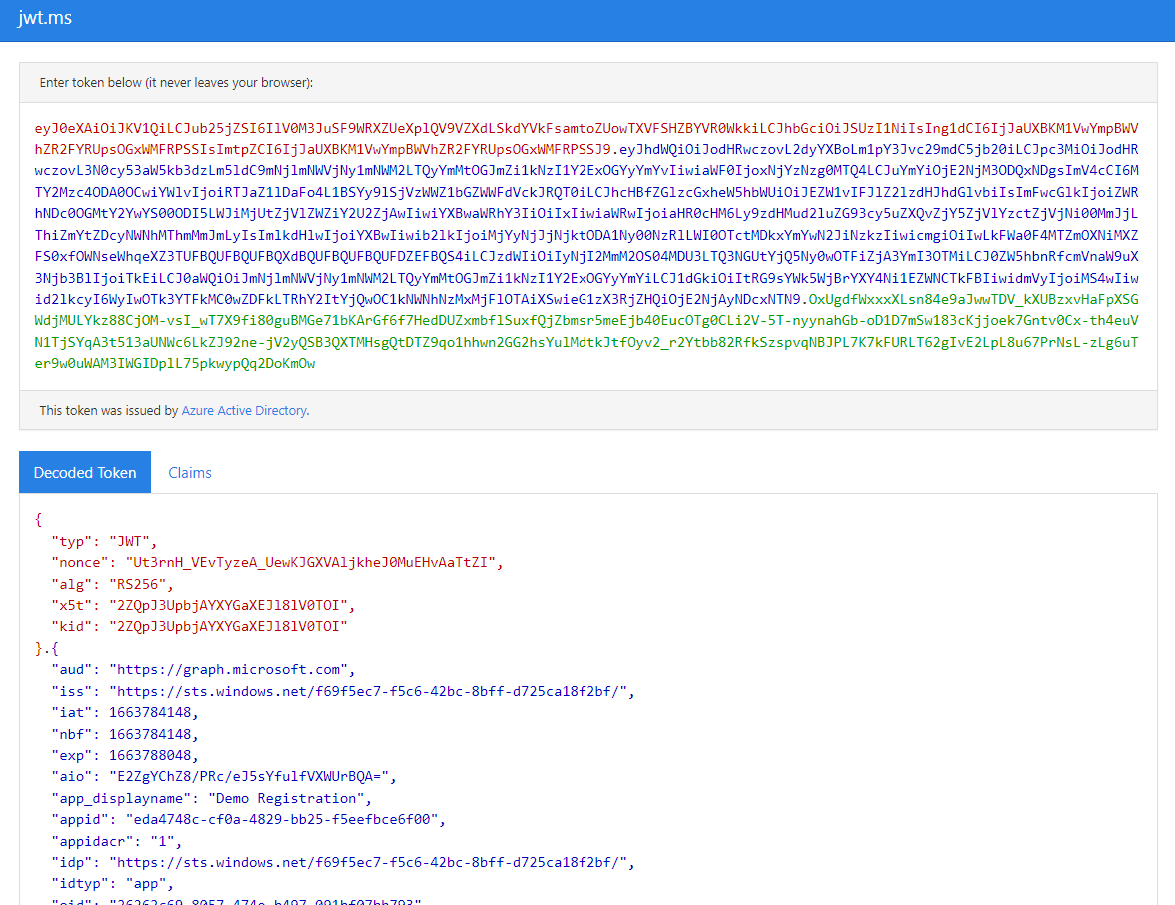
Fig. 27
Calling the Graph API
Now that you have a token representing a user account and that account has the appropriate permissions, you can make a call to the Microsoft Graph API.
Let's start with a call to get all users. Send an HTTP GET request to https://graph.microsoft.com/v1.0/users.
Add the following key-value pair to the HTTP Header of the request:
| key | value |
|---|---|
| Authorization | Bearer jwt |
where jwt is the JSON Web Token you created for the user account.
This is shown in Fig. 28.
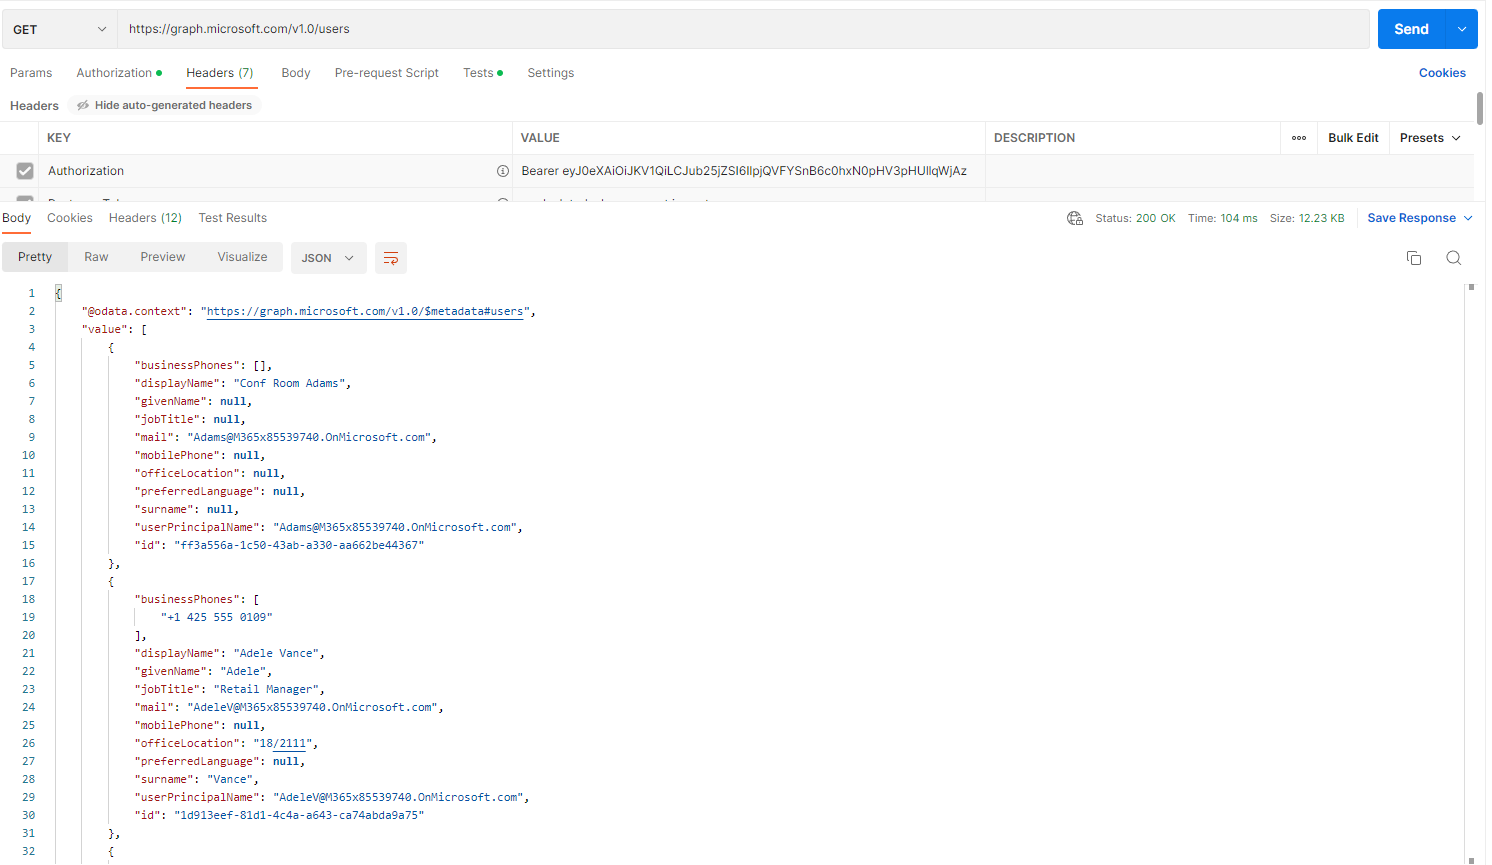
Fig. 28
As you can see, if we pass a valid JWT, the API returns a list of users in JSON format.
Conclusion
This article jumped around a bit, but it was out of necessity. I wanted to show where information is used before showing how to get that information. So, I showed the MS Graph API and that it needs a JWT; then I showed how to generate a JWT, but that it needs a Client ID and Client Secret; so, I showed how to get those. And so on.
In summary, these steps are required:
- Register App and Create Secret
- Record Tenant ID, Client ID, Client Secret
- Obtain appropriate AD permissions
- Create Token
- Call API
In this article, I introduced Identity Management and the Microsoft Graph API; I showed how they work together, and I provided step-by-step instructions on implementing IAM to access the API.