In a previous article, I showed how to use the Microsoft Cognitive Services Computer Vision API to perform Optical Character Recognition (OCR) on a document containing a picture of text. We did so by making an HTTP POST to a REST service.
If you are developing with .NET languages, such as C# Visual Basic, or F#, a NuGet Package makes this call easier. Classes in this package abstract the REST call, so can write less and simpler code; and strongly-typed objects allow you to make the call and parse the results more easily.
To get started, you will first need to create a Computer Vision service in Azure and retrieve the endpoint and key, as described here.
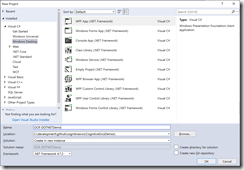
Then, you can create a new C# project in Visual Studio. I created a WPF application, which can be found and downloaded at my GitHub account. Look for the project named "OCR-DOTNETDemo". Fig. 1 shows how to create a new WPF project in Visual Studio.
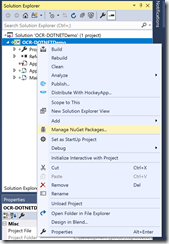
In the Solution Explorer, right-click the project and select "Manage NuGet Packages", as shown in Fig. 2.
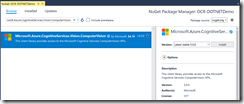
Search for and install the "Microsoft.Azure.CognitiveServices.Vision.ComputerVision", as shown in Fig. 3.
The important classes in this package are:
- OcrResult
A class representing the object returned from the OCR service. It consists of an array of OcrRegions, each of which contains an array of OcrLines, each of which contains an array of OcrWords. Each OcrWord has a text property, representing the text that is recognized. You can reconstruct all the text in an image by looping through each array. - ComputerVisionClient
This class contains the RecognizePrintedTextInStreamAsync method, which abstracts the HTTP REST call to the OCR service. - ApiKeyServiceClientCredentials
This class constructs credentials that will be passed in the header of the HTTP REST call.
Create a new class in the project named "OCRServices" and make its scope "internal" or "public"
Add the following "using" statements to the top of the class:
using Microsoft.Azure.CognitiveServices.Vision.ComputerVision;
using Microsoft.Azure.CognitiveServices.Vision.ComputerVision.Models;
using System.IO;
Add the following methods to this class:
Listing 1:
internal static async TaskUploadAndRecognizeImageAsync(string imageFilePath, OcrLanguages language) { string key = "xxxxxxx"; string endPoint = "https://xxxxx.api.cognitive.microsoft.com/"; var credentials = new ApiKeyServiceClientCredentials(key); using (var client = new ComputerVisionClient(credentials) { Endpoint = endPoint }) { using (Stream imageFileStream = File.OpenRead(imageFilePath)) { OcrResult ocrResult = await client.RecognizePrintedTextInStreamAsync(false, imageFileStream, language); return ocrResult; } } } internal static async Task<string> FormatOcrResult(OcrResult ocrResult) { var sb = new StringBuilder(); foreach(OcrRegion region in ocrResult.Regions) { foreach (OcrLine line in region.Lines) { foreach (OcrWord word in line.Words) { sb.Append(word.Text); sb.Append(" "); } sb.Append("\r\n"); } sb.Append("\r\n\r\n"); } return sb.ToString(); }
The UploadAndRecognizeImageAsync method calls the HTTP REST OCR service (via the NuGet library extractions) and returns a strongly-typed object representing the results of that call. Replace the key and the endPoint in this method with those associated with your Computer Vision service.
The FormatOcrResult method loops through each region, line, and word of the service's return object. It concatenates the text of each word, separating words by spaces, lines by a carriage return and line feed, and regions by a double carriage return / line feed.
Add a Button and a TextBlock to the MainWindow.xaml form.
In the click event of that button add the following code.
Listing 2:
private async void GetText_Click(object sender, RoutedEventArgs e)
{
    string imagePath = @"xxxxxxx.jpg";
    OutputTextBlock.Text = "Thinking…";
    var language = OcrLanguages.En;
    OcrResult ocrResult =  await OCRServices.UploadAndRecognizeImageAsync(imagePath, language);
     string resultText = await OCRServices.FormatOcrResult(ocrResult);
    OutputTextBlock.Text = resultText;
 }
Replace xxxxxxx.jpg with the full path of an image file on disc that contains pictures of text.
You will need to add the following using statement to the top of MainWindow.xaml.cs.
using Microsoft.Azure.CognitiveServices.Vision.ComputerVision.Models;
If you like, you can add code to allow users to retrieve an image and display that image on your form. This code is in the sample application from my GitHub repository, if you want to view it.
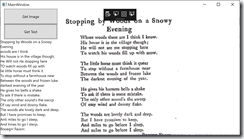
Running the form should look something like Fig. 4.


