Overview

Azure Active Directory (AAD) Security Defaults allows you a quick and easy way to implement some base level security within your AAD network. Enabling Security Defaults implements the following:

  • Requires every user to register for Multifactor Authentication
  • Blocks legacy authentication protocols, such as SMTP, POP3, and many proprietary protocols used by older applications.
  • Requires Multifactor Authentication before users can access high security areas, such as the Azure Portal and the Azure CLI.

One important limitation of Security Defaults is that you may NOT implement them if you have created any Conditional Access Policies. Conditional Access Policies provide more flexibility and are likely a better choice in the long run for your organization's security; but it may take you some time to determine which policies are appropriate and to implement them. In the meantime, Security Defaults are a good first step.

Configuring AAD Security Defaults

To configure AAD Security Defaults, first log onto the Azure Portal as an Administrator; then search for Azure Active Directory, as shown in Fig. 1.

Search For Azure Active Directory
Fig. 1

The "Overview" blade of Azure Active Directory displays, as shown in Fig. 2.

Azure Active Directory
Fig. 2

In the left menu, click the [Properties] button (Fig. 3) to open the "Properties" blade, as shown in Fig. 4.

Properties Button
Fig. 3

Properties Blade
Fig. 4

Click the "Manage security defaults" link (Fig. 5) to display the "Enable security defaults" dialog, as shown in Fig. 6.

Manage Secuirty Defaults Link
Fig. 5

Enable Security Defaults Dialog
Fig. 6

Toggle, the "Enable security defaults" radio button to "Yes". If you see a warning message like the one shown in Fig. 7, this means that you have configured at least one Conditional Access Policy.

Enable Security Defaults Confirmation with warning
Fig. 7

You may not enable Security Defaults unless you first delete all Conditional Access Policies. If this is what you want, exit this dialog and go to the Conditional Access Policies "Overview" blade: Azure Active Directory | Security | Conditional Access Policies.

After removing all Conditional Access Policies, repeat the above steps. The [Save] button in the "Enable security defaults" dialog will be enabled, as shown in Fig. 8.

Enable Security Defaults Confirmation without warning
Fig. 8

Click the [Save] button to turn on Security Defaults.

Conclusion

In this article, you have learned how to quickly implement some basic security settings in an Azure Active Directory by enabling AAD Security Defaults. When you wish to implement more complex security rules, you may turn off Security Defaults and replace them with Conditional Access Policies and other security measures.


Overview

Sometimes it makes sense to apply a security policy to every user in every context. But sometimes you may want to apply to only certain users accessing specific applications in specific ways. For example, you may want to block guest accounts from accessing SharePoint applications. Or you may want to require Multi-Factor Authentication for users in specific countries. Azure Active Directory Conditional Access allows you to implement such security policies.

Steps

To implement a Conditional access policy, log onto the Azure Portal as an Administrator; then search for Azure Active Directory, as shown in Fig. 1.

Search For Azure Active Directory
Fig. 1

The "Overview" blade of Azure Active Directory displays, as shown in Fig. 2.

Azure Active Directory
Fig. 2

In the left menu, click the [Security] button (Fig. 3) to open the "Security" blade, as shown in Fig. 4.

Security Button
Fig. 3

Security Blade
Fig. 4

In the "Protect" section of the left menu, click the [Conditional Access] button (Fig. 5) to open the "Conditional Access Policies" blade, as shown in Fig. 6.

Conditional Access Button
Fig. 5

Policies Blade
Fig. 6

To create a new Conditional Access policy, click the [New policy] button (Fig. 7) to display the "New Conditional Access policy" dialog, as shown in Fig. 8.

New Policy Button
Fig. 7

New Conditional Access Policy Page
Fig. 8

At the "Name" field, enter a unique (to this AAD) name for this policy.

This dialog contains five sections. Clicking each of these prompts you for more information. You do not need to configure each section. I will explain each section below.

Users or Work identities

The "Users or Work Identities" section (Fig. 9) allows you to determine which users, groups, and roles are affected by this Conditional Access Policy.

Users or Workload Identities dialog
Fig. 9

By default, this criterion is ignored, but you can include all users or select specific users, roles, or groups. You can also specify that it applies to all users except those you exclude by clicking the "Exclude" tab and selecting users and/or groups to exclude.

Cloud apps or actions

The "Cloud apps or actions" section allows you to include or exclude this policy based on which apps are accessed or actions are taken. Fig. 10 shows the "Cloud apps" options, which allow you to Include or exclude specific applications.

Cloud Apps or Actions dialog - Cloud Apps option
Fig. 10

Fig. 11 shows the "User actions" option, allowing you to apply this policy to when a user self-registers their security information or when they identify a device, such as a phone or laptop, to Active Directory.

Cloud Apps or Actions dialog - User Actions option
Fig. 11

Conditions

The "Conditions" section (Fig. 12) allows you to specify which conditions trigger the policy.

Conditions dialog
Fig. 12

Conditions are categorized by the following categories:

  • User risk
  • Sign-in risk
  • Device platform
  • Locations
  • Client apps
  • Filter for devices

User risk

This can include known leaked credentials or activity detected that is unusual for the current user

Sign-in risk

This an include users signing in from an unusual location or from two distant locations in a short period of time or from a suspicious IP address.

Device platform

You can specify policies based on the device used to log in. If you distrust Android security, you may want to force extra login policies when logging in with an Android device.

Locations

This allows you to apply policies when a user logs in from a specific location. For example, you may want to restrict users from logging in from Russia. Or you may want to require Multi-Factor Authentication when logging in from outside the United States.

Client apps

Here you can apply the policy based on the application the user is accessing. For example, you can apply different policies for browser apps than for rich client apps.

Filter for devices

This section lets you apply complex queries that identify properties of the device from which the user is accessing the system.

Grant

The "Grant" section (Fig. 13) specifies what happens if the user and client meet the criteria specified in the sections above.

Grant or Block Access dialog
Fig. 13

You can choose to block access if they meet the criteria; or you can choose to grant access - but only if they perform some function, such as multifactor authentication or setting a strong password.

Session

If a Conditional Access Policy applies to a user and the user satisfies the login requirements, you can use the "Session" section (Fig. 14) to determine how long they remain signed in. A common use case is to check "sign-in frequency" and require the user to re-authenticate after a given amount of time.

Session dialog
Fig. 14

Enable policy

At the bottom of the page

Conclusion

Conditional Access Policies are a powerful way to either block groups of users or to require additional barriers when users connect in potentialy unsafe ways. In this article, you learned how to configure Conditional Access Policies in Azure Active Directory.


Episode 733

Eric Lawrence on Web Browser Complexity

A web browser is a complex application built on millions of lines of code. Eric Lawrence describes how they work and why you should care.

https://textslashplain.com/2020/02/09/demystifying-browsers/


December 2022 Gratitudes

Comments [0]

12/5

Today I am grateful for my slow cooker


12/7

Today I am grateful to kick off this year's high school STEM Challenge yesterday at Chicago Tech High School


12/8

Today I am grateful to live close to an area with many great places to enjoy tacos


12/9

Today I am grateful for naps


12/10

Today I am grateful to see the Wild Feathers in concert last night


12/11

Today I am grateful for an afternoon in Kalamazoo


12/12

Today I am grateful to learn something new every day.


12/13

Today I am grateful to see Los Lobos in concert last night


12/14

Today I am grateful for my new French Press.


12/15

Today I am grateful to coach an IT workshop this week for the first time in years.


12/16

Today I am grateful:

-to attend a Microsoft alumni event yesterday organized by Dan

-to see Jeff "Skunk" Baxter in concert last night.


12/17

Today I am grateful I can stream movies and TV shows on demand into my home


12/18

Today I am grateful to see Miriam Plotkin's cabaret show last night at Davenport's Piano Bar.


12/19

Today I am grateful for some exciting NFL games this weekend


12/20

Today I am grateful for pizza last night with Tim and Natale


12/21

Today I am grateful for the difference a CPAP machine makes in my life


12/22

Today I am grateful to begin my vacation watching Nick's team in a convincing victory last night


12/23

Today I am grateful for:

- 2 days in Kalamazoo with my son

- arriving home safely after driving through a snowstorm last night


12/24

Today I am grateful for a warm home on a cold day


12/25

Today I am grateful for:

- Christmas Eve dinner in Chinatown

- Seeing "Avatar: The Way of Water" in 3D last night


12/26

Today I am grateful that Amanda and Megan drove hundreds of miles to spend Christmas with me


12/27

Today I am grateful for a refrigerator full of tasty leftovers


12/30

Today I am grateful for phone calls with old friends Ondrej and Glenn yesterday.


12/31

Today I am grateful to see "Dear Evan Hansen" last night with my son


1/1

Today I am grateful to see the Zoo Lights at the Lincoln Park Zoo last night


Is it ever ok to lie? What if your lie brings comfort to those around you? And, if so, is it ok to benefit from the lie?

"Dear Evan Hansen" addresses these questions with a clever script and beautiful music.

This moral dilemma faces high school senior Evan Hansen, who writes a letter to himself, which is found in the pocket of Connor Murphy after Connor commits suicide. Connor's family assumes that Evan and Connor were best friends. Evan does not deny it - partly because he sees how much this means to the family, partly because he sees an opportunity for a family he never knew.

Friday evening's performance of DEH at Chicago's brought all the emotion of Evan's predicament. Anthony Norman brings a sensitivity to the title character. The audience believes his painfully shy awkwardness and the pain it causes him. And they believe his transformation as he gains self-confidence with reinforcement from others. And they feel the pain when he suffers the consequences of his actions.

And then, there is the music - a collection of beautiful, often melancholy songs by  Benj Pasek and Justin Paul, who also collaborated on the "La La Land" soundtrack. Norman and the rest of the cast show impressive vocal range and style range in their deliveries.

"Dear Evan Hansen" is a tragic tale of the consequences of well-intentioned lying.


If we want to make or inspire consistent, long-term change, we need to change habits. "Switch" by brothers Chip and Dan Heath provides some tools to build and reinforce habits - in ourselves and in others.

The Heaths identify three primary factors in making any change:

- Your analytical brain, which they label "The Elephant"

- Your emotional brain, which they label "The Rider" (of the elephant)

- The Path, which are the external factors outside of you

When implementing change, you need to consider all three of these factors. It is useful to identify which of these factors you can control and to address those factors first.

Here are a few specific examples of their advice.

Shrink the change. Set small goals and increase them over time, so the change is not overwhelming.

Point to the Destination. A teacher's first-grade class was struggling behaviorally and academically. She began emphasizing "You will be third graders soon", repeating this phrase often in her tuition. The students internalized it and began to adopt behaviors consistent with older kids.

Identify a specific behavior you want to change. For example, researchers at West Virginia University wanted to convince Americans to consume a healthier diet. Rather than provide broad advice on nutrition, they focused on getting people to drink low-fat milk instead of whole milk. This was an identifiable goal that everyone understood and it was successful.

Create Action Triggers: When this happens, I will do that. It is easier to reinforce a habit if you tie it to a specific action. For example, "I will go to the gym after I drop off my daughter at school". If we associate one action with another, it makes it easier to continue it.

One thing to avoid is what they call the Fundamental Attribution Error - assuming that an action or lack of action is primarily due to a flaw in the person. This thinking leads to a fixed mindset, which prevents us from improving ourselves. A growth mindset is preferred, as it motivates us to improve ourselves.

The authors’ style is a good mix of academic and casual. They present case studies but focus on the human aspects and the outcomes of those studies. The book is broken into sections, describing ways to change the Elephant, the Rider, or the Path.

Most of the book focuses on how we can change the habits and behaviors of others. But you can use many methods to improve your own life. I found it useful and entertaining.


After reading the first nine books in Robert Jordan's "Wheel of Time" series, it was hard to imagine the author slowing the story even more. But that is what he does in "Crossroads of Twilight" - book 10 in the series.

Despite hundreds of named characters, only a few can be categorized as main characters. These main characters do and experience very little in the 800+ pages of this volume.

Perrin Aybara searches for his kidnapped wife Faile Bashere but does not find her.

Faile contemplates escape but does not succeed or even attempt it.

Mat Cauthon courts Tuon because he believes they are destined to marry, but he makes no progress.

Elayne Trakand consolidates her power as queen of Andor, but not much happens; Rand al'Thor does some talking.

Rand al'Thor does not appear until the second half of the book and does a lot of talking when he finally shows up.

Egwene al'Vere prepares to attack the White Tower but does not.

Min Farshaw fades into the background.

If Nynaeve al'Meara was in the book, I missed it.

Jordan takes his plodding storytelling to a new low pace. Hundreds of pages pass with no advancement of the plot and little development of the characters.

I now begrudgingly turn to volume 11.


Episode 732

Himanshu Rao on Reliability, Performance, and Scalability in the Cloud

Cloud Solution Architect Himanshu Rao describes how you can take advantage of cloud computing to make your applications more reliable, scalable, and performant.


Skunk and David Thursday evening At Evanston's SPACE nightclub, Jeff "Skunk" Baxter could have filled his set with Steely Dan and Doobie Brothers songs and the audience would have been happy. Baxter was a founding member of Steely Dan and a member of the Doobies during their most successful years. When the promoters of Baxter's current tour asked him to play only songs from his former bands, he told them they should hire a cover band if that's what they want.

He chose instead to focus on his solo music from his recent album "Speed of Heat". This album features a wide range of genres, including Scottish battle music ("Ladies from Hell"), funk ("I Can Do Without"), surf guitar ("Apache"), and smooth jazz ("My Place in the Sun"). He played most of the album tonight, taking his time between songs to tell stories of his decades in the music business and his collaboration with others. 

Skunk BaxterBaxter did mix in some Steely Dan songs ("My Old School", "Do It Again") and Doobie Brothers songs ("China Grove"), but he added his own arrangement to each song.

For the "Speed of Heat" album, Baxter worked with Clint Black, Michael McDonald, and Johnny Lang. None of them were in his touring company, but C.J. Vanston, who produced the album, accompanied Baxter on keyboards. They were joined on stage by bassist Hank Horton and drummer Mark Damian, each of which sang lead on some songs. 

Together, the quartet brought a high dose of energy that excited a packed house in my favourite Evanston venue.

And the audience was happy.


Los Lobos Finishes Strong

Comments [0]

Los Lobos Monday night at the City Winery, it felt like Los Lobos served as their own warm-up band. They hit the stage promptly at 8 PM and played 40 minutes of adequate, but uninspired music before taking a break. Maybe this is it, I thought. Maybe 49 years of touring have left them without the stamina to captivate an audience. Maybe they have reached the point in their careers where it is enough for them to show up and play all the correct notes.

But, after 20 minutes, the band returned to the stage with renewed energy. With each song, they seemed to gain momentum. Their catalog includes originals and covers; ballads, blues, and rock & roll and they drew from it all. But Los Lobos is at their best when they infuse Latin music with rock rhythms. It is here that their East Los Angeles roots shine through and when we hear their enthusiasm for their chosen art form.

A packed house sensed the increased intensity, singing, clapping, and dancing to the music. 

The show ended with an adrenalin-charged encore of cover songs. It began with The Sir Douglas Quintet's "She's About a Mover", followed by their biggest hit: Richie Valens’ "La Bamba". Los Lobos first recorded this song for the soundtrack of the "La Bamba" movie; but, on this night, they transformed it into a medley, interspersing The Young Rascals' "Good Lovin'" between the verses. The result was electric and brought the crowd to its collective feet.

This was my third time seeing Los Lobos and the first time I have seen them perform indoors. I can believe that it takes a few minutes for a band that plays so many outdoor festivals to warm up to the intimacy of a small club like City Winery. Whatever the reason, their finish was much stronger than their beginning.


More Photos


GCast 138:

Granting Azure Active Directory API Permissions to an App Registration

Learn how to use Azure Active Directory to grant permissions for your application to perform specific actions on specific objects


Episode 731

Beth Humphreys on Technical Leadership

Beth Humphreys is a manager at Microsoft. She talks about the difference between management and leadership and how each of us can be a leader in our organization.


Her: "Want to go to a concert Friday?"

Me: "Who is playing?"

Her: "The Wild Feathers!"

Me: "Who?"

Her: "At the City Winery!"

Me: "Who?"

Her: "The show starts at 8"

Me: "Are you familiar with this band?"

Her: "We can meet at the venue!"

Me: "Do I know this band?"

Her: "Listen to them online. Trust me."

Me: "Count me in!"

The Wild Feathers I took a chance. I was there and she was right. The Wild Feathers from Nashville, TN put on a show to remember. Their blend of rock and blues was perfectly combined to please the audience. Three different vocalists took turns singing lead in this guitar-heavy band. 

Even the warmup band - country rock group The Heavy Hours - impressed enough that TWF singer/guitarist Ricky Young wore their t-shirt on stage.

The show featured mostly original songs from their five albums, but they mixed in a cover of The Traveling Wilburys' "Handle with Care" and closed with a smooth version of Led Zeppelin's "Hey Hey What Can I Do" and a rousing rendition of The Band's "The Weight" in which they were joined on stage by The Heavy Hours.

The show was excellent in its energy and timing and the audience left with a smile. It was a chance I am glad I took.


The Island I did not know what to expect Saturday evening at the Court Theatre on the campus of The University of Chicago in Hyde Park. I was only vaguely aware of "The Island" - a play written in the early 1970s by South Africans Athol Fugard, John Kani, and Winston Nthsona.

The two-man play features Ronald L. Conner as Winston and Kai A. Ealy as John - two cellmates imprisoned on an island during Apartheid-era South Africa.

The set was deceptively simple. Although sparse, it was dominated by a large stone wall in the back and a flat slab precariously balanced on a fulcrum in the center of the stage. This slab served as the prison cell, the work area, the hills of the island, and a part of the stage on which the duo performed a play-within-a-play.

The story of the island addresses punishment and hope and friendship. Each of the men is conflicted when they learn that one of them has had his sentence reduced and will depart in a few months, while the other remains convicted for life. The change puts a major strain on their relationship as the two men have only each other. The waking hours of their days consist of meaningless work, followed by brief periods of talking. The monotony is relieved by their rehearsal for the play they plan to perform for other prisoners. They have chosen to perform Sophocles's "Antigone", which gives voice to their message about choosing to obey a higher moral authority while disobeying the law. 

"The Island" is a story of friendship and hope and despair and speaking out against an unjust political system. It sometimes slow in its pacing, but it is strong in its feelings. It is set in the South Africa of the last century; but its emotions resonate here and now.


Episode 30

Sara Benhamron on Sustainability

Sara Benhamron is a Microsoft Cloud Solution Architect for Sustainability. She discusses Microsoft's sustainability goals, what they and their partners are doing to achieve these goals, and Microsoft's Cloud for Sustainability.


November 2022 Gratitudes

Comments [0]

11/7
Today I am grateful to see Chris Smither in concert last night

11/8
Today I am grateful to pay off some sleep debt last night

11/9
Today I am grateful to vote

11/10
Today I am grateful for tacos with Tim last night

11/11
Today I am grateful for the veterans who offered their service in defense of our country, especially my late father LtCmdr E Normand Giard

11/12
Today I am grateful that the unseasonably warm weather lasted into mid-November

11/13
Today I am grateful for:

  • breakfast yesterday with John and Kim
  • seeing the LightScape show at Chicago Botanical Garden last night

11/14
Today I am grateful to attend the unveiling of Ronald's tombstone and the celebration of his life with his family yesterday.

11/15
Today I am grateful to feel refreshed after a midday nap

11/16
Today I am grateful for new winter gloves.

11/17
Today I am grateful for the many flavours of Ben & Jerry's ice cream.

11/19
Today I am grateful:

  • for lunch with Adam yesterday
  • to see "The Mark of Kane" at City Lit Theater last night

11/20
Today I am grateful to finally get my email set up on my new iPhone

11/21
Today I am grateful to attend an exciting Patriots - Jets game in Foxborough, MA yesterday.

11/22
Today I am grateful to visit my father's hometown for the first time and to see the house in which he grew up.

11/23
Today I am grateful for dinner with Bill and his family last night in Portland.

11/24
Today I am grateful for:

  • a visit to the International Cryptozoology Museum in Portland, ME yesterday
  • a lobster roll in Portsmouth, NH
  • my first visit to Salem, MA
  • dinner last night with Sean and Emilie

11/25
Today I am grateful for Thanksgiving dinner with friends yesterday.

11/26
Today I am grateful for;

  • a visit to the Musuem of Fine Arts and the Isabella Stewart Gardner Museum in Boston
  • a home-cooked Shabbat meal last night, courtesy of Shoshana

11/27
Today I am grateful for a week exploring and visiting friends in New England.

11/28
Today I am grateful to sleep in my own bed last night.

11/30
Today I am grateful for a late November evening warm enough for a Chicago bike ride.

12/1
Today I am grateful to see Nick's Kalamazoo team play at the University of Chicago last night.

12/2
Today I am grateful for a tour of the Microsoft Technology Center.

12/3
Today I am grateful to pass the SC-300 Microsoft certification exam yesterday.

12/4
Today I am grateful to see a production of "The Island" on my first visit to The Court Theatre.


New England Rhapsody

Comments [0]

Patriots versus JetsOver 500 miles of driving, three states, four hotels, three museums, one NFL game, a Thanksgiving dinner, many coffee shops, and meetups with friends on multiple days.

That is how I spent Thanksgiving week!

It began because friends invited me to spend Thanksgiving with them at their home in suburban Boston. That seemed like a long way to travel just for Thanksgiving, so I decided to fly out the Sunday before and attend the Patriots-Jets game in Foxborough. It was a sloppy game. The Patriots dominated but their mistakes kept the score tied at 3 until Marcus Jones returned a punt for a touchdown with 5 seconds remaining. Eleven weeks into the season, this was the first punt returned for a touchdown in an NFL game.

My father's boyhood home in Haverhill, MAAfter the game, I drove up near Haverhill, MA - the town in which my father grew up. I visited his childhood home and a couple of cemeteries, but I was unable to find any tombstones with my last name carved on them. During most of Monday, I worked from a Haverhill coffee shop, attending a couple of online meetings and studying Azure security.


New Hampshire State HouseI spent Tuesday in Concord, the capital of New Hampshire. This was my first-ever visit to the Granite State. Again, I worked from a coffee shop most of the day; but I did manage two touristy activities: I took a tour of the New Hampshire State House (most states call this a State Capitol)


Franklin Pierce home in Concord, NHI also visited the home of Franklin Pierce the only US President from New Hampshire. His house is closed until the spring, but it sits on the Merrimack River and is very picturesque and worth walking around the grounds.

Tuesday evening, I drove to Portland, Maine, which was my first visit to this state. My friend Bill and I made plans to meet for dinner with his family at a downtown restaurant. I arrived early, so I sat in a nearby cafe that sold both coffee and cannabis. I consumed one of these items while waiting. I had not seen Bill in years and only a couple of times since each of us moved away from southeast Michigan years ago. This was the first time I met his wife and daughter - a pleasant experience.

Museum of Cryptozoology, Portland, METhe next morning, I drove around Portland, seeing the seaside park along the Eastern Promenade before visiting the International Museum of Cryptozoology - a bizarre museum dedicated to creatures that may or may not exist. To my knowledge, this is the only museum of its kind in the world. It features exhibits on Bigfoot, Yeti, the Loch Ness Monster, Mothman, and other probably-mythical creatures.

I took a vacation day Wednesday and drove south, stopping in Portsmouth, NH - a town on the Maine - New Hampshire border. I visited a park on the water and tasted an excellent lobster roll at a downtown deli.

Samantha Statue in Salem, MAI noticed I was close to Salem, MA, so I decided to make a side trip to see this place, famous for convicting and executing suspected witches in the seventeenth century. Traffic was heavy in the area, so I did not have much time to explore Salem, but I noticed that they do not shy from their reputation. I saw numerous stores that were based on the occult or named after supernatural ideas and a downtown square features a statue of Samantha, the main character of the popular 1960s TV show "Bewitched".

Wednesday evening, I arrived at Logan Airport to pick up friends and drive them to our hotel in Waltham - just west of Boston. We met friends for dinner at an excellent steakhouse nearby, where I ate entirely too much.

Minuteman memorial at Lexington GreenThursday was Thanksgiving, which we spent with friends in Wayland, just a few miles west of Waltham. Before driving over, I felt compelled to visit nearby Lexington Green - the site of the first battle of the Revolutionary War (The British dominated that battle, but the American Minutemen drove back the Redcoats the next day in Concord.)

Museum of Fine Arts, BostonFriday morning, a group of us traveled to downtown Boston to visit the Museum of Fine Arts and the Isabella Stewart Gardner Museum.

I enjoyed each museum, but the latter had an especially entertaining story. In 1990, thieves stole 13 pieces of art from the Gardner collection, including two by Rembrandt. None of the art was ever recovered and the museum displays empty frames where the paintings used to display.

Empty frames at the Gardner MuseumSaturday was a get-together with some friends and their cousins and second cousins and cousins once removed, before heading back to Logan and a flight home.

In addition to connecting with friends, learning some new things, and seeing new sights, I made progress on a couple of my bucket lists. After visiting Maine and New Hampshire for the first time, only 9 US states remain unvisited; and, after seeing a game at Gillette Stadium in Foxborough, I have only 9 NFL stadiums left to visit.

I arrived home exhausted and grateful.

How was your Thanksgiving?


GCast 137:

Registering an Application with Azure Active Directory

Learn how to register an application with Azure Active Directory (AAD) and create a Client Secret. This is necessary when using AAD to authenticate users for your application.


Episode 729

Chander Dhall on AI in Azure, Google, and AWS

Chander Dhall compares the artificial intelligence services from the three largest cloud vendors and discusses how you can take advantage of the strengths of each.


"Less" by Andrew Sean Greer

Comments [0]

Arthur Less is about to turn fifty. He is a tall, handsome, gay writer, and he has stumbled into most of the success he achieved in his life. His first novel received positive reviews and sold well, but the praise and popularity of each succeeding book decreased until he now cannot find a publisher for his latest work.

Andrew Sean Greer's "Less" is Arthur's story.

Everything has come easy for Arthur. He has had several long-term relationships, including an older Pulitzer Prize-winning poet (who left his wife to be with Arthur) and a much younger man who plans to marry someone else shortly after separating from Arthur. In between (and sometimes during) these relationships, handsome men pick him up and share their bed.

In part to avoid the wedding of his ex-lover, Arthur embarks on a journey around the world. He travels to New York City, Mexico, Italy, Germany, France, Morocco, India, and Japan. 

Greer writes the novel mostly in the present tense, giving a sense of immediacy to the characters' thoughts and actions; but Greer switches to the past tense, relating the incidents that brought Less to his current situation and helping the reader understand why Less is the way that he is.

Greer tells Arthur Less's story with humor and a lighthearted style. For example, the organizer of a literary conference in Mexico brags about all the famous authors who were invited and almost attended the event. Later, Less secures a teaching position at a school in Germany by insisting that he is fluent in German. He is not, but he is convinced that he is and that is enough to get him by. 

Arthur is a simple man, who does not entirely understand his life; but he strives for happiness as he knows how. This is what gets him through each day and year. 

Even though Arthur wears his gayness openly and I am straight, I found myself identifying with him. I remember well the months approaching my fiftieth birthday. I had been through several long-term relationships following my divorce and I began to wonder if I would remain single forever. I was successful in my career, but I recognized the help others had given me and wondered for how much professional success I could claim credit.

Shortly after I finished reading this novel, I learned that Andrew Sean Greer had written a sequel. Now I want more of Less.


In 1939, a 6-page story appeared in the 27th issue of Detective Comics, introducing a mysterious masked crime known as The Batman. The character became an instant sensation. The Batman received his own title shortly afterward and he is among the most recognized fictional characters in history, retaining that fame over 80 years later.

Credit for this character went to comic book artist Bob Kane. Only his name appeared on most stories and for decades, he was credited as the sole originator of Batman. But others were involved. Kane hired ghostwriters and ghost artists, who wrote and drew the stories without receiving any credit. Most significant among these was writer Bill Finger. Many people have suggested that Finger had at least as much input as Kane in the Batman's creation.

"The Mark of Kane" explores the relationship between Finger and Kane. Kane was an adept salesman and self-promotor, who negotiated ownership of the character and credit for each story. Finger was shy and lacked confidence, but contributed far more ideas than Kane. Finger received a small fee, but never the credit he deserved nor financial rewards commensurate to his contribution. He died anonymous and destitute at the age of 59.

"The Mark of Kane" debuted this season at the City Lit Theater in Edgewood this season and I was fortunate enough to see Friday night's performance. It was a powerful story of arrogance, hubris, and manipulation. A strong cast was led by Josh Zagoren and Todd Wojcik as Kane and Finger, respectively. As the play progressed, we grew to despise Kane and pity Finger.

I do not know how accurate is the story presented in "The Mark of Kane"; but I found its telling to be very entertaining.


Viet Than Nguyen's "The Sympathizer" tells the story of a Vietnamese man fighting with the South Vietnamese army against the Viet Cong. The twist is that he claims to be a spy for the North Vietnamese. The other twist is that he repeatedly commits atrocities against supporters of the North to prove his loyalty to the South.

This first-person narrative takes us through the Vietnam War, the fall of Saigon, an escape to America, and a return to Vietnam on a secret mission.

Most of the book is written as a confession to someone called "The Commandant".

Despite the dark story and subject matter, Nguyen includes plenty of humor and satire.

After his escape to America, the narrator takes a job as a consultant on a Vietnam War movie - a role he accepts when he realizes how the director has dehumanized all the Vietnamese characters, stripping them of dialogue and not even giving them names. It is an obvious parody of Francis Ford Coppola's "Apocalypse Now". He succeeds in changing the representation only slightly and the movie's tone remains unaltered. Angered at the death of her son, a Vietnamese brothel owner shoots the movie's hero - an ultra-macho American soldier. His last words are "The whore! The whore!", echoing Colonel Kurtz's famous dying words: "The Horror! The Horror!"

Not only does the narrator fail in improving the film's Asian representation, he internalizes some of its sins. When telling his story, he identifies those he encounters only with labels like "the crapulent Major", "The dark one" and "the darker one". He never even identifies himself by name.

The Vietnam War sparked a great deal of controversy in the United States, but the entire dialogue of all sides was told from an American perspective. This is the first time I have heard the story told from a Vietnamese perspective. Like the narrator, Nguyen is a half-Vietnamese refugee of the War (his parents emigrated to California when he was a child).

The narrator must reconcile his ideologies with his friendships, which are often in direct conflict with one another. "I am simply able to see any issue from both sides", he states on the first page.

And he does present multiple sides - not often in a positive light. You will find no heroes in "The Sympathizer". Everyone is to blame, and everyone is a hypocrite. Each faction insists they fight for the freedom of their people, yet each works in their own self-interest, from the imperialist ambitions of the American government to the greedy South Vietnamese General to the sadistic North Vietnamese interrogators. The possession and pursuit of power corrupt them all. 

Given the strength of the writing, the characters, and the story, it is not surprising that Viet Than Nguyen's debut novel won the 2016 Pulitzer Prize. The novel is a powerful indictment of war in general and of the Vietnam War in particular.


GCast 136:

Creating an Azure Active Directory User

Learn how an Admin can create and manage a new Azure Active Directory user in the Azure portal.


Overview

Identity and Access Management (IAM) is an important part of securing an application - particularly one that is exposed externally. An IAM solution allows users to authenticate, verifying to a system or application who they are; and allows that system to determine the actions each user is authorized to perform.

This article will show how to make a call to the Microsoft Graph (MS Graph) API, including any prerequisites to calling the API.

Fig. 1 illustrates the prerequisites to making a Graph API call.

Workflow to call MS Graph
Fig. 1

Microsoft Graph

Microsoft Graph (MS Graph) provides a REST API that allows you to access and manage objects in Microsoft 365, which includes Microsoft Office, Windows, and Active Directory (AD) objects, including information about users and their organizations. Microsoft Graph provides an API that allows you to read and write objects in Azure and Microsoft 365 objects. Examples include accessing and maintaining information on users, calendars, Teams, and devices.

You can call the Graph API by sending a POST, PUT, or GET request to a set of endpoints at https://graph.microsoft.com. As of this writing, MS Graph is on version 1.0, so all the endpoints begin with https://graph.microsoft.com/v1.0/, but that version number at the end may change in the future. These endpoints are documented here.

Some of these requests require sending some data in the HTTP body and all of them require sending data in the HTTP header. One common method of authentication is to send a Bearer Token in the header of each HTTP request. A JSON Web Token (JWT) is a type of Bearer Token issued by an identity provider, such as Azure Active Directory (AAD). It verifies the identity of the person or service making the API call, and it can contain information about that identity.

An API call runs as an account identity. That identity must be authenticated by someone that MS Graph trusts. That identity must have permission to perform actions in the API call

Later in this article, I will walk you through the steps of generating a JWT Bearer Token using Azure Active Directory as the identity provider.

Another requirement of making a call to the Microsoft Graph API is that the caller must have permission to perform the requested actions on the objects specified in the request. For example, in order to read information about a user, the account must have READ permissions on the User object.

Later in this article, I will show you how an AD Administrator can grant permissions on an object to an account.

Bearer Token

A Bearer Token is a token that can be sent with a web request. It is an encrypted string that indicates under which account the request will run, validates the authenticity of that request, and (potentially) contains some information about that account.

You can generate a JWT Bearer Token by POSTing form data to an HTTP endpoint. In order to do this, you will need 3 pieces of information: -Tenant ID -Client ID -Client Secret

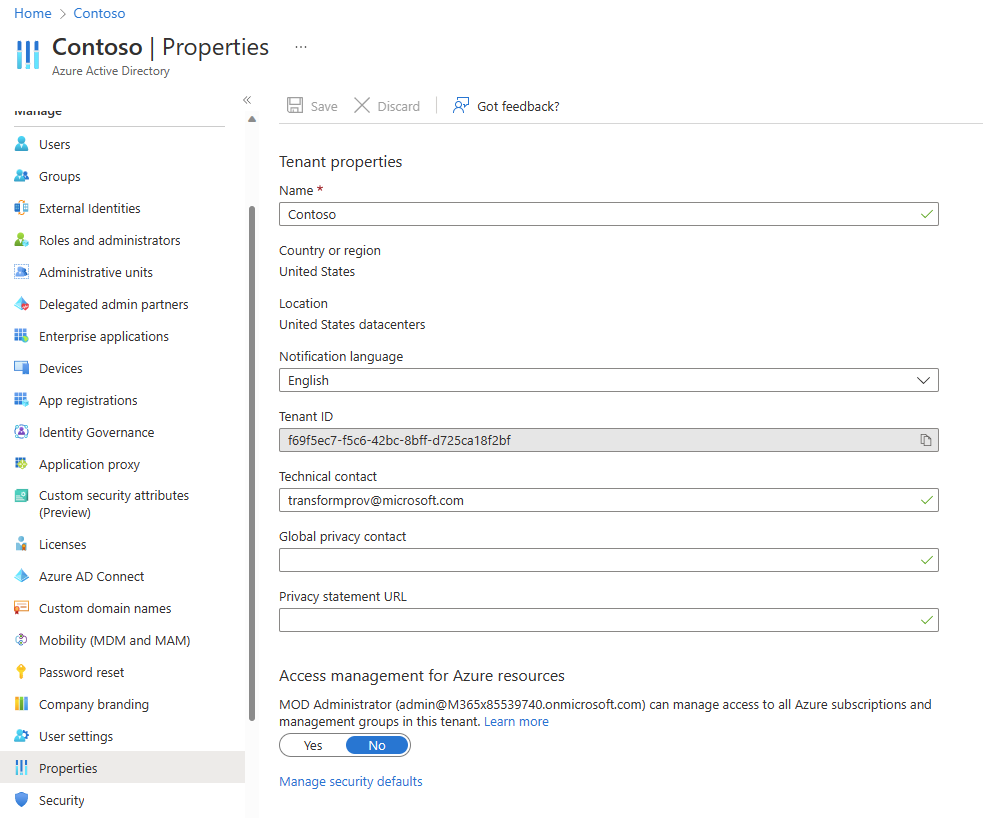
You can find the Tenant ID in your Azure subscription's Active Directory tenant.

To get the Client ID and Client Secret, you will need to register your application with Azure Active Directory.

We will return to the Bearer Token generation after I show you how to find these three pieces of information.

Azure Active Directory

To use Azure Active Directory as an Identity Provider, you will need an Azure subscription.

Log into the Azure Portal, search for and select Azure Active Directory (Fig. 2) to display the Azure Active Directory "Overview" blade, as shown in Fig. 3.

Searching for Active Directory in Azure portal
Fig. 2

Azure Active Directory Overview blade
Fig. 3

You can find the Tenant ID for this subscription on the "Overview" blade. Copy and save this value. You will need it later.

Click the [App registrations] button (Fig. 4) in the left menu to display the "App registrations" blade, as shown in Fig. 5.

App Registrations Button
Fig. 4

App Registrations Blade
Fig. 5

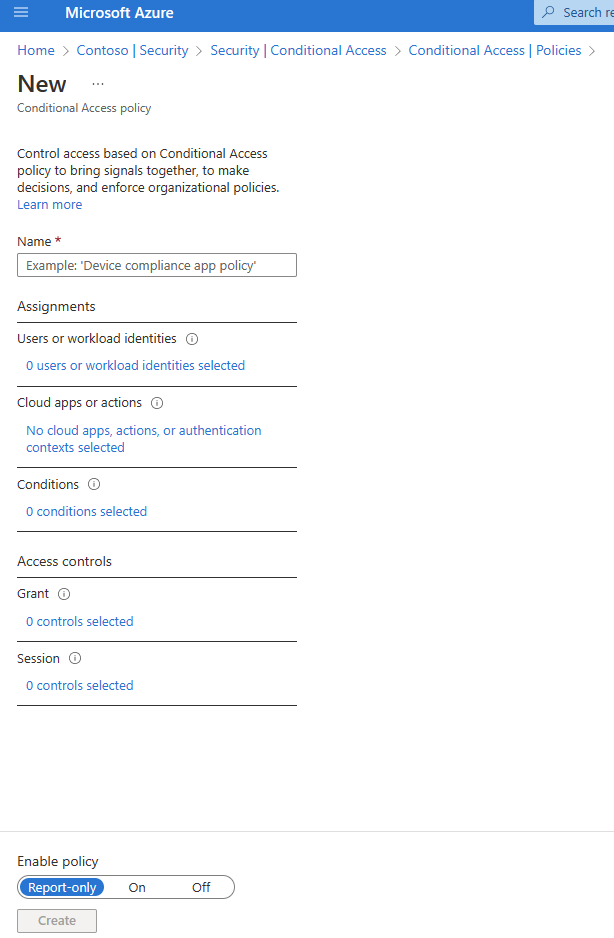
Click the [New registration] button (Fig. 6) to display the "Register an application" dialogue, as shown in Fig. 7.

New Registration Button
Fig. 6

Register Application Dialogue
Fig. 7

At the "Name" field, enter a descriptive name for this Application Registration. This will appear in the list of registrations.

At the "Supported account types" radio buttons, select which clients this registration will support. You can specify only the current Active Directory or allow authentication of accounts in other Active Directories or outside AD.

At the "Redirect URI" field, you can select a URI to which a user is directed after they authenticate. This is useful in interactive web applications. After authentication, the user can be returned to the home page or to their profile page via this setting. This information is optional and can be added or changed later.

Click the [Register] button to register the application.

This registers the application with Active Directory and displays the Application Registration Details page, as shown in Fig. 8.

Registration Details Page
Fig. 8

You can find the Application (client) ID on this page. Copy and save this value. You will need it later.

You will need a Client Secret in order to generate a JWT.

Click the [Certificates & secrets] button (Fig. 9) to display the "Certificates & secrets" blade, as shown in Fig. 10.

Certificates And Secrets Button
Fig. 9

Certificates And SecretsBlade
Fig. 10

Select the "Client secrets" tab, if it is not yet selected.

Click the [New client secret] button (Fig. 11) to display the "Add client secret" dialogue, as shown in Fig. 12.

New Client Secret Button
Fig. 11

Add Client Secret Dialogue
Fig. 12

You can find the Secret Value on this blade. Copy and save the "Value". You will need it later.

IMPORTANT: After you navigate away from this page, there is no way to retrieve the Secret Value. If you do not copy and save it now, you will need to regenerate a Secret.

Granting Permissions in MS Graph

In order for an account to successfully call the Graph API, that account must have permissions to perform the actions specified by that API. A user can grant permissions to some objects associated with themselves. For example, I may give you permission to read my calendar; but, for most objects and actions, an AD Administrator is responsible for granting those permissions. Here are the steps to take while logged into Azure as an AD Administrator for the subscription involved.

At the "AD Application Registration" page (Fig. 13), click the [API permissions] button (Fig. 14) in the left menu to display the "API permissions" blade, as shown in Fig. 15.

App Registrations Page
Fig. 13

API Permissions Button
Fig. 14

API Permissions Blade
Fig. 15

Click the [Add a permission] button (Fig. 16) to display the "Request API permissions" dialogue, as shown in Fig. 17.

Add Permission Button
Fig. 16

Request Api Permissions Diallogue
Fig. 17

Click the "Microsoft Graph" button (Fig. 18) to filter the permission request to Microsoft Graph permission types, as shown in Fig. 19.

MS Graph Button
Fig. 18

MS Graph Permissions Filtered Dialogue
Fig. 19

Click the [Application permissions] button (Fig. 20). This allows the account to make calls, even if it is not explicitly signed in to AD. A list of permission categories displays, as shown in Fig. 21.

Application Permissions Button
Fig. 20

List of Permissions
Fig. 21

Here you can expand a category and select the permissions to grant to an account via this Application Registration. Fig. 22 shows the "User" category expanded with the "User.Read", which would allow an account to Read a user's information in the Active Directory, but would not allow them to change, add, or delete user information.

User Permissions
Fig. 22

Click the [Add permissions] button (Fig. 23) to save selected permission changes.

Add Permissions Button
Fig. 23

Generating a Token

After you have Registered an Application with Azure Active Directory, generated a Client Secret, and granted the appropriate Microsoft Graph permissions, you may now generate a JSON Web Token (JWT). This Bearer Token can be passed in Microsoft Graph API requests to authenticate the user.

You will need the following information from the Application Registration step above:

-Tenant ID -Client ID -Client Secret

To generate a new JWT, send an HTTP POST request to https://login.microsoftonline.com/{{TenantID}}/oauth2/v2.0/token

where {{TenantID}} is the Tenant ID of the Azure subscription recorded above.

You can do this in code or using a CURL command or using a tool like Postman, I will demonstrate how to make this API call using Postman.

In Postman, create a new request, select POST from the HTTP Verb dropdown, and enter into the URL textbox "https://login.microsoftonline.com/{{TenantID}}/oauth2/v2.0/token", replacing {{TenantID}} with the Tenant ID recorded above.

This is shown in Fig. 24.

Postman Url
Fig. 24

Select the "Body" tab, select the "x-www-form-urlencoded" radio button, and enter the following Key-Value pairs:

Key Value
client_id (the Client ID recorded above)
client_secret (the Client Secret recorded above)
scope https://graph.microsoft.com/.default
grant_type client_credentials

This is shown in Fig. 25.

Postman Body
Fig. 25

Click the [Send] button to send the HTTP POST request. You should receive a response, similar to the one in Fig. 26.

Token Response
Fig. 26

The resulting JSON includes a node named "access_token". Copy and save this value (without the surrounding quotation marks). You will need it later.

The access token is an encrypted JSON object. You can view this object by pasting it into the form at https://jwt.ms, as shown in Fig. 27.

jwt.ms page
Fig. 27

Calling the Graph API

Now that you have a token representing a user account and that account has the appropriate permissions, you can make a call to the Microsoft Graph API.

Let's start with a call to get all users. Send an HTTP GET request to https://graph.microsoft.com/v1.0/users.

Add the following key-value pair to the HTTP Header of the request:

key value
Authorization Bearer jwt

where jwt is the JSON Web Token you created for the user account.

This is shown in Fig. 28.

Calling MS Graph Users API
Fig. 28

As you can see, if we pass a valid JWT, the API returns a list of users in JSON format.

Conclusion

This article jumped around a bit, but it was out of necessity. I wanted to show where information is used before showing how to get that information. So, I showed the MS Graph API and that it needs a JWT; then I showed how to generate a JWT, but that it needs a Client ID and Client Secret; so, I showed how to get those. And so on.

In summary, these steps are required:

  1. Register App and Create Secret
  2. Record Tenant ID, Client ID, Client Secret
  3. Obtain appropriate AD permissions
  4. Create Token
  5. Call API

In this article, I introduced Identity Management and the Microsoft Graph API; I showed how they work together, and I provided step-by-step instructions on implementing IAM to access the API.


Overview

An Azure Application Gateway allows you to distribute web traffic among multiple backend resources. This can help to increase the scalability and the availability of a resource. An Application Gateway serves similar goals to an Azure Load Balancer, however there are some significant differences.

  • An Azure Application Gateway is specifically designed for HTTP and HTTPS traffic. An Azure Load Balancer can route traffic with other protocols
  • An App Gateway provides more features - most of which are specific to HTTP and HTTPS
  • An App Gateway operates at a higher network level than a Load Balancer

An App Gateway exposes a public URL or IP Address endpoint and connects to one or more backend resources, such as an App Service or a Virtual Machine.

In this article, I will show you how to create an Azure Application Gateway that connects to a backed consisting of two nearly-identical web applications deployed as Azure App Services.

Creating the Backend App Services

For this demo, I created two nearly identical Application Services - dgtestAgWebApp1 and dgtestAgWebApp2. They share the same App Service Plan, the same operating system (Windows) and the same technology stack (ASP.NET). I deployed a single default HTML page to each App Service. This page differs only slightly, so we can identify which App Services is rendering the site for a given request to the App Gateway.

Fig. 1 and Fig. 2 show the two default pages for dgtestAgWebApp1 and dgtestAgWebApp2, respectively.

Web App 1 output
Fig. 1

Web App 2 output
Fig. 2

To learn how to create a Web App as an App Service, see this article.

To simplify this demo, I will not create or upload any digital certificates to the app services or the Application Gateway. Because of this, we need to make a small change to each App Service: On the "TLS/SSL settings" blade, set "HTTPS only" to "Off". This allows a client to call the app service via either HTTP or HTTPS.

Creating an Azure Application Gateway

To create a new Azure Application Gateway, log into the Azure Portal, select the [Create a resource] button (Fig. 3), and search for Application Gateway, as shown in Fig. 4.

Create Resource button
Fig. 3

Search for Application Gateway
Fig. 4

Click the [Create] button to open the "Basics" tab of the "Create application gateway" dialog, as shown in Fig. 5.

Create Application Gateway dialog
Fig. 5

At the "Resource Group" field, select or create a Resource Group into which to save this Gateway. I prefer to keep the Gateway, the backend resources, and all other related resources in the same Resource Group.

At the "Application gateway name" field, enter a unique name for this Gateway.

At the "Region" field, enter the region in which to deploy this Gateway. To reduce latency, you may consider the location of your backend services and/or the location of your users when selecting a region.

At the "Enable autoscaling" field, select "Yes" and enter the minimum and maximum allowable instances of the gateway.

Expand the "Availability zone" field (Fig. 6) and select the zones into which you wish to deploy the Gateway. Deploying to multiple zones provides redundancy, which can increase the Gateway's availability.

Availability Zones dialog
Fig. 6

If you wish to allow clients to connect to the Gateway via HTTP/2, select the "Enabled" radio button at the "HTTP2" field. This affects only the front-end connection. Regardless whether you enable HTTP2, the Gateway connects to the backed resources via HTTP/1.1.

At the "Virtual network" field, click the "Create new" link to open the "Create virtual network" dialog, as shown in Fig. 7.

Create Virtual Network dialog - Basic Tab
Fig. 7

Enter a unique name for the Virtual Network and provide an address and subnet range. Click the [OK] button to save your changes and close the "Create virtual network" dialog.

Click the [Next: Frontends] button to advance to the "Frontends" tab, as shown in Fig. 8.

Create Virtual Network dialog - Frontends Tab
Fig. 8

At the "Frontend IP address type" field, select "Public".

At the "Public IP address field, click the "Add new" link to open the "Add a public IP" dialog, as shown in Fig. 9.

Add Public IP dialog
Fig. 9

At the "Name" field, enter a name for the Public IP.

Click the [Next: Backends] button to advance to the "Backends" tab, as shown in Fig. 10.

Create Virtual Network dialog - Backends Tab
Fig. 10

Click the "Add a backend pool" link to open the "Add a backend pool" dialog, as shown in Fig. 11.

Add Backend Pool dialog
Fig. 11

The Backend Pool configures the pool of backend resource that the Application Gateway will serve when a client connects to the front end.

At the "Name" field, enter a name for the Backend Pool.

At the "Add backend pool without targets" field, select "No".

In the "Items" section, select "App Services" in the "Target type" column and select the first web app service ("dgtestAgWebApp1") in the "Target" column. In the second row, select "App Services" in the "Target type" column and select the second web app service ("dgtestAgWebApp2") in the "Target" column.

Click the [Add] button to add this backend pool to the Application Gateway.

Click the [Next: Configuration] button to advance to the "Configuration" tab, as shown in Fig. 12.

Create Virtual Network dialog - Configuration Tab
Fig. 12

This tab should show the Frontend IP and the Backend Pool you created and assigned to this Gateway. You will need to add a Routing Rule. Click the [Add a routing rule] button to open the "Listener" tab of the "Add a routing rule" dialog, as shown in Fig. 13.

Add Routing Rule dialog
Fig. 13

At the "Rule name" field, enter a name for the rule.

At the "Priority" field, enter "100". Because this is the first and only rule, this number is not yet relevant. However, when you add multiple rules, rules with a Priority of a lower number will take precedence.

At the "Listener name" field, enter a name for the Listener.

At the "Frontend IP field, select "Public" to allow clients to connect to the Gateway frontend over the Internet.

At the "Protocol" field, select "HTTP".

At the "Port" field, enter "80".

At the "Listener type" field, select "Basic".

At the Error page url" field, select "No"

Select the "Backend targets" tab of the "Add a routing rule" dialog, as shown in Fig. 14.

Create Virtual Network dialog - Backend Targets Tab
Fig. 14

AT the "Target type" field, select the "Backend pool" radio button.

At the "Backend target" field, select the Backend Pool you created in an earlier step above.

At the "Backend settings" field, click the "Add new" link to open the "Add Backend setting", as shown in Fig. 15.

Add Backend Settings dialog
Fig. 15

At the "Backend settings name" field, enter a name for this backend setting.

At the "Backend protocol" field, select "HTTP".

At the "Backend port" field, enter "80".

At the "Override with new host name" field, select "Yes".

At the "Host name override" field, select "Pick host name from backend target".

Leave the defaults for all the other fields.

Click the [Add] button to add this backend setting to the Routing Rule and close the dialog.

Click the [Add] button to add this routing rule to the Application Gateway and close the dialog.

Click the [Next: Tags] button to advance to the "Tags" tab, as shown in Fig. 16.

Create Virtual Network dialog - Tags Tab
Fig. 16

Enter any name/value pairs you wish to associate with this Gateway. These do not affect performance, but they can be useful in reporting.

Click the [Review + create] button to advance to the "Review + create" tab, as shown in Fig. 17.

Create Virtual Network dialog - Review and Create Tab
Fig. 17

If you made any errors (skipping a required field or selecting incompatible options, for example), they will display here, and you may correct them. When no errors are reported, click the [Create] button to create a new Azure Application Gateway. This may take a few minutes.

Try It

The public IP address of the Azure Application Gateway can be found on the "Overview" tab, as shown in Fig. 18.

Public IP Address in App Gateway Overview Tab
Fig. 18

Open a browser and paste this IP address in the address bar. You should see one of the two App Services. Refresh a few times and the browser should sometimes display App 1 and sometimes display App 2.

Conclusion

In this article, you learned how to create and configure an Azure Application Gateway to manage HTTP traffic to an Azure App Service.

Note

I am grateful to Pete Rodriguez, who helped me troubleshoot this demo and provided guidance on this technology.


Episode 728

Buck Woody on Database Security

Database expert Buck Woody describes the security issues we face when publishing a database and how we can protect ourselves.

Links:

  • https://aka.ms/sqlworkshops
  • https://aka.ms/sqlsecurity101

The universe of Robert Jordan's "The Wheel of Time" series contains The One Power, a mystical force that is split into two parts - saidine, the male half which men can control; and saidar, the female half which women can control. Only a select few can channel this power and the male half comes with a great price: it drives mad and eventually kills any man who uses it. The most drastic example of this is The Dragon Reborn - a being destined to appear every few thousand years and lead a battle against the forces of evil before going mad and destroying the world until the cycle repeats. Rand al'Thor is the current Dragon Reborn and he is fighting the madness inside his head.

In book 9 - "Winter's Heart" - Rand decides he can and will remove the taint from saidine, freeing the men who channel from their black fate. The book also contains a lot of Mat Cauthon's adventure - significant because he was absent from volume 8 - as he plans his escape; and Elayne Trakand, who is establishing herself as queen of her mother's country.

Some plot lines are wrapped up and some leave the reader hanging. In early chapters, Perrin sets out to rescue his kidnapped wife; then the story never returns to them.

As with the other books in this series, the plot advances slowly until the last few chapters when an epic battle accelerates the action.

So far, I have read thousands and thousands of pages, and I am frustrated that this saga is not yet complete.


Portuguese Rhapsody

Comments [0]

It is rare that I take a two-week vacation. I did it last fall when I traveled to Croatia to explore Dubrovnik and bike around the Dalmatian Islands. I enjoyed that so much that I contracted the same bike tour company for a trip to southern Portugal.

We began our trip with almost a week in Lisbon - Portugal's capital and largest city, exploring the neighborhoods, taking tours (by boat, by bus, and by something that looked like a golf cart), and listening to Fado music - a Portuguese tradition of melancholy ballads. Lisbon has a rich history, influenced by the Romans, the Moors, and a series of European kings before becoming a Republic in the twentieth century. The entire city was nearly destroyed in 1755 by earthquake, tsunami, and fires before being rebuilt in a short period - something it shares with my current hometown of Chicago.

While staying in Lisbon, we took one side trip to Sintra, which is less than an hour's drive but has a completely different feel. Mountains surround Sintra, making the climate wet and the landscape green. This was a common getaway destination for Portuguese royalty, so we toured three "palaces" in the area. One so-called palace was built in the late nineteenth century by a Brazilian merchant and featured beautiful gardens.

On Day 6, the tour company picked us up and bused us to Evora, where we began our biking tour. Each day consisted of eating and biking and eating and biking and eating. I am trying to convince myself that it was a zero-net calorie week, but I may be kidding myself. We averaged 20-25 miles per day biking, usually through the countryside to a small city, where we stopped for lunch and sometimes for a tour and history lesson. The most memorable stretch was the last day in which we traveled along the Guadiana River and ended up at the Atlantic coast on the southern shore of Portugal. Every two nights, we moved to a new hotel in a new town - the most delightful of which was the Villa Monte Farm House in Moncarapacho.

We spent our final day in Cascais, an oceanside town a few miles west of Lisbon. Walking around the city was relaxing and the most memorable thing was the Boca do Inferno ("Mouth of Hell") - a cave opening to the Atlantic on which the ocean waves violently strike.

I was satisfied and ready to go home when we departed on an early morning flight. 

I have not yet decided, but I am fairly certain a two-week vacation with a bike trip is in my plans next autumn.


Overview

An Azure App Service is a managed service that can host a web application, such as a website or a web service. By deploying a web application to an App Service, you are freed from the infrastructure or "plumbing" of maintaining a web service. Azure can take care of things like autoscaling, failover, and logging, so that you are able to focus on the business logic of your application.

Creating a Web Application

To create a new Web Application, hosted as an Azure App Service, log into the Azure Portal, click the [Create a Resource] button (Fig. 1) and search for "Web App", as shown in Fig.2.

Create Resource button
Fig. 1

Search for Web App
Fig. 2

In the "Web App" card, expand the "Create" menu and select "Web App", as shown in Fig. 3.

Web App Card with Create menu expanded
Fig. 3

The "Create Web App" dialog displays, as shown in Fig. 4.

Create Web App dialog
Fig. 4

At the "Resource group" field, select or create a resource group into which you wish to organize the Web App.

At the "Name" field, enter a unique name for this web app. You will be able to access the web app via the url http://_appname_/azurewebsites.net or https://_appname_/azurewebsites.net, where appname is the name you assign in this field. Of course, you may also configure a DNS record to point a more friendly domain name to the app.

At the "Publish" radio button, select whether you are going to deploy code directly to an App Service, to a Docker Container, or to take advantage of the speed of a Static Web App. I selected "Code" for the flexibility of a dynamic site.

If you select "Code", at the "Runtime stack" dropdown, select the language/framework and version of the code you plan to deploy. As of this writing, supported options are .NET, .NET Core, ASP.NET Java, Go, and Node.

At the Operating System, field, select the operating system (Linux or Windows) on which your application will run.

At the "Windows Plan", enter a unique name for the Application Service Plan under which your application will run. The Application Service Plan defines the size of the machine(s) onto which the application is deployed. More powerful machines tend to be more expensive. Click the "Change size" link to select the machine appropriate for your application's needs.

At the "Zone redundancy" field, select whether you want to enable zone redundancy, which will provide more fault tolerance for your application.

You may wish to modify the options for Deployment, Networking, Monitoring, and Tagging. There are tags for each of these, but these changes are all optional and you may modify them later if you like.

Click the [Review + create] button to advance to the "Review + create" tab, as shown in Fig. 5.

Review + Create tab
Fig. 5

If you made any errors (skipping a required field or selecting incompatible options, for example), they will display here and you may correct them. When no errors are reported, click the [Create] button to create a new Web App.

After a few seconds, Azure finishes creating and deploying the Web Application and displays the message shown in Fig. 6.

Deployment Complete message
Fig. 6

Click the [Go to resource] button to navigate to the "Overview" blade of your newly=deployed web application, as shown in Fig. 7.

App Services Overview blade
Fig. 7

After you deploy code to the application, you can see it by navigating to the URL listed in the "Essentials" section of this blade. Initially, a placeholder page displays, as shown in Fig. 8.

Web App initial placeholder page
Fig. 8

Conclusion

In this article, you learned how to create a new Web Application as an Azure App Service.


Sometimes, you may receive the following error message, when trying to do something in Azure:

"The subscription is not registered to use namespace 'Microsoft.AzureActiveDirectory'. See https://aka.ms/rps-not-found for how to register subscriptions."

This message prevented me from creating an Azure Active Directory B2C Tenant in the Azure portal.

You can resolve this with a few Azure CLI commands.

Log into the Azure Portal and click the "Cloud Shell" button (Fig. 1) to open a PowerShell terminal window, as shown in Fig. 2.

Cloud Shell Button

Fig. 1

Cloud Shell

Fig. 2

To register an account, you need to know the name of your account. You can list all your accounts with the following command:

az account list

Fig. 3 shows the output of this command. By default, it is in JSON format.

azaccount list

Fig. 3

If you have many accounts (as I do), it may be easier to write the output to a file, download that file, and open it in an editor, such as VS Code. The following commands will do that:

az account list>myaccounts.json
download myaccounts.json

Fig. 4 shows the output opened in VS Code. I want to use the first subscription, so I note the name - in this case "dgiard-Microsoft Internal Subscription".

azaccount list In VS Code

Fig. 4

Use the following command to set the desired subscription as your default for this session:

az account set --subscription "name of subscription"

In my case, it was:

az account set --subscription "dgiard-Microsoft Internal Subscription"

Then register this subscription with the following command:

az provider register --namespace Microsoft.AzureActiveDirectory

This last step may take a few minutes. To view the status, execute the following command and check the

az provider show -n Microsoft.AzureActiveDirectory

Fig. 5 shows the output of this command.

provider show output

Fig. 5

When the "registrationState" property is set to "Enabled", the command has completed executing and the subscription is registered.

After the subscription is registered, you should no longer receive the error message.

NOTE: You can do execute these same commands locally, but you will first need to log into your Azure account with the following command: az login

In order to use Azure Active Directory B2C (AD B2C) features, you must first connect an Azure AD B2C tenant with an Azure subscription.

There are several reasons why you may want to do this.

  • You may want to create distinct directories for each environment, so that Dev, QA, and Production users and policies do not overlap
  • You may want to create a directory in your subscription for your customer to develop security features of an application
  • You may want a sandbox in which to learn the features of AD B2C.

Whatever the reason, here is how you proceed.

Navigate to the Azure Portal, click the [Create a resource] button (Fig. 1), and search for "Active Directory B2C". The "Active Directory B2C" page displays, as shown in Fig. 2.

New Resource Button
Fig. 1 ADB2C Page
Fig. 2

Click the [Create] button to display the "Create new B2C Tenant or Link to existing Tenant" options, as shown in Fig. 3.

New or Existing B2C option

Fig. 3

Click "Create a New Azure B2C Tenant" to display the "Create a tenant" blade, as shown in Fig. 4.

Create A Tenant Blade

Fig. 4

NOTE: When you create a new Azure B2C Tenat, it is automatically linked to the current subscription. This is a recent change, so the only time you might consider clicking the other option is if you created a B2C tenant some months ago and never linked it to your subscription.

Click the [Review + create] button to display the "Review + create" tab, as shown in Fig. 5.

Review Create Tab

Fig. 5

Click the [Create] button to create the Azure AD B2C Tenant.

NOTE: You may receive the following error message:


"The subscription is not registered to use namespace 'Microsoft.AzureActiveDirectory'. See https://aka.ms/rps-not-found for how to register subscriptions."

If so, follow the steps in this post.

If the Teant creation is successful, a confirmation message will display. Click this message to navigate to the Azure AD B2C page for this tenant.

In this article, you learned how to create a new Azure Active Directory B2C tenant.


Episode 727

Stephen Rose on New Features in Microsoft Teams

Stephen Rose describes some of the new announcements and new features in Microsoft Teams, including Intelligent Recap, new security features, Excel Live, live translations, Intelliframe (which highlights individuals on a 360 camera), and animated avatars.


Links:

http://aka.ms/insidemsteams

https://twitter.com/stephenlrose


October 2022 Gratitudes

Comments [0]

10/3
Today I am grateful to see Sergio Mendes in concert last night

10/4
Today I am grateful to receive a COVID booster shot yesterday

10/6
Today I am grateful for a visit from Christina

10/7
Today I am grateful for a good job

10/8
Today I am grateful to see Matt Maeson in concert last night

10/9
Today I am grateful to experience a new restaurant and good conversation with new friends

10/10
Today I am grateful that I did not get caught in any of the Chicago Marathon traffic jams this weekend.

10/11
Today I am grateful for mild weather in October

10/12
Today I am grateful for a 5K ride for charity yesterday

10/13
Today I am grateful to see The Who in concert last night from Row 3!

10/14
Today I am grateful for 9 years at Microsoft

10/15
Today I am grateful to see Todd Rundgren and Adrien Belew perform a tribute to David Bowie last night.

10/16
Today I am grateful to pass 600 subscribers for my GCast show

10/17
Today I am grateful my son came over last night for a home-cooked meal

10/18
Today I am grateful for my new Roomba

10/19
Today I am grateful for dinner with Philip last night

10/20
Today I am grateful for dinner with Austin last night

10/21
Today I am grateful to meet many members of my team in person for the first time

10/22
Today I am grateful for a new iPhone

10/23
Today I am grateful for my first visit to Lisbon

10/24
Today I am grateful to listen to live fado music in Lisbon last night

10/25
Today I am grateful for
- a private tour of the old neighborhoods of Lisbon
- a visit to the Museu De Artes Decorativas Portuguesas
- a walk around the Castelo de São Jorge

10/26
Today I am grateful for:
- a bus tour of the modern areas of Lisbon
- a visit to The Lisbon Cathedral (Sé de Lisboa) and two beautiful churches - Saint Mary Magdalene and Saint Anthony
- to watch the sunset over the Tagus River from a rooftop cafe

10/27
Today I am grateful:
- for a visit to the Museu Calouste Gulbenkian
- for a boat ride along the Tagus River out to the ocean and back
- to learn about the history of Lisbon at the Lisbon Story Center

10/28
Today I am grateful for a visit to Sintra, Portugal yesterday

10/29
Today I am grateful to begin this bike trip across Portugal

10/30
Today I am grateful for 2 days in Évora

10/31
Today I am grateful for:
- 2 days visiting Mertola and Pmoarao
- a boat ride up the Guadiana River
- my first time in Spain

11/1
Today I am grateful for:
- 2 days visiting Mertola and Pmoarao
- a boat ride up the Guadiana River
- my first time in Spain

11/2
Today I am grateful for a bike ride along the Guadiano River yesterday afternoon

11/3
Today I am grateful for a tour of an olive oil factory yesterday

11/4
Today I am grateful for a day in Cascais

11/5
Today I am grateful for a bike trip across Portugal these past 2 weeks.

11/6
Today I am grateful for an extra hour of vacation


Michael Crichton's novel "Jurassic Park" and its movie adaptation were so popular that Crichton's publisher and audience convinced him to write a sequel. In "The Lost World", chaos mathematician Ian Malcolm - presumed dead in the first novel - returns to explore rumours that some genetically created dinosaurs survived on a different island. Malcolm flies to the island and finds himself caught between a reckless paleontologist and bad guys intent on stealing dinosaur eggs.

In some ways, Crichton repackaged themes from his earlier novel. 

Malcolm points out the hubris of those attempting to play with forces they cannot control.

Greedy corporate goons skip all the hard work and try to steal scientific discoveries of others.

A beautiful scientist shows up and proves strong, yet feminine.

Two pre-teens tag along and play a role in solving the problems the adults encounter.

While not as original as its preceding novel, this is still a fun story filled with almost non-stop action. It is a thrill ride that accelerated the flow of my adrenalin.


GCast 135:

Deploying a Web App to Azure from VS Code

Visual Studio Code is an excellent development environment for creating web applications. It also contains tools to deploy those applications to Azure App Services. Learn how to use those tools to move your web app to the cloud.


Using the MS Graph API

Comments [0]

Microsoft Graph (MS Graph) provides a REST API that allows you to access and manage many Active Directory (AD) objects, including information about users and their organizations. Microsoft Graph provides an API that allows you to read and write objects in Azure and Microsoft 365 objects. Examples include accessing and maintaining information on users, calendars, Teams, and devices.

You can call the Graph API by sending a POST, PUT, or GET request to a set of endpoints at https://graph.microsoft.com. As of this writing, MS Graph is on version 1.0, so all the endpoints begin with https://graph.microsoft.com/v1.0/, but that version number at the end may change in the future. These endpoints are documented here.

Some of these requests require sending some data in the HTTP body and all of them require sending data in the HTTP header. One common method of authentication is to send a Bearer Token in the header of each HTTP request. A JSON Web Token (JWT) is a type of Bearer Token issued by an identity provider, such as Azure Active Directory (AAD). It verifies the identity of the person or service making the API call, and it can contain information about that identity. In order to successfully, generate a JWT, you must create a user account; register an application with Azure Active Directory; and must generate a Client Secret; and you must grant the appropriate Microsoft Graph permissions to the account.

An API call runs as an account identity. That identity must be authenticated by someone that MS Graph trusts. That identity must have permission to perform actions in the API call

Another requirement of making a call to the Microsoft Graph API is that the caller must have permission to perform the requested actions on the objects specified in the request. For example, in order to read information about a user, the account must have READ permissions on the User object.

Fig. 1 illustrates the prerequisites to making a Graph API call.

Workflow to call MS Graph
Fig. 1

Below are the steps (including prerequisites) when making a call to MS Graph. For each prerequisite, I have linked to an article describing the step in detail.

  1. Register App. Record Tenant ID and Client ID
  2. Create Client Secret
  3. Obtain appropriate AD permissions
  4. Create Token
  5. Call API

Once you have a token representing a user account and that account has the appropriate permissions, you can make a call to the Microsoft Graph API.

Let's start with a call to get all users. Send an HTTP GET request to https://graph.microsoft.com/v1.0/users.

Add the following key-value pair to the HTTP Header of the request:

key value
Authorization Bearer jwt

where jwt is the JSON Web Token you created for the user account.

This is shown in Fig. 2.

Calling MS Graph User API with Postman
Fig. 2

As you can see, if we pass a valid JWT, the API returns a list of users in JSON format.

In this article, I introduced Identity Management and the Microsoft Graph API; I showed how they work together, and I provided step-by-step instructions on implementing IAM to access the API.


Episode 726

Christina Aldan on Brain Performance and Memory

Christina Aldan discusses the physiology of brain performance and memory; and describes things we can do to improve our memory.


"The Path of Daggers" begins the second half of Robert Jordan's 14-volume "Wheel of Time" series.

The book progresses the story: a group of heroines use an ancient artifact to reverse the unnatural global warming brought on by demonic forces of darkness in a previous novel; and Elayne finally returns to Caemlyn to ascend to the throne, vacated by her mother, who disappeared two books ago; Rand - the "Dragon Reborn" battles an invading army and fights to retain his sanity which is eroded by his use of mystical powers.

It is not a bad book in a decent series, but it has already gone on longer than needed.

"Daggers" is the shortest in the series and the first to reach #1 on the New York Times Best Seller list.

One would think Jordan would learn his lesson from this and begin writing shorter novels.

Alas, this was not the case. Jordan continued to plod along, slogging through his story. On to volume 9!


"In the narrative of my life, which is the look backward rather than forward into the unknown and unstoried future, I emerged from the pool as from a baptismal font—changed, reborn—as if I had been shown what would be my calling even then. This is how the past fits into the narrative of our lives, gives meaning and purpose. Even my mother’s death is redeemed in the story of my calling, made meaningful rather than merely senseless. It is the story I tell myself to survive."

Natasha Trethewey is a poet. A very good one. So good, in fact that she was named Poet Laureate of the United States in 2012.

But "Memorial Drive" is not a book of poetry. It is a memoir of her life, written in prose, rather than poetry. Yet even her prose sounds like poetry. In describing a photograph of her grandmother holding Natasha's infant mother in her arms, she writes:

"But the photograph hints, too, at another story. I can see it in the tall grass brushing her ankles, the blades bent as if moved by wind."

Trethewey was born in Mississippi on the 100th celebration of Confederate Memorial Day - a day which celebrates a battle for white supremacy in the south. As the daughter of a white Canadian father and a black southern mother, she grew up experiencing racism firsthand. Interracial marriage was illegal in Mississippi at the time of their matrimony!

But this book is less about her early childhood in Mississippi and more about the time after her parents’ divorce, when she and her mother emigrated to Atlanta. She recounts the abuse suffered by her mother at the hands of her stepfather Joel - abuse that ultimately led to the murder of her mother. She refers to this period as her "lost years".

Ms. Trethewey pours out her soul into these writings, recounting memories she had tried to forget.

"You are in the fifth grade the first time you hear your mother begin beaten", she writes.

Memorable parts of the book include:

  • Upon discovering that her stepfather had broken the lock on her journal and was reading it, teenage Natasha began addressing journal entries directly to him, letting him know he was abusing her mother.
  • The book reprints parts of a journal kept by Natasha's mother in the weeks before she died. The police found it in her briefcase the day of the murder, but Natasha did not read it until 25 years later. It details the abuse she suffered during her second marriage.
  • A police report to the police, following Joel's first attempt on the life of his estranged wife.
  • An encounter decades after the incident with a policeman who was on the scene. Meeting Ms. Trethewey brought tears to the eyes of the officer.

Brace yourself for an emotional journey - one you will not soon forget.


In a previous article, I showed you how to create an Active Directory user account.

Accounts are not much use unless they can do something, such as create, read, update, or delete objects. In order for a user account to do anything, that account must have permissions to perform the attempted action. A user can grant permissions to some objects associated with themselves. For example, I may give you permission to read my calendar; but, for most objects and actions, an AD Administrator is responsible for granting those permissions. Here are the steps to take while logged into Azure as an AD Administrator for the subscription involved. This article describes how to grant access to add permission to read user accounts (which can be done via Microsoft Graph), but the steps are similar regardless what permissions you are granting.

Log into the Azure Portal as an Administrator and search for Azure Active Directory, as shown in Fig. 1 to display the Azure Active Directory "Overview" blade, as shown in Fig. 2.

Search Azure for Active Directory
Fig. 1

Azure Active Directory Overview Blade
Fig. 2

Click the [App registrations] button (Fig. 3) to open the "App Registrations" blade, as shown in Fig. 4.

Azure Active Directory Overview Blade
Fig. 3

App Registrations Button
Fig. 4

Select your App registration to open its details page, as shown in Fig. 5.

App Registrations Blade
Fig. 5

Click the [API permissions] button (Fig. 6) in the left menu to display the "API permissions" blade, as shown in Fig. 7.

Registration Details Page
Fig. 6

API Permissions Blade
Fig. 7

Click the [Add a permission] button (Fig. 8) to display the "Request API permissions" dialogue, as shown in Fig. 9.

AddPermissionButton
Fig. 8

Request API Permissions Dialogue
Fig. 9

Click the "Microsoft Graph" button (Fig. 10) to filter the permission request to Microsoft Graph permission types, as shown in Fig. 11.

MS Graph Button
Fig. 10

MS Graph Permissions Filtered Dialogue
Fig. 11

Click the [Application permissions] button (Fig. 12). This allows the account to make calls, even if it is not explicitly signed in to AD. A list of permission categories displays, as shown in Fig. 13.

Application Permissions Button
Fig. 12

List of permissions
Fig. 13

Here you can expand a category and select the permissions to grant to an account via this Application Registration. Fig. 14 shows the "User" category expanded with the "User.ReadAll" selected, which would allow an account to Read all users' information in the Active Directory, but would not allow them to change, add, or delete user information.

User Permissions
Fig. 14

Click the [Add permissions] button (Fig. 15) to save selected permission changes.

Add Permissions Button
Fig. 15


Configured Permissions
Fig. 16

The Configured Permissions list displays again with the _User.Read.All_ application permission added. Note the "Yes" under the "Admin consent required column" and the "Not granted" warning in the "Status" column. This indicates that the permission will not take effect until an admin consents to it. Not all permissions require this, but _User.Read.All_ does. Click the [Grant admin consent" button (Fig. 17) and click the [Yes] button when prompted for confirmation (Fig. 18).

Grant Admin Consent Button
Fig. 17 Grant Admin Consent Confirmation
Fig. 18

The Configured Permissions list displays again with the warning replaced by a "Granted" message in the "Status" column, as shown in Fig. 19. The account now has permission to read user information.

Configured Permissions
Fig. 19

As you can see, the steps for granting permissions to an Active Directory User Account are simple. The catch is that you must be logged on as the owner of the object acted upon or as an AD Administrator in order to grant these permissions.


Creating a JWT Bearer Token

Comments [0]

A Bearer Token is a token that can be sent with a web request. It is an encrypted string that indicates under which account the request will run, validates the authenticity of that request, and (potentially) contains some information about that account.

Microsoft Azure can generate a JSON Web Tokens (JWT) when it validates an account. A JWT can be used as a Bearer Token.

This article describes how to generate a JWT.

In order to successfully generate a JWT, you must register an application with Azure Active Directory (described in this article); generate a Client Secret (described in this article); and you must grant the appropriate Microsoft Graph permissions to the account (described in this article).

You will need the following information from the Application Registration step:

-Tenant ID

-Client ID

-Client Secret

To generate a new JWT, send an HTTP POST request to https://login.microsoftonline.com/{{TenantID}}/oauth2/v2.0/token

where {{TenantID}} is the Tenant ID of the Azure subscription recorded above.

You can do this in code or using a CURL command or using a tool like Postman, I will demonstrate how to make this API call using Postman.

In Postman, create a new request, select POST from the HTTP Verb dropdown, and enter into the URL textbox "https://login.microsoftonline.com/{{TenantID}}/oauth2/v2.0/token", replacing {{TenantID}} with the Tenant ID recorded above.

This is shown in Fig. 1.

API URL in Postman
Fig. 1

Select the "Body" tab, select the "x-www-form-urlencoded" radio button, and enter the following Key-Value pairs:

Key Value
client_id (the Client ID recorded above)
client_secret (the Client Secret recorded above)
scope https://graph.microsoft.com/.default
grant_type client_credentials

This is shown in Fig. 2.

Request Body in Postman
Fig. 2

Click the [Send] button to send the HTTP POST request. You should receive a response, similar to the one in Fig. 3.

Response Body in Postman
Fig. 3

The resulting JSON includes a node named "access_token". Copy and save this value (without the surrounding quotation marks). You will need it later.

The access token is an encrypted JSON object. You can view this object by pasting it into the form at https://jwt.ms, as shown in Fig. 4.

Decoding the JWT with jwt.ms
Fig. 4

Now that you have a JWT, you can pass this in the header of an HTTPS request to identify to the API which account is making the request.


Creating a Service Principle in Azure requires a Client Secret. The Secret serves as the password for the principle. For example, you will need a Client Secret in order to generate a JSON Web Token.

A Client Secret is associated with an Application Registration. To get started, you will need to register your application in Active Directory, as described in this article.

Log into the Azure Portal and search for Azure Active Directory, shown in Fig. 1.

Search Azure for Active Directory
Fig. 1

Select "Azure Active Directory" to navigate to the Azure Active Directory "Overview" blade, as shown in Fig. 2.

Azure Active Directory Overview Blade
Fig. 2

Click the [App registrations] button (Fig. 3) to open the "App Registrations" blade, as shown in Fig. 4.

App Registrations Button
Fig. 3

App Registrations Blade
Fig. 4

Select your App registration to open its details page, as shown in Fig. 5.

Registration Details Page
Fig. 5

Click the [Certificates & secrets] button (Fig. 6) to display the "Certificates & secrets" blade, as shown in Fig. 7.

Certificates And Secrets Button
Fig. 6

Certificates And Secrets Blade
Fig. 7

Select the "Client secrets" tab, if it is not yet selected.

Click the [New client secret] button (Fig. 8) to display the "Add client secret" dialogue, as shown in Fig. 9.

New Client Secret Button
Fig. 8

Add Client SecretDialogue
Fig. 9

Provide a brief description of the secret. This will show up in lists, making it easier to identify later.

Select a time at which the secret will expire and need to be regenerated.

Click the [Add] button to generate the Client Secret and return to the "Certificates & Secrets" value. You should see your newly-generated secret listed on this blade. Copy and save the "Value". You will need it later.

IMPORTANT:

After you navigate away from this page, there is no way to retrieve the Secret Value. If you do not copy and save it now, you will need to regenerate a Secret. 

Keep this secret in a safe place - in Azure Key Vault or in a secure folder. If it is compromised, a hacker can access your API with this service identity.

This article showed how to generate a Client Secret. This Client Secret serves as a password for a principle account. You can use it when generating a JSON Web Token.


Overview

You may want to add a new user to an Azure Active Directory to onboard a new employee, to allow an external person access to the directory or to provide an account under which a service will run.

Creating a new user in Azure Active Directory is a straightforward process and can be done within the Azure Portal.

The Steps

Log into the Azure Portal as an Administrator and search for Azure Active Directory, as shown in Fig. 1 to display the Azure Active Directory "Overview" blade, as shown in Fig. 2.

Search Azure for Active Directory
Fig. 1

Azure Active Directory Overview Blade
Fig. 2

Click the [User] button (Fig. 3) in the left menu to display the "Users" blade, as shown in Fig. 4

Users Button
Fig. 3

Users Blade
Fig. 4

Click the [New User] button and select "Create new user" from the dropdown, as shown in Fig. 5.

New User Button
Fig. 5

The "New user" dialog displays, as shown in Fig. 6.

New User Dialogue
Fig. 6

At the "User name" field, enter a unique name for this user. This will be displayed in user lists and will be used to sign in and potentially as an email address.

At the "Name" field, enter the full name of the user.

At the "First name" field, enter the user's first name

At the "Last name" field, enter the user's last name

At the "Groups and roles" field, select any AD Groups or Roles to which you wish to assign the user.

At the "Block sign in" toggle, select "Yes" if you want to wait to make the user active; otherwise select "No" (the default).

At the "Usage Location" field, select the user's primary country of residence.

At the "Job title" field, enter the user's title.

At the "Department" field, enter the user's department.

At the "Company name" field, enter the name of the company for which the user works.

At the "Manager" field, you may select the user's manager.

"User Name" and "Name" are the only required fields in this dialog. Almost all of these settings can be added or changed later.

Click the [Create] button to create this user.

You will return to the "Users" blade, where you can use the search box to find the user you just added, as shown inf Fig. 7.

Search For User
Fig. 7

Click the Display name link to display details about the user, as shown in Fig. 8.

User Details
Fig. 8

Modifying a User

To modify information about the user, click the [Edit properties] (Fig. 9) button to display the Properties dialog, as shown in Fig. 10.

Edit Properties Button
Fig. 9

Properties Dialogue
Fig. 10

To delete a user, click the [Delete] button (Fig. 11); then click the [Delete] button in the confirmation dialog shown in Fig. 12.

Delete Button
Fig. 11

Delete Confirmation Dialog
Fig. 12

As you can see, there are far more user properties to edit than were available when you created the user. Make any desired changes and click the [Save] button to commit these changes to the User record.

Conclusion

In this article, I showed you how to create and manage a User in Azure Active Directory.


Dan Rey on Live Streaming

Comments [0]

Episode 725

Dan Rey on Live Streaming

Dan Rey shares a lot of technical information online via live streaming on LinkedIn, Facebook, YouTube, and other platforms. He discusses the tools and technologies he uses to make this happen.


Michael Bond had a formula when writing about Paddington the Bear. 

The bear begins with good intentions and a plan; things get messed up due to lack of foresight or lack of skill or bad luck; things work out anyway. Bond executed this plan over the course of just a few pages and repeated it seven times, then bundled those seven stories into a single volume.

The plan works because Paddington - the anthropomorphic bear adopted by the Brown family - is charming and likable and readers want to know into what mischief he will find himself next.

"Paddington at Work" sticks to this plan and amuses the reader with another delightful collection of tales.

Paddington returns from his sea trip to South America and is startled by the appearance of the Browns aboard his ship.

Paddington is taken in by a swindler who sells him shares in a fake company.

Paddington attempts to build a serving hatch in a wall, but forgets which wall leads to the outside.

Paddington fills in for a barber without being asked or trained.

Paddington is a last-minute substitute at a ballet.

There is nothing surprising in these stories. They are exactly what fans of the talking bear will expect. 

And they are fun!


Natasha Trethewey and me
I recently met Natasha Trethewey. She spoke at the Printers Row Lit Fest near my home, and she was kind enough to pose for a photo with me after her reading. When I heard she was coming, I knew I had to read some of her work before seeing and hearing her. I began with "Thrall" - a 2012 collection of poems about life and death and race and art.

She opens with an Elegy to her father - a memory of the two of them fishing together when she was a young girl, and her parents were still married.

Some nights, dreaming, I step again into the small boat that carried us out and watch the bank receding— my back to where I know we are headed.

The title is misleading as it was published two years before her father's death, but it captures beautifully her relationship with the man who gave her life.

She returns to her father and her mother multiple times in this collection, mostly remembering them separately, as they divorced when she was six. Despite their brief time together, one must believe that the marriage between a white Canadian and a black Mississippian had a powerful impact on their daughter growing up in Mississippi at a time when interracial marriage was illegal in that state. Another incident that impacted young Natasha was the death of her mother - murdered by her second husband when Natasha was 19 years old.

Trethewey writes of death, but it is not always sad. Trethewey's poems radiate hope and a fondness for the life that once was - fishing with her father; or her mother pulling young Natasha from the water as the nearly-drowned little girl sees "sun, a corona of light around her face".

In between, Trethewey authors poems inspired by art - mostly art depicting blacks and mulattos and whites interacting in colonial settings. Of course, I had to look up the paintings that inspired these poems and shift my gaze between the words on the page and the image on my computer.

"Thrall" was published just as Trethewey was named Poet Laureate of the United States - a position she held until 2014. The emotion in this volume shows why she was granted such an honor.


"A Crown of Swords" is Book 7 of Robert Jordan's 14-volume "Wheel of Time" series. The title refers to the crown worn by the king of Ilyan - a crown literally composed of swords, making it difficult to wear physically and metaphorically.

In this book, Rand wonders if he is going insane, but is reassured when he finds a new lover, who can partially predict his future. He spends most of the novel gathering his forces - via conquering, persuasion, and inspiration - in order to invade Ilyan and battle the evil Sammael.

Other star-crossed lovers finally hook up after a long separation; while Elayne and Nynaeve with the help of Mat continue their quest for the Bowl of the Winds, which can halt the unnatural global warming brought on by the dark ones; and Egwayne asserts her power as the new Amyrlin Seat. Oh, and Mat is raped by a queen.

I am now halfway through Robert Jordan's massive "Wheel of Time" series, and I feel committed. Each book which hovers around a thousand pages, but I am convinced Jordan could have told this story in far less space.

I like the characters and I like the story. But I wish Jordan would get on with it.


GCast 134:

Managing Microsoft Edge Profiles

The Microsoft Edge web browser allows you to create and manage multiple profiles on the same machine. Using multiple profiles, you can open browser sessions on the same machine that are associated with different users or different accounts. This can be useful to keep separate your work and personal browser settings and your company settings separate from each customer's environment. In this video, you will learn how to create and manage Microsoft Edge profiles.


Overview

In a recent article, I showed you how to errors in a Java Spring Boot application. You can start with the code from that article, which is found here.

This article will describe a more elegant way of handling exceptions.

The Problem with Try/Catch

Here is the relevant error-handling code from the controller's DivideNumbers method, described in the previous article:

@PostMapping(path="DivideNumbers", consumes = "application/json", produces = "application/json")
public ResponseEntity<DivideNumbersOutput> DivideNumbersPost(@RequestBody DivideNumbersInput input) throws MissingArgumentsException {
    Integer firstNumber = input.getFirstNumber();
    Integer secondNumber = input.getSecondNumber();
    String personName = input.getPersonName();
    Integer quotient = null;
    try {
        quotient = mathService.DivideNumbers(firstNumber, secondNumber);
    } catch (ArithmeticException e) {
        String message = "An error has occurred, " + personName + ": " + e.getMessage();
        DivideNumbersOutput output = new DivideNumbersOutput(null, message);
        return new ResponseEntity<DivideNumbersOutput>(output, HttpStatus.BAD_REQUEST);
    } catch (Exception e) {
        String message = "An error has occurred, " + personName + ": " + e.getMessage();
        DivideNumbersOutput output = new DivideNumbersOutput(null, message);
        return new ResponseEntity<DivideNumbersOutput>(output, HttpStatus.BAD_REQUEST);
    }
    String message = firstNumber + " divided by " + secondNumber 
        + " is " + quotient + ", " + personName;
    DivideNumbersOutput output = new DivideNumbersOutput(quotient, message);
    return new ResponseEntity<DivideNumbersOutput>(output, HttpStatus.OK);
}

There is nothing wrong with this code. It handles errors gracefully. However, it can become inefficient if we have the same error handling in many methods of our application. In that case, we will end up copying and pasting the same code in multiple places, and we will need to maintain the same code in multiple places.

The Spring framework provides a built-in way to address this concern using the @ControllerAdvice annotation, which allows you to handle exceptions across all modules of an application.

We will make a slight change to our application, adding MathInput and MathOutput model classes, These are similar to the input and output classes for adding and dividing numbers, in order to provide generic inputs and outputs for our math methods.

public class MathInput {
    private Integer firstNumber;
    private Integer secondNumber;
    private String personName;

    public Integer getFirstNumber() {
        return firstNumber;
    }
    public void setFirstNumber(Integer firstNumber) {
        this.firstNumber = firstNumber;
    }

    public Integer getSecondNumber() {
        return secondNumber;
    }
    public void setSecondNumber(Integer secondNumber) {
        this.secondNumber = secondNumber;
    }

    public String getPersonName() {
        return personName;
    }
    public void setPersonName(String personName) {
        this.personName = personName;
    }
}
public class MathOutput {
    private Integer result;
    private String message;

    public Integer getQuotient() {
        return result;
    }
    public void setQuotient(Integer result) {
        this.result = result;
    }

    public String getMessage() {
        return message;
    }
    public void setMessage(String message) {
        this.message = message;
    }

    public MathOutput(Integer result, String message) {
        super();
        this.result = result;
        this.message = message;
    }
}

Next, we add a class to hold a ControllerAdvice class that will contain all the error handling for our application. I named this class DgTestControllerAdvice and decorated it with @ControllerAdvice to indicate it is a ControllerAdvice class.

@ControllerAdvice
public class DgTestControllerAdvice {

I added two methods to this class: One to handle errors of type ArithmeticException and one to handle all other exceptions. Each class is decorated with three annotations:

  • @ExceptionHandler specifies the exception that will trigger calling this method
  • @ResponseStatus specifies the HTTP Response Code to return to the client. This frees us from having to create a ResponseEntity class
  • @ResponseBody tells Spring to serialize the body of the response as JSON

Here are the two methods:

@ExceptionHandler(ArithmeticException.class)
@ResponseStatus(HttpStatus.BAD_REQUEST)
@ResponseBody
MathOutput handleArithmeticException(ArithmeticException ex) {
    String message = "Math error: " + ex.getMessage();
    MathOutput mathOutput = new MathOutput(null, message);
    return mathOutput;
}

@ExceptionHandler(Exception.class)
@ResponseStatus(HttpStatus.BAD_REQUEST)
@ResponseBody
String handleException(Exception ex) {
    String message = "Error: " + ex.getMessage();
    return message;
}

Of course, we can add more logic to these methods (log the error, for example), but I kept it simple to demonstrate how the pattern works.

Now that we have a @ControllerAdvice class with exception handler methods, we no longer need to clutter our controller with error handling code. The refactored DivideNumbersPost method becomes much simpler and the business logic is more clear without the try/catch structure.

    @PostMapping(path="DivideNumbers", consumes = "application/json", produces = "application/json")
    public ResponseEntity<DivideNumbersOutput> DivideNumbersPost(@RequestBody DivideNumbersInput input) throws MissingArgumentsException {
        Integer firstNumber = input.getFirstNumber();
        Integer secondNumber = input.getSecondNumber();
        String personName = input.getPersonName();
        Integer quotient = mathService.DivideNumbers(firstNumber, secondNumber);
        String message = firstNumber + " divided by " + secondNumber 
            + " is " + quotient + ", " + personName;
        DivideNumbersOutput output = new DivideNumbersOutput(quotient, message);
        return new ResponseEntity<DivideNumbersOutput>(output, HttpStatus.OK);
    }

Error Handling Calling DivideNumbers With Controller Advice
Fig. 1 shows the results of running this application and calling the DivideNumbers method using Postman.

Fig. 1

Conclusion

Adding a ControllerAdvice class to your application and moving error handling logic into that class can simplify your code, make error handling reusable and easier to maintain, and improve the readability of your business logic. This article walked you through how to implement this pattern. You can find the code here.


<< Older Posts | Newer Posts >>