Overview

Spring is a framework designed to build Java applications quickly. Applications built with Spring are flexible because the framework supports many other frameworks, such as Hibernate, Struts, and EJB.

Start.Spring.io

The folks who created Spring provided a page to quickly bootstrap an application. To create your first Spring app, open a browser and navigate to https://start.spring.io/, as shown in Fig. 1.

spr01-StartSpringIo
Fig. 1

At the "Project" field, select the Build Automation tool you want your app to use. Maven and Gradle are both popular tools, so your choice may come down to which tool you and your team are most familiar with.

At the "Language" field, select your language of choice. Java, Kotlin, and Groovy all compile to Java bytecode and run on the Java Virtual Machine (JVM), so they are all compatible with Spring.

At the "Spring Boot" field, select the version of Spring you wish to use. Generally, you should select the latest version that is not a "SNAPSHOT" version. SNAPSHOT versions are created for development and testing and may not be as stable.

At the "Group" field, enter a group ID for the project. This is similar to a project's default namespace in .NET.

At the "Artifact" field, enter a descriptive name for the project.

The "Name" field defaults to your Artifact ID. It is usually fine to accept this default.

At the "Description" field, enter a brief description of your project.

The "Package name" field defaults to the Group ID, followed by ".", followed by the Artifact ID. It is usually fine to accept this default.

At the "Packaging" field, specify whether you want Spring to generate JAR files or WAR files when packaging the application. A WAR file is only appropriate for a web application, while a JAR file can be used for any application. This article explains the differences between the two. I typically select JAR files.

At the "Java" field, select the version of Java your application will use. For a new project, you will likely want to choose the latest Long Term Release (LTS) version of Java. As of this writing, that is version 17. Exceptions would be

  • You need a feature available in a more recent version
  • You are creating an application that must be compatible with a project built using an older version

Click the [ADD DEPENDENCIES] button to add more dependencies to your application. A dialog displays a list of available dependencies, as shown in Fig. 2.

spr03-AddDependencies
Fig. 2

For example, you can select "Spring Web" if you intend to build a REST API. You can always add dependencies after the project is created, but this wizard makes it easier to do so.

Click the [GENERATE] button to generate the project. The wizard will generate all the necessary folders and files, compress them into a ZIP file, and download that file.

Extract the ZIP file into a location on your hard drive. The structure will look similar to that shown in Fig. 3.

spr03-ProjectStructure
Fig. 3

Open the project in your favourite Integrated Development Environment (IDE). This is a good starting point for your application.

Conclusion

In this article, I showed you how to create a new Spring application using start.spring.io.

You can find the final code here.


Application Insights is a scalable Azure data store and service that is ideal for storing monitoring information of all kinds.

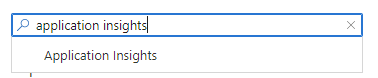
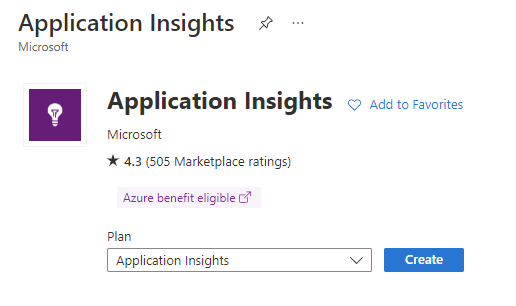
To install an Application Insights service, navigate to the Azure Portal then, click the [Create a resource] button (Fig. 1), and search for Application Insights (Fig. 2) to display the "Application Insights" start page, as shown in Fig. 3.

Create Resource Button
Fig. 1

Search for Application Insights
Fig. 2

Applicatino Insights Description Page
Fig. 3

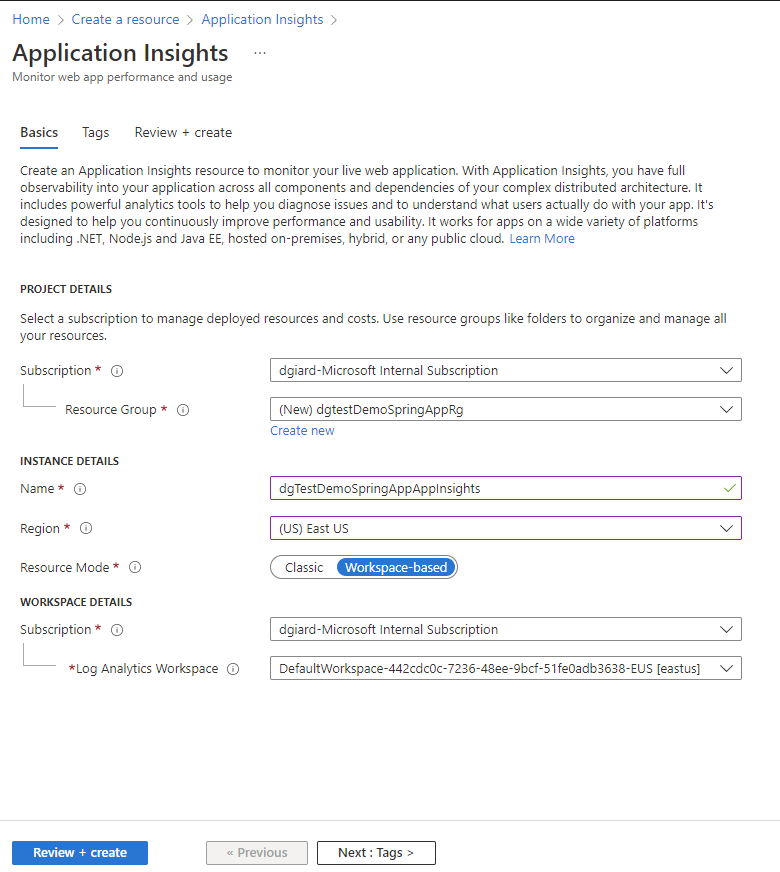
Click the [Create] button to open the "Application Insights" creation dialog, as shown in Fig. 4.

Create Application Insights Blade
Fig. 4

At the "Subscription" dropdown, select the Azure subscription in which to create the Application Insights service. Most of you will have only one subscription.

At the "Resource Group" dialog, select a resource group in which to store the Application Insights service or click "Create new" to create a new one.

At the "Name" field, enter a unique name for your Application Insights service.

At the "Region" field, select a region into which to deploy this service. Consider the locations of the services that will write to this data store in order to reduce latency.

At the "Resource Mode" field, select "Workspace-based".

At the WORKSPACE DETAILS fields, select the defaults.

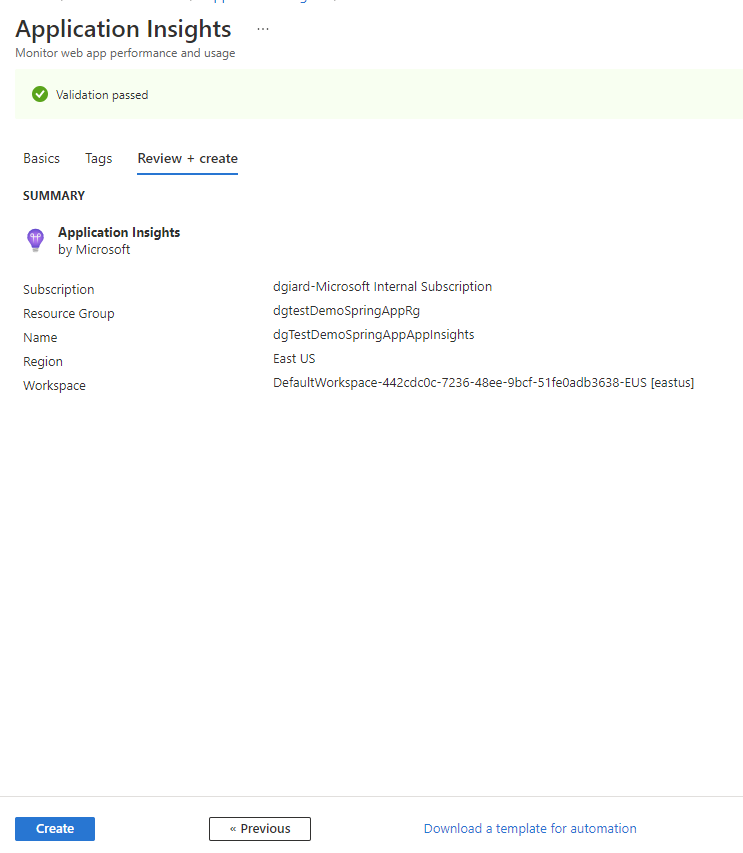
Click the [Review + create] button to display the "Review + create" tab, as shown in Fig. 5.

Create Application Insights Blade
Fig. 5

This tab will display any validation errors. Correct them and click the [Create] button to create the Application Insights service.

After Azure creates the service, navigate to its "Overview" blade, as shown in Fig. 6.

Application Insights Overview Blade Fig. 6

The "Overview" blade contains the "Instrumentation Key" (Fig. 7). This is an important piece of information that is often used to connect your application to Application Insights.

Instrumentation Key
Fig. 7

In this article, you learned how to create an Azure Application Insights service.


Episode 717

Michael Scherotter on Galleryst

Using tools from Adobe and Microsoft, as well as open source libraries, Michael Scherotter has created a portal to display photography and artwork within a virtual gallery. He describes how he created galeryst.com and how to use it.


Malcolm sighed. "Do you have any idea," he said, "how unlikely it is that you, or any of us, "will get off this island alive?"

Michael Chrichton was already a bestselling author when he published "Jurassic Park" in 1990. But none of his novels and few novels by other authors had the cultural impact of this one. Steven Spielberg adapted this book into an excellent movie in 1993, which spawned five sequels of varying quality but undeniable popularity.

JP is the story of a billionaire who hires a group of scientists to clone extinct dinosaurs to create a zoo / theme park on a remote island off the coast of Central America. They are confident that their redundant systems have eliminated any risk. Of course, they are wrong; and everything soon goes tragically wrong.

It is a story of the consequence of hubris and the arrogance of man playing the part of God.

But it is not only a morality tale. It is an action story and an adventure story and a horror story and a monster story and a story of corporate espionage. Chrichton - a former MD - goes to great lengths to make the science plausible, even if we are unlikely to resurrect extinct creatures any time soon in this world.

If the book has a weakness, it is the single-dimensional characters; but this did not bother me. The dinosaurs are the stars here.

As the climax approached, I felt the fear and the stress, and the danger experienced by both heroes and villains as the dinosaurs closed in on them. I related to Alan and Ellie and Malcolm and Tim and Lex and Hammond and their approach to the project.

Spielberg made dinosaurs a cultural phenomenon; but he would not have done so without this book.


CruelIntentions"Cruel Intentions: The 90s Musical" is a play based on a movie I never saw, which is based on a book I never read. I did not know what to expect.

In preparation to see the live show at the Chopin Theatre Saturday evening, I watched the 1999 movie on Friday. I was underwhelmed by the campy dialogue and mediocre acting, despite the presence of stars Reese Witherspoon and Sarah Michelle Gellar and semi-star Ryan Phillipe.

But the things that brought down the movie worked in the live production. The musical version took itself far less seriously than the film, making the campy dialogue seem more appropriate, often gaining an audience laugh where the same line inspired an eye roll while watching the movie.

"Cruel Intentions" is the story of Sebastian Valmont and Kathryn Merteuil – entitled step-siblings enrolled at an exclusive prep school in Manhattan. They are so privileged and amoral that they place a bet on whether Sebastian can deflower the virginal daughter of the school's new headmaster.

Manipulation, false promises, and general sociopathy ensue; but all this is interrupted periodically by cast members bursting into hit songs from the 1990s. In the stage version, the plot takes a back seat to the music. Feeling confused or angsty? Sing REM's "Losing My Religion"; Feeling sexy? Belt out Marcy Playground's "Sex and Candy"; a little self-hate can be expressed with a raucous rendition of Garbage's "I'm Only Happy When It Rains"; Use the Back Street Boys' "I Want it That Way" to flirt. The lyrics do not always fit the situation exactly, but the mood does. And somehow it works.

It works because the cast has fun with it. And so did I.


Overview

Java is a popular language for developing applications on a variety of platforms. In order to create applications, you must first install Java on your machine or virtual machine. This article will walk you through the steps to install Java on Windows 10 or 11.

Is Java Already Installed?

You can test whether Java is currently by opening a command prompt, typing "java -version", and pressing ENTER.

If Java is installed, information about the current Java version will display. If Java is not installed, you will see a message similar to the following:

'java' is not recognized as an internal or external command, operable program or batch file.

A Note About Versions

You can choose from a number of available versions of Java. Generally, I recommend installing the latest Long Term Support ("LTS") version of Java. You may want to install a more recent non-LTS version of Java if you require a feature that is only available in that version. Also, the application on which you are working may require a specific version of Java.

As of this writing, Java 18 is the most recent version of Java, but it is not LTS. The available LTS versions are Java 8, 11, and 17.

This article describes the current LTS versions of Java.

Download the installation Executable

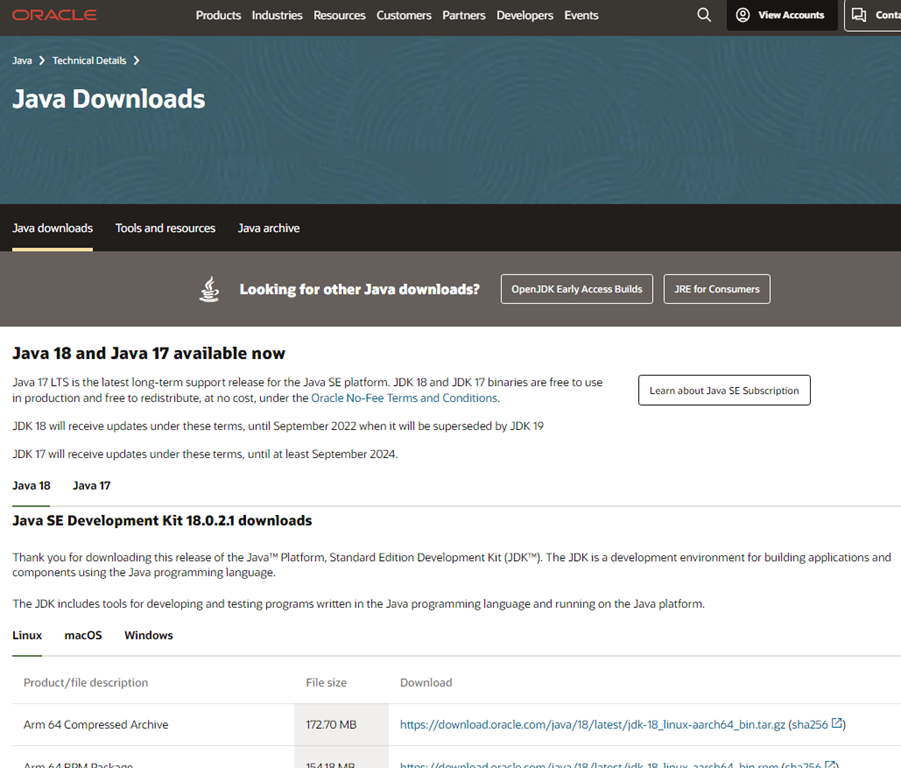
To download the installation files, navigate to https://www.oracle.com/java/technologies/downloads/. This page is shown in Fig. 1.

ij01-JavaDownloads
Fig. 1

In the center of the page are tabs for "Java 18" and "Java 17", as shown in Fig. 2.

ij02-JavaVersionTabs
Fig. 2

Currently, Java 18 is selected, so I will select "Java 17" because I want the LTS version. The "Java 17" tab is shown in Fig. 3.

ij03-Java17Downloads
Fig. 3

Lower on the page are tabs for different operating systems (Linux, macOS, and Windows), as shown in Fig. 4.

ij04-OSTabs
Fig. 4

Currently, Linux is selected; but I want to install this on Windows, so I will click the Windows tab. The Windows tab is shown in Fig. 5.

ij05-Java17WindowsDownloads
Fig. 5

NOTE: As of this writing, you navigate directly to the Java 17 Windows tab with the following URL: https://www.oracle.com/java/technologies/downloads/#jdk17-windows

The tab lists the available downloads relevant to Windows developers for Java 17.

Click jdk-17_windows-x64_bin.exe to begin downloading it.

Install It!

When the exe file finishes downloading, click the file to launch the install wizard.

The Installation Wizard displays, as shown in Fig. 6.

ij06-InstallWizard
Fig. 6

Click the [Next>] button to advance to the next page of the Wizard, as shown in Fig. 7.

ij07-Folder
Fig. 7

If desired, click the [Change…] button to change the folder in which Java is installed. Usually, there is no reason for doing this.

Click the [Next] button to begin installing Java.

When installation completes, a confirmation dialog displays, as shown in Fig. 8.

ij08-JavaInstalledConfirmation
Fig. 8

Click the [Close] button to close the Installation Wizard.

Verify Installation

After installing Java, it is a good idea to verify that it was installed correctly. The simplest way to do this is to open a command prompt, type "java -version", and press ENTER.

If Java is installed, information about the current Java version will display. If Java is not installed, you will see a message similar to the following:

'java' is not recognized as an internal or external command, operable program or batch file.

Note that you must open this command prompt after installing Java. If you opened the prompt before installation, it will not know that Java is installed.

Conclusion

In this article, I showed you how to install the latest LTS version of Java on your Windows machine.


Overview

By default, Azure App Services will not enforce any authorization for your Web Apps. You can implement authorization within your code, or you can configure an Identity Provider to perform authentication and authorization for you. In this article, I will walk you through the process of configuring Azure Active Directory as an identity provider. This will force anyone to log in with an Account in or registered in Azure Active Directory before accessing your website.

Register Identity Provider

The first step after you create your web app is to register an Identity provider.

Navigate to the App Service, as shown in Fig. 1.

waip01-OverviewBlade
Fig. 1

Select "Authentication" from the left menu to open the Authentication blade, as shown in Fig. 2.

waip02-AuthenticationBlade
Fig. 2

A new app will contain no Identity Providers. Click the [Add identity provider] button (Fig. 3) to open the "Add an identity provider" dialog, as shown in Fig. 4.

waip03-AddIdentityProviderButton
Fig. 3

waip04-AddAnIdentityProviderDialog
Fig. 4

Completing this dialog will create a new App Registration in Azure Active Directory. From the "Identity provider" dropdown, select "Microsoft". The rest of the dialog will display prompts related to this provider, as shown in Fig. 5.

waip05-AddAnIdentityProviderDialogBasics
Fig. 5

At the "App registration type" prompt, select the "Create new app registration" radio button.

At the "Name" prompt, enter a unique name for the app registration. This will default to the name of your web app.

At the "Supported account types" prompt, you can choose to restrict access to only accounts in the current Active Directory tenant, to accounts in this and other tenants, and/or to personal accounts registered with Active Directory.

At the "Restrict access" prompt, select the "Require authentication" radio button.

The "Unauthenticated requests" prompt allows you to select the HTTP response returned when a user fails to authenticate. Most of these are appropriate for APIs. For a website, select the "HTTP 302" radio button.

Click the [Add] button to create a new App Registration in Azure Active Directory and return to the "Authentication" blade, as shown in Fig. 6.

waip06-AuthenticationBlade
Fig. 6

You should now see your newly created Identity Provider listed.

Grant access to roles

After registering your application, the next step is to grant access to specific users or roles within your app. By default, each App Service contains a couple of dozen roles. Adding an account to a role permits them to perform certain activities, such as viewing or updating your site.

To assign an account to a role, click the [Access control (IAM)] button (Fig. 7) in the left menu to open the "Access control (IAM)" blade, as shown in Fig. 8.

waip07-IAMButton
Fig. 7

waip08-IAMBlade
Fig. 8

On the "Access control (IAM)" blade, click the [Add role assignment] button (Fig. 9) to open the "Add role assignment" page, as shown in Fig. 10.

waip09-AddRoleAssignmentButton
Fig. 9

waip10-AddRoleAssignmentRole
Fig. 10

On the "Role" tab, select the "Reader" role; then, click the [Next] button to advance to the "Members" tab, as shown in Fig. 11.

waip11-AddRoleAssignmentMembers
Fig. 11

Click the "Select members" link (Fig. 12) to open the "Select members" dialog, as shown in Fig. 13.

waip12-SelectMembersLink
Fig. 12

waip13-SelectMembers
Fig. 13

Search for an Active Directory account, as shown in Fig. 14 and 15.

waip14-SelectMembers
Fig. 14

waip15-SelectMembers
Fig. 15

Click the [Select] button to add this account to the "Reader" role. You will return to the "Add role assignment" page, as shown in Fig. 16. The account will now be listed under "Members".

waip16-AddRoleAssignment
Fig. 16

Click the [Review + assign] button to advance to the "Review + assign" tab, as shown in Fig. 17.

waip17-ReviewAndAssign
Fig. 17

Click the [Review + assign] button to save your changes.

Conclusion

In this article, you learned to configure Azure Active Directory as an Identity Provider for an Azure Web App. The steps above will create a new App Registration, which you can view from the "App Registration" blade of Azure Active Directory, as shown in Fig. 18.

waip18-AppRegistration
Fig. 18

You have the option to create and configure the App Registration yourself; but the steps describe here take care of much of the configuration for you.


Overview

You can use Visual Studio Code to create applications in a number of languages. Many of those applications can run in Microsoft Azure App Services. This article will show you how to deploy a web application from Visual Code to an Azure App Service.

## Install VS Code Azure App Service Extension

Before you begin deployment, you must install the Azure App Service Extension. Click the Extensions icon (Fig. 1) in the left sidebar and search for the Azure App Service extension from Microsoft, as shown in Fig. 2.

vcas01-ExtensionsIcon
Fig. 1

vcas02-InstallExtension
Fig. 2

If this extension is not yet installed, a [Publish] button will display. Click this button to install it.

Create a Web App

You can create a web app using ASP.NET, ASP.NET Core, Java, Ruby, Node.js, PHP, or Python. Visual Studio Code has extensions to support each of these. The language and framework are not relevant to this article, as the steps are the same.

Create a New Azure App Service

Before you deploy your code, you will need to Create a New Azure App Service to Host your Web App.

With your web application code open, click the Azure icon (Fig. 3) in the left sidebar and expand the Azure subscription to which you want to deploy and the "App Services" group within that subscription, as shown in Fig. 4.

vcas03-AzureIcon
Fig. 3

vcas04-SubscriptionAppService
Fig. 4

You will need an Azure Web App to host your code. If you have not yet created a Web App, you can create one now by right-clicking the "App Services" node and selecting "Create New Web App.." from the context menu, as shown in Fig. 5.

vcas05-AppServiceMenu
Fig. 5

Enter a globally unique name for this Web App, as shown in Fig. 6, and press ENTER.

vcas06-WebAppName
Fig. 6

Select the runtime stack from the list of supported stacks and press ENTER. In Fig. 7, I selected Node 16 LTS because I wrote my application in Node. The language in which you wrote your app will determine your selection.

vcas07-RuntimeStack
Fig. 7

At the "Select a pricing tier" prompt, select the tier to which you want to deploy your Web App, as shown in Fig. 8. More powerful tiers will be more robust and reliable, but more expensive.

vcas08-PricingTier
Fig. 8

After a few minutes, an Empty Web App is created. You can now deploy your application to this Web App by clicking the [Deploy] button on the confirmation dialog, as shown in Fig. 9.

Deploy App to Azure App Service

You can now deploy your application to this Web App by clicking the [Deploy] button on the confirmation dialog, as shown in Fig. 9.

vcas09-WebAppContextMenu
Fig. 9

The prompt in Fig. 10 displays.

vcas10-DeployTo
Fig. 10

Select the folder containing your application's code from the list or click browse to find it on your computer.

After you select the code location, the warning in Fig. 11 displays.

vcas11-AreYouSure
Fig. 11

Click the [Deploy] button to begin deploying your code to the Azure App Service.

You will receive the confirmation message shown in Fig. 12 when the deployment succeeds.

vcas12-WebAppCreated
Fig. 12

You can now browse your web site or manage the App Service in the Azure Portal.

Conclusion

In this article, I showed how to deploy a web application quickly and easily from Visual Studio Code.


Episode 716

Darryl Hogan on Accelerating Technologies for Nonprofits

Darryl Hogan discusses how technologists can help nonprofit organizations with their technical issues, such as building applications, databases, web sites, or infrastructure.


With "The Final Cut", Michael Dobbs concludes his "House of Cards" trilogy, and he does so in dramatic fashion.

This story begins with a flashback to a young Francis stationed in Cyprus in the British Army, assigned to fight the Cypriots in their battle for independence. Urquhart committed and covered up a war crime that no one has since discovered. Decades later, Urquhart faces a new challenge in Cyprus, which gives him the opportunity to rise above the public's criticism and save the day. He is decisive and forceful and determined to achieve victory at all costs; and he knows that he will be hailed a hero if he succeeds.

The series tells of the rise to power of British Prime Minister Francis Urquhart. TFC reveals what happens when Urquhart reaches the top and the world tires of him. Urquhart has been PM for 10 years and he is poised to eclipse Margaret Thatcher's tenure, but his popularity is declining. The public is clamoring for new blood and fresh ideas, while Francis is losing the support of many in his cabinet. Dobbs paints a picture of a ruthless man, terrified of losing his power. FU knows only politics and has no interests outside politics. He knows he will be lost if he loses the power he has built. "The Final Cut" is the story of a master Machiavellian, who rose to power by exploiting and destroying others and must use those same vile skills to stay on top. The PM always seems to come out on top at the expense of his rivals. Dobbs keeps us wondering if that will be the case this time.

This is a strong finish to an excellent trilogy.


Overview

The Microsoft Edge web browser allows you to create and manage multiple profiles on the same machine.

Using multiple profiles, you can open browser sessions on the same machine that are associated with different users or different accounts. This can be useful to keep separate your work and personal browser settings and your company settings separate from each customer's environment.

Each profile is associated with an email address. You can create a new email address at https://outlook.com

Creating a New Profile

To create a new profile, open Microsoft Edge and click the profile icon (Fig. 1) in the top right corner of the browser to launch the menu shown in Fig. 2. My profile icon has a photo of me, but yours may have your initials. You configured a default profile the first time you launched Microsoft Edge after installing it on this machine.

np01-ProfileIcon
Fig. 1

np02-ProfileMenu
Fig. 2

Click the [Add profile] menu option to open the "Add a profile" blade, as shown in Fig. 3.

np03-AddProfileDialogue
Fig. 3

The "Welcome to Microsoft Edge" screen displays, as shown in Fig. 4.

np04-SignIn
Fig. 4

Click the [Sign in to sync data] button to display, the "Let's get you signed in" dialog, as shown in Fig. 5.

np05-SignIn
Fig. 5

Enter your email address and click the [Sign In] button to display the "Enter password" dialog, as shown in Fig. 6.

np06-Password
Fig. 6

Enter the password associated with this email and click the [Sign In] button to display the "Help us protect your account" dialog, as shown in Fig. 7.

np07-ProtectAccount
Fig. 7

Re-enter your email address and click the [Next] button to display the "Enter your security code" dialog, as shown in Fig. 8; then check your email for a message with a 6-digit code.

np08-SecurityCode
Fig. 8

Enter the 6-digit code from the email and click the [Next] button to display the confirmation dialog, as shown in Fig. 9.

np09-UseWindowsHello
Fig. 9

Click the [OK] button to close this dialog and display the "Windows Security" dialog, as shown in Fig. 10.

np10-EnterPIN
Fig. 10

Enter the PIN you use to unlock this Windows workstation. click the [OK] button to display the "Add details" dialog, as shown in Fig. 11.

np11-AddDetails
Fig. 11

Enter your name, birth date, and country in the appropriate fields and click the [Next] button to display the "Please confirm your age" dialog, as shown in Fig. 12.

np12-ConfirmAge
Fig. 12

Click the [Next] button if your birth date is displayed correctly and click the [Next] button to display a confirmation dialog, as shown in Fig. 13. If your birth date is not displayed correctly, click the [Back] button and correct it.

np13-Confirm
Fig. 13

Click the [Confirm and start browsing] button to begin using this new profile.

Now that you have create the profile, you can switch between profiles by clicking the profile icon at the top right of the Edge browser, as shown in Fig. 14.

np14-ProfileMenu
Fig. 14

Managing a Profile

You can make changes to your profiles from the Edge Settings page. Open the Edge Settings page by clicking the Ellipsis in the top right corner of the browser and selecting "Settings" from the dropdown menu, as shown in Fig. 15.

np15-BrowserMenu
Fig. 15

The "Settings" page displays, as shown in Fig. 16.

np16-ProfileSettings
Fig. 16

If the "Profiles" tab is not selected, select it from the left sidebar. The current profile is highlighted, but you can view your other profiles in the "More profiles" section below. Click the [Switch] button next to one of these profiles to view the settings associated with it.

To modify profile settings, click the Ellipsis next to the profile and select "Edit" from the dropdown menu, as shown in Fig. 17.

np17-ProfileMenu
Fig. 17

The "Edit profile" dialog displays, as shown in Fig. 18.

np18-EditProfile
Fig. 18

Give this profile a more descriptive name, making it easy to identify from a list of your profiles.

By default, this profile displays only your initials. To upload your own picture, click the "Change picture" link, which displays the dialog shown in Fig. 19.

np19-ChangePhoto
Fig. 19

Click the "Add a photo" link and select a photo from your local drive. The photo will display in the Drop Zone, as shown in Fig. 20.

np20-ChangePhoto
Fig. 20

Use the controls to zoom in and out and position the photo as desired. Click the [Save] button to commit this photo.

The confirmation dialog shown in Fig. 21 displays.

np21-Profile
Fig. 21

Click the [Close] button when finished.

Deleting a Profile

If you decide you no longer need a profile, you can delete it from the Microsoft Edge Settings page. Sometimes, I create a profile for the purpose of using Single Sign On in with a customer's credentials and I no longer need this profile when my work with that customer concludes.

Open the Edge Settings page by clicking the Ellipsis in the top right corner of the browser and selecting "Settings" from the dropdown menu, as shown in Fig. 22.

np22-BrowserMenu
Fig. 22

The "Settings" page displays, as shown in Fig. 23.

np23-ProfileSettings - Copy
Fig. 23

If the "Profiles" tab is not selected, select it from the left sidebar. The current profile is highlighted, but you can view your other profiles in the "More profiles" section below. Click the [Switch] button next to one of these profiles to view the settings associated with it.

To delete a profile, click the Ellipsis next to the profile and select "Delete" from the dropdown menu, as shown in Fig. 24.

np24-ProfileMenu
Fig. 24

Conclusion

In this article, you learned how to create a new profile in Microsoft Edge, manage that profile, and delete that profile.


GCast 129:

Using the Microsoft Docker Extension for Visual Studio Code

Learn how to use the Microsoft Docker extension for Visual Studio Code to make your Docker development more efficient.


Jeff Fritz on .NET Conf

Comments [0]

Episode 715

Jeff Fritz on .NET Conf

Jeff Fritz is preparing for .NET Conf - a 3-day online conference scheduled in November, considiing with the release of .NET 7. He talks about the content of the conference, what goes into putting it on, and how you can get involved.


FabulousThunderbirdsThe Fabulous Thunderbirds know the blues.

Monday evening at the City Winery, they delighted the audience for two hours, moving seamlessly from jump blues to boogie-woogie to rock & roll to slow burn songs like Charles Brown's "Black Night" to funky songs like their 1980s song "Wrap It Up".

The band formed nearly five decades ago in Austin, TX. Lead vocalist Kim Wilson remains the only constant member, but the current lineup still brings strong energy and technical chops to their performance. Bob Welsh's energetic solo on "Slow Down" - a Larry Williams song made famous by The Beatles - was outstanding, as were Jerry Weldon's saxophone solos and Dean Shot's guitar solos on multiple songs.

In all those years, their only US Top-40 hit was "Tuff Enuff", which peaked at Number 10 in 1986 and which they played as the penultimate song of the evening. But the group continued to tour, and it is their live performances that drive the band and their fans. I saw them at a festival in Detroit in 1989 with Jimmie Vaughn on guitar. The names and faces have changed but the energy remains high.

The club Monday night was barely half full, but those who attended enjoyed it. A couple at the table next to mine appeared to be in their 70s or 80s but spent much of the evening dancing.

The show's opening was delayed as Weldon had trouble locating the microphone for his sax; but it closed with a strong harmonica solo by Wilson that brought the audience to its feet.

More photos


HowieDayHowie Day has a beautiful voice, is an accomplished guitar player, and has written dozens of great songs. For many, that would be enough. But Day takes it a step further in his concerts.

Thursday night at City Winery, Day appeared on stage with only a guitar and a few switches at his feet. Frequently, he would record his voice or his guitar playing or the sound of him tapping on the exterior of his instrument; then, play back these recordings on a loop to create rich layers of music. At times, he would enhance the playback with a bit of reverb. We heard musical arrangements and harmony vocals as if he were not alone on stage.

Between songs, Howie chatted casually with the audience about his life and his music. He introduced the song "Disco" by telling us he recorded it in his parents' basement "which sounds sad, but I was seventeen at the time". He sang an alternate country music version of his song "Be There", entitled "Beer There", complete with a southern twang.

Highlights included "Be There", "Tree Tops", "Longest Night", and his biggest hit "Collide". Nearly every song was an original, but he mixed in U2's "One" and opened his encore set with Crowded House's "Don't Dream It's Over".

It was a show filled with more energy than one would expect from a singer/songwriter who specializes in ballads and love songs.

I have never seen anything quite like a Howie Day performance. I have seen many musicians backed by drum machines or pre-recorded instruments and I have even seen a few record a brief snippet before playing on loop as their own accompaniment; but I have never seen a musician layer so many levels of music simultaneously and create such a rich sound as I witnessed Thursday evening.

More photos


Episode 714

Michael Mishal on Reinforcement Learning

Michael Mishal describes how reinforcement learning can use rewards to solve complex artificial intelligence problems.


July 2022 Gratitudes

Comments [0]

7/4
Today I am grateful for all the good things about the United States and for the freedom to express my opinions on the bad things about it

7/5
Today I am grateful to watch fireworks displays around the city from my balcony.

7/6
Today I am grateful for groceries delivered to my door.

7/8
Today I am grateful to sleep much of yesterday while recovering and still be able to sleep last night

7/9
Today I am grateful to the friend who gave me a bunch of really nice furniture yesterday.

7/10
Today I am grateful to those who care about my health

7/11
Today I am grateful for a call from my brother and sister-in-law in Australia yesterday.

7/12
Today I am grateful to finally test negative for COVID

7/13
Today I am grateful for:
- a kickoff to the Fiscal Year with others in my organization
- having Zoe stay with me for a couple weeks

7/14
Today I am grateful for:
-my first visit to Nebraska
-hanging out last night with the Nebraska.Code speakers

7/15
Today I am grateful to deliver a keynote presentation at the Nebraska.Code conference yesterday

7/16
Today I am grateful to Ken and the organizers and volunteers that made Nebrasa.Code a great success!

7/17
Today I am grateful to see the Nitty Gritty Dirt Band in concert last night

7/18
Today I am grateful to go bike riding this weekend for the first time since getting sick weeks ago.

7/19
Today I am grateful:
- for dinner last night with Chris and his family
- to see an entertaining David Gray concert last night

7/20
Today I am grateful:
- to attend the Microsoft Inspire event with partners at the Aon Center yesterday
- for drinks and jazz with Thad last night

7/21
Today I am grateful for an unexpected visit from my son this week

7/22
Today I am grateful for 75 years of marriage for my Uncle Bill and Aunt Jean.

7/23
Today I am grateful for my first visit to the South Loop Farmers Market at Grant Park

7/24
Today I am grateful to see the Psychedelic Furs in concert last night.

7/25
Today I am grateful to catch up on sleep yesterday and last night.

7/26
Today I am grateful to work with my trainer this morning for the first time since I became sick last month.

7/27
Today I am grateful for online training resources.

7/28
Today I am grateful for an ice cream social  at the Aon Center yesterday.

7/29

7/30
Today I am grateful to experience Teatro Zinzanni last night in Chicago

7/31
Today I am grateful for my first visit to Second City in years.

8/1
Today I am grateful that my lingering COVID symptoms are nearly gone

8/2
Today I am grateful for a new (to me) kitchen table - the first one I have owned in over 8 years!

8/3
Today I am grateful to see the Jim Irsay collection and band at Navy Pier last night

8/4
Today I am grateful for dinner with a bunch of Microsoft folks in downtown Chicago last night.

8/5
Today I am grateful:
-to co-lead a Diversity & Inclusion workshop yesterday morning
-to attend the Windy City Smokeout with Josh yesterday afternoon
-to see Howie Day in concert last night

8/6
Today I am grateful for a return to Grand Rapids, MI for the first time in years.

8/7
Today I am grateful to speak at an excellent Beer City Code conference yesterday.


TeatroZinZanni-1I have been to circuses and concerts and restaurants and theater, and dinner theater and improv shows and drag shows.

Thursday night at the Cambria Hotel in Chicago's Theater District, I experienced Teatro ZinZanni, which combined all of these into a single evening performance.

I had heard good things about this show but an announcement that it would close in two days was the motivation I needed to buy Friday evening tickets.

At center stage was a cross-dressed oversexed giantess, who shamelessly teased and flirted with the audience, driving the show forward. He/she was funny and crass and over the top.

TeatroZinZanni-2But in between, we heard excellent singers backed by a top-rate band and jugglers and acrobats and trapeze artists. The trapeze artists were the most impressive to me.

In between these, cast members ran among the tables in elaborate costumes interacting with the audience.

In between these, we enjoyed a very good dinner.

I did not know what to expect, but the show entertained us greatly.

Teatro ZinZanni has left Chicago to begin a run on the west coast. But the theater will reopen with Cafe Zazou in September. I think I know what to expect from this show.

But who knows?


GCast 128:

Maintaining State with Docker Volumes

Docker containers are stateless by default, which means that, when one is destroyed, all data created after the container is lost. However, you can get around this limitation by attaching a volume to your container. This video shows you how to create and manage Docker volumes.


To access an Azure Key Vault secret from your code, you must register your key vault as an application.

The steps are:

  1. Create the key vault
  2. Register the application with Azure Active Directory
  3. Add a Client Secret to the App Registration
  4. Add an Access Policy to the Key Vault
  5. Set Environment Variables
  6. Write the code

Create the key vault

First, you need to create a Key Vault in which to store your secrets. For instructions on how to create a Key Vault, see this article.

Register the application with Azure Active Directory

After creating a Key Vault, register the Key Vault with Azure Active Directory.

This article shows how to do this.

For our purposes, the most important pieces of information from the Application Registration are the  Application ID, which is sometimes called the Client ID.

You can find this on the Azure Active Directory "App registrations" blade. Search for your App Registration by name, as shown in Fig. 1.

kvc01-AppRegistration
Fig. 1

Record the Display name, the Application (client) ID) and the Directory (tenant) ID. You will need these later.

Add a Client Secret to the App Registration

Next, you will need to create a Client Secret within your Application Registration.

Within the App Registration, click the [Certificates & secrets] button (Fig. 2) to open the "Certificates & secrets" blade, as shown in Fig. 3

kvc02-CertificatesAndSecretsButton
Fig. 2

kvc03-CertificatesAndSecretsBlade
Fig. 3

To create a Client Secret, select the "Client secrets" tab and click the [New client secret] button (Fig. 4) to open the "Add a client secret" dialogue, as shown in Fig. 5.

kvc04-NewClientSecretButton
Fig. 4

kvc05-AddClientSecret
Fig. 5

At the "Description" field, enter a description of the secret (e.g., for which application are we generating a secret).

At the "Expires" dropdown, select how soon this secret will expire, requiring you to generate a new one.

When you finish completing the dialogue, click the [Add] button (Fig. 6) to return to the Application Registration" page, as shown in Fig. 7.

kvc06-AddButton
Fig. 6

kvc07-ClientsAndSecretsBlade
Fig. 7

Your newly created secret will display in the list on the "Client secrets" tab. Copy and save the "Value" column. After you navigate away from this page, you will no longer be able to view the Value.

Add an Access Policy to the Key Vault

An Access Policy tells Azure which users, applications, and services have access to Azure Key Vault and what actions they can take on the information stored in Key Vault. After you have registered the application, you will need to create an Access Policy in Azure Key Vault, providing the Application Registration access to the key vault.

To add an Azure Key Vault Access Policy, navigate to the Azure Portal, log in, and open the Azure Key Vault, as shown in Fig. 2.

kvc08-AzureKeyVault
Fig. 8

Click the [Access policies] button (Fig. 3) in the left menu to display the "Access Policies" blade, as shown in Fig. 4.

kvc09-AccessPoliciesButton
Fig. 9

kvc10-AccessPolicyBlade
Fig. 10

Click the [Add Access Policy] button (Fig. 5) to display the "Add access policy" dialogue, as shown in Fig. 6.

kvc11-AddAccessPolicyButton
Fig. 11

kvc12-AddAccessPolicyDialogue
Fig. 12

This dialogue provides a number of templates which preselect permissions to access and manage keys, secrets, and certificates in this Azure Key Vault. If you like, you can select one of these, as shown in Fig. 7.

kvc13-AccessPolicyTemplates
Fig. 13

Alternatively, you can specify each permission explicitly for keys, secrets, and certificates in this key vault. Fig. 8 shows how to select all permissions for managing secrets, which I will do for this demo.

When you have selected all the desired permissions, click the [Add] button (Fig. 8) to return to the "Add access policy" dialogue.

kvc14-SecretPermissions
Fig. 14

The next step is to give these permissions to the Application Registration. Click the link next to "Select principal" to open the "Principal" dialogue, as shown in Fig. 9.

kvc15-AddButton
Fig. 15

Search for the Application Registration by display name, select the Registration from the list, as shown in Fig. 10 and click the [Select] button to close the "Principal" dialogue and return to the "Add Access Policy" dialogue, as shown in Fig. 11.

kvc16-SelectPrincipalDialogue
Fig. 16

kvc17-AddAccessPolicy
Fig. 17

Finally, click the [Save] button (Fig. 12) to close the "Principal" dialogue and return to the "Access Policies" blade, as shown in Fig. 13. You will lose your changes if you fail to click the [Save] button before navigating

kvc18-SaveButton
Fig. 18

kvc19-AccessPoliciesBlade
Fig. 19

Set Environment Variables

The sample application below uses the DefaultAzureCredential class to authenticate the user. This class pulls information from the following environment variables:

  • AZURE_CLIENT_ID (from App Registration "Overview" blade)
  • AZURE_CLIENT_SECRET (from App Registration "Certificates & secrets" blade, "Value" field)
  • AZURE_TENANT_ID (from App Registration "Overview" blade)

The values for each of these fields were acquired in the steps above.

Write the code

In a .NET Core application, the following NuGet packages assist you when working with Azure Key Vault.

  • Azure.Security.KeyVault.Secret
  • Azure.Identity

Create a new Console Application in Visual Studio and install the Azure.Security.KeyVault.Secrets and Azure.Identity NuGet packages.

As stated above, we can use the DefaultAzureCredential class to represent the principal used to make calls to our Azure Key Vault and the information (AZURE_CLIENT_ID, AZURE_CLIENT_SECRET, and AZURE_TENANT_ID) are stored in environment variables.

We create a DefaultAzureCredential object with the following code:

var credentials = new DefaultAzureCredential();

Then, we use this object to create a SecretClient object, as in the code below.

secretClient = new SecretClient(new Uri(keyVaultUri), credentials);

The SecretClient object provides methods to access and manage our Key Vault secrets.

For instance, we can get information about all the secrets in our Key

The following code retrieves information on all secrets in the Key Vault and lists the name, value, and content type of each

Console.WriteLine("All Secrets:");
var allSecrets = secretClient.GetPropertiesOfSecrets();
foreach (var secret in allSecrets)
{
     var secretValue = secretClient.GetSecret(secret.Name);
     Console.WriteLine($"{secret.Name} | {secretValue.Value.Value} | {secretValue.Value.Properties.ContentType}");
}
Console.WriteLine();

Other SecretClient methods allow us to get, set, or delete a Secret, as shown in the following code snippets:

await secretClient.SetSecretAsync(setSecretName, setSecretValue);
var secret = secretClient.GetSecret(setSecretName);
var operation = secretClient.StartDeleteSecret(deleteSecretName);

By default, Azure Key Vault supports soft delete, meaning that a deleted object can be retrieved for a given period after deletion (90 days, by default).
To permanently delete a secret prior to this, we can issue a purge command after the soft delete has completed. We can determine when the soft delete has completed by querying the Boolean DeleteSecretOperation.HasCompleted property.

if (operation.HasCompleted)
{
     secretClient.PurgeDeletedSecret(purgeSecretName);
}

Below is the full code of a .NET Core Console application

using Azure.Identity;
using Azure.Security.KeyVault.Secrets;
using System;
using System.Threading;
using System.Threading.Tasks;

namespace testKeyVaultConsoleApp
{
     internal class Program
     {
         const string KEYVALUTNAME = "dgtestkeyvault"; // Set this to the name of your key vault
         static string keyVaultUri = $"https://{KEYVALUTNAME}.vault.azure.net";

        static SecretClient secretClient = null;

        static async Task Main(string[] args)
         {
             var credentials = new DefaultAzureCredential();
             secretClient = new SecretClient(new Uri(KEYVAULTURI), credentials);

            ListAllSecrets();

            Console.Write("Input the Secret name to set (ENTER to skip):");
             var setSecretName = Console.ReadLine();
             if (setSecretName != "")
             {
                 Console.Write("Input the Secret value to set:");
                 var setSecretValue = Console.ReadLine();

                Console.WriteLine("Setting secret...");
                 await secretClient.SetSecretAsync(setSecretName, setSecretValue);
                 Console.WriteLine($"Secret {setSecretName} set to {setSecretValue}!");

                // Set content type
                 var secret = secretClient.GetSecret(setSecretName);
                 secret.Value.Properties.ContentType = "Demo Type";
                 secretClient.UpdateSecretProperties(secret.Value.Properties);
             }

            Console.Write("Input a Secret Name to soft delete (ENTER to skip):");
             var deleteSecretName = Console.ReadLine();
             if (deleteSecretName != "")
             {
                 var operation = secretClient.StartDeleteSecret(deleteSecretName);
                 Console.Write($"Deleting secret {deleteSecretName}...");
                 while (!operation.HasCompleted)
                 {
                     Thread.Sleep(1000);
                     Console.Write($".");
                     operation.UpdateStatus();
                 }
                 Console.WriteLine();
                 Console.WriteLine($"Secret {deleteSecretName} deleted!");
             }

            Console.Write("Input a Secret Name to permanently delete (ENTER to skip):");
             var purgeSecretName = Console.ReadLine();
             if (purgeSecretName != "")
             {
                 var operation = secretClient.StartDeleteSecret(purgeSecretName);
                 Console.Write($"Soft deleting secret {purgeSecretName}...");
                 while (!operation.HasCompleted)
                 {
                     Thread.Sleep(1000);
                     Console.Write($".");
                     operation.UpdateStatus();
                 }
                 Console.WriteLine();
                 Console.WriteLine($"Secret {purgeSecretName} deleted!");
                 secretClient.PurgeDeletedSecret(purgeSecretName);
                 Console.WriteLine($"Secret {purgeSecretName} purged!");
             }

            ListAllSecrets();

            Console.WriteLine();
             Console.WriteLine("Done!");
         }

        private static void ListAllSecrets()
         {
             Console.WriteLine("All Secrets:");
             var allSecrets = secretClient.GetPropertiesOfSecrets();
             foreach (var secret in allSecrets)
             {
                 var secretValue = secretClient.GetSecret(secret.Name);
                 Console.WriteLine($"{secret.Name} | {secretValue.Value.Value} | {secretValue.Value.Properties.ContentType}");
             }
             Console.WriteLine();

        }
     }
}

You can find the code here.

NOTE: Visual Studio reads Environment Variables on launch, so it may be necessary to restart Visual Studio after you set the environment variables.

Conclusion

In this article, you learned how to create a Key Vault and manage its secrets from a .NET Console application.


Episode 713

James McKee on Application Security vs Developer Security

Security Advocate James McKee describes how we can increase cybersecurity by building security into the application development process.


"The Fires of Heaven" is Robert Jordan's fifth book in "The Wheel of Time" series. Despite a plethora of characters introduced in the first four novels, this book is very much the story of Rand al'Thor. Rand is the Dragon Reborn, the foretold reincarnation of Lews Therin Telamon - a warrior king from thousands of years ago, who is destined to lead the forces of light against those of darkness in the upcoming final battle. Rand gathers and command his armies, battles dark friends, and feels his sanity slipping away as Lews Therin's thought intrude upon his mind.

Jordan is often criticized (sometimes by me) for the slow pace of the series. But the passage of time makes Rand's gradual transformation from naive shepherd to warrior king more plausible.

Two other characters grow considerably in this volume: Mat tries to run from his responsibilities but repeatedly rises to the challenges set before him; and Morgaine sacrifices her pride and more to do what is right.

Other significant developments in TFOH:

  • Villainess Lanfear's obsession with Rand and Lews Theron finally erupts into a violent confrontation
  • An ancient warrior woman is released to the real world after centuries trapped in a dream world

Perrin is notably missing from this book - presumably resting from his heroic actions in the previous novel and celebrating his honeymoon.

The action accelerates near the end of this book: major characters are killed, and others seek vengeance against their murderers. The switching perspectives in the final chapters show the same action from different points of view, giving a frantic pace to the narration.

"The Fires of Heaven" starts slowly but is saved by a strong finish.


Psychedelic FursSome things stay the same and sometimes that is a very good thing. Brothers Richard and Tim Butler formed The Psychedelic Furs in the late 1970s and they form the core of the band today. Saxophonist Mars Williams joined in 1983 and remains with the band.

Saturday night, they were joined by Amanda Kramer (keyboards), Rich Good (guitar), and Zack Alford (drums) to the delight of thousands of fans at the Aragon Ballroom in Chicago's Uptown neighborhood.

The evening began with a set by LA-based band X, a group I remember from my college days in the early 1980s. Back then, they were primarily a punk band, but they showed greater range on this night than I remember from their LPs in my dorm room. In addition to their earlier hardcore music, we heard a mix of rockabilly and alternative rock. X maintained even more consistency over the decades than the Furs. Their founding members - D. J. Bonebrake, Exene Cervenka, John Doe, and Billy Zoom still perform together and still know how to rock hard.

XListening to X primed the audience for The Psychedelic Furs, who opened by launching into the frantic "Mr. Jones", which got the crowd bouncing. Of course, the biggest cheers came when they played their biggest hits, such as "Pretty in Pink", "Love My Way", "Heaven", and "Heartbreak Beat". These songs were recorded and released in the 1980s, but they sound fresh today. Vocalist Richard Butler's voice remains unchanged over the decades and the rest of the band retains a high energy when playing these songs for the thousandth time. Thanks in large part to Richard’s vocals, the live performance retains the technical quality of their recording sessions.

The Psychedelic Furs were part of a strong group of British synthpop bands that emerged after the punk movement of the 1970s. They have had more staying power than most of their peers, thanks to strong melodies and arrangements and a commitment to touring for the past decades.

We nearly saw a second show when an unstable patron tripped and fell, knocking heads with a woman in the front row of the balcony, nearly sending both of them over the railing. Thankfully, no one was seriously injured.

And no one went home disappointed from this excellent, high-energy show.


Registering an application in Azure Active Directory (AAD) allows the Microsoft Identity Platform to manage access to that application. Registration establishes trust between the application and the client.

To register an application, navigate to the Azure Portal, log in, and select the [Azure Active Directory] button (Fig. 1) in the left menu (or search for Azure Active Directory in the search box at the top of the portal.

ra01-AADButton
Fig. 1

The Azure Active Directory "Overview" blade displays, as shown in Fig. 2.

ra02-AADOverviewBlade
Fig. 2

Click the [App registrations] button (Fig. 3) in the left menu to display the "App registrations" blade, as shown in Fig. 4.

ra03-AppRegistrationButton
Fig. 3

ra04-AppRegistrationBlade
Fig. 4

Click the [New registration] button (Fig. 5) to display the "Register an application" dialogue, as shown in Fig. 6.

ra05-NewRegistrationButton
Fig. 5

ra06-RegisterApplicationDialogue
Fig. 6

At the "Name" field, enter a name for this registration. If I am registering one application, I like to include the name of that application, followed by "AppReg". Whatever you choose, it should be easily identifiable, so you can pick it out of a list of app registrations.

At the "Supported account types" prompt, select the appropriate radio button depending on where the login accounts of the client reside. You can accept logins from only the current Azure Active Directory, from this and other Active Directories, from Active Directories plus non-AAD Microsoft accounts, and only from non-AAD Microsoft accounts.

The "Redirect URI" section is optional. It is most useful in web applications to indicate to which page the system redirects a user after a successful authentication. If you are unsure, you can leave this empty and configure it later.

The "Service Tree ID" field is only relevant if you are using the Microsoft Service Tree service, which allows you to relate multiple apps and services, making them more easily searchable by your users.

If you have a Service Tree account, enter the ID in this field.

After completing the dialogue, click the [Register] button to register the application. It typically takes less than a minute to register an application.

After the registration is complete, the app registration page displays, as shown in Fig. 7.

ra07-AppRegistrationOverviewBlade
Fig. 7

The next steps depend on the type of application you are registering. I will cover some scenarios in future articles; but you can get a head start by clicking the appropriate link under "Build your application with the Microsoft identity platform".


Azure Key Vault is an ideal place to securely store, manage, and retrieve secrets used by your application or service.

A secret is a name/value pair in which the value is any string or serialized object of length up to 25k bytes. We retrieve a secret's value by its name. Secret values are encrypted by default.

In this article, I will show how to add a secret to a Key Vault.

Navigate to the Azure Portal, sign in, and open the Azure Key Vault. If you do not have a Key Vault, see this article, for instructions on how to create one.
https://portal.azure.com
/creating-an-azure-key-vault

The Key Vault "Overview" blade displays, as shown in Fig. 1

kvs01-OverviewBlade
Fig. 1

Click the [Secrets] button (Fig. 2) in the left menu to display the "Secrets" blade, as shown in Fig. 3

kvs02-SecretsButton
Fig. 2

kvs03-SecretsBlade
Fig. 3

On the "Secrets" blade, click the [Generate/Import] button (Fig. 4) to display the "Create a secret" dialog, as shown in Fig. 5.

kvs04-GenerateImportButton
Fig. 4

kvs05-CreateASecret
Fig. 5

At the "Uploads" dropdown, select "Manual".

At the "Name" field, enter a name for your secret.

At the "Value" field, enter the value of your secret. This can be any string. It will not display as you type.

Optionally, you can select a range in which the secret is valid. To do so, select either or both of the checkboxes ("Set activation date" and "End activation date"). Fields will display, allowing you to enter the date, time, and time zone for the earliest and/or latest time that the secret can be accessed.

If you do not want to make the secret available yet, but have not yet decided on which date it will be available, you can toggle the "Enabled" switch to "No" and change it to "Yes" when you decide the secret should be available.

If you wish, you can add one or more tags to the secret. Tags are name/value pairs that provide metadata for an Azure resource. They don’t affect the resource, but they can be useful when grouping them together on reports – for determining which resources belong to which departments, for example.

After completing this dialog, click the [Create] button (Fig. 6) to add the Secret to the Key Vault. The "Secrets" blade will display again with the newly-added secret listed, as shown in Fig. 7.

kvs06-CreateButton
Fig. 6

kvs07-SecretsBlade
Fig. 7

You can now use this secret in code or in a variety of Azure services.


Azure Key Vault is a service that provides a secure way to store and manage secrets, encryption keys, and certificates.

You can access it through the portal, via PowerShell or Azure CLI, and using a variety of SDKs.

Before using this service, you must first create an Azure Key Vault in your subscription. This article describes how to do this.

Navigate to the Azure Portal and sign in.

Click the [Create a resource] button (Fig. 1); then, search for and select "Key Vault", as shown in Fig. 2.

ckv01-CreateResource
Fig. 1

ckv02-SearchKeyVault
Fig. 2

A description of the Azure Key Vault displays, as shown in Fig. 3.

ckv03-KeyVaultDescription
Fig. 3

Click the [Create] button to begin the creation process. The "Create a Key Vault" blade displays with the "Basics" tab selected, as shown in Fig. 4

ckv04-CreateKeyVaultBlade
Fig. 4

At the "Subscription" dropdown, select the subscription in which you want to store this Key Vault. Most users will have only one subscription.

At the "Resource group" field either select an existing resource group or create a new one for this Key Vault.

At the "Key vault name" field, enter a unique name for this Key Vault.

At the Region, select an Azure region into which to deploy this Key Vault. It should be physically close to the services and applications that will access it.

At the "Pricing Tier" prompt, select either "Standard" or "Premium". The main difference is that the Premium tier supports keys protected by a Hardware Security Model (HSM).

When a Key Vault is deleted, Azure retains it for a period before permanently "purging" it in case you wish to restore the Key Vault. This is known as a "soft delete". In the "Recover options" section, you can set the number of days between the deletion and the permanent purge. You can also use the radio buttons to allow or disallow authorized users to manually purge a key vault before the retention period ends.

To create a Key Vault, it is only necessary to complete the information on the "Basics" tab. So, you can click the [Review + Create] button to advance to the "Review + Create" tab. However, you may wish to further customize the key vault, so I will review the other tabs. You can switch between tabs by either clicking the [Next] and [Previous] buttons at the bottom or by selecting the name of the tab at the top.

Fig. 5 shows the "Access Policy" tab.

ckv05-AccessPolicyTab
Fig. 5

Here you can give ARM templates and VM deployments, as well Disk Encryption access to the information in this Key Vault. You can also give specific permissions to specific users.

Fig. 6 shows the "Networking" tab.

ckv06-NetworkingTab
Fig. 6

On this tab, you can restrict access to a given set of private networks.

Fig. 7 shows the "Tags" tab.

ckv07-TagsTab
Fig. 7

Tags are name/value pairs that provide metadata for an Azure resource. They don’t affect the resource, but they can be useful when grouping them together on reports – for determining which resources belong to which departments, for example.

Fig. 8 shows the "Review + Create" tab.

ckv08-ReviewCreateTab
Fig. 8


Correct any errors reported. When all settings are validated, click the [Review + Create] button (Fig. 9) to begin creating the Key Vault.

ckv09-ReviewCreateButton
Fig. 9

It takes a few seconds to create and deploy a Key Vault. Upon completion, the confirmation message shown in Fig. 10 displays.

ckv10-DeploymentComplete
Fig. 10

Click the [Go to resource] button (Fig. 11) to display the Key Vault's "Overview" blade, as shown inf Fig. 12.

ckv11-GoToResourceButton
Fig. 11

ckv12-KeyVaultOverviewBlade
Fig. 12

You are now ready to store secrets, keys, and certificates in your Key Vault, which I will cover in a future article.


Episode 712

Drew Brown on The New Technology Employment Contract

Drew Brown is the CIO of Union Bank & Trust. He discusses the way the workplace has changed in the last few years and what this means for the future.


With "Paddington Marches On", I am now halfway through the twelve collections of short stories that Michael Bond published about the talking bear Paddington Brown.

Paddington continues to get in trouble, despite his best intentions. And, in each case, things work themselves out for the best. Mr. Bond has found a formula and it works. We keep reading because we like Paddington and we care about him and we want him to succeed, even though we know he always will.

As a bonus, I learned a bit about the sport of cricket!

And there is a nice surprise for Paddington and for the reader at the end of the last story!


"Paddington At Large" is Michael Bond's fifth collection of stories about Paddington the bear, who was discovered by the Brown family in London's Paddington Station and became a member of their family.

This anthology is less cohesive than the last two; its stories are only loosely connected, but all involve the antics of the talking bear and the trouble he gets into and out of while trying to do good.

Of the seven tales contained herein, my favourite was "Paddington Hits the Jackpot" in which the young bear appears on a television game show and outsmarts the host by explaining why each of his answers is correct, despite what is written on the host's card.

In other stories,

Paddington has a disastrous time mowing the lawn of his mean neighbor Mr. Curry;

At a concert in the park, Paddington is annoyed to learn that one of the symphonies is "unfinished"

Paddington confronts a repairman in the Brown home

A recipe for toffee proves too much for a young bear to handle

Paddington causes chaos in a department store

A local playwright recruits Paddington for his stage production in which the bear saves the day

Each story is short and each one made me smile.


Usually, we need to have the right answers to build the right solution. But, to get these answers, we need to ask the right questions.

The Microsoft Azure Well-Architected Framework helps us to frame those questions.

The framework divides Azure concepts into five categories, which they refer to as "pillars". Just as physical pillars that can hold up a physical structure, these pillars hold up the design of your cloud application. Each pillar covers a broad area of web architecture and helps you formulate questions and answers about that area. The pillars (in no particular order) are:

  • Cost Optimization
  • Operational Excellence
  • Performance Efficiency
  • Reliability
  • Security

Let's briefly discuss what each one covers

Cost Optimization

Azure resources can provide, but they cost money. This pillar helps you maximize the value for the price you are paying: Are you getting sufficient value for money outlayed and are there ways to save money, while still meeting your needs?

Some ways you can increase your cost optimization are:

  • Look for wasted resources, such as services that are running during times they are not used
  • Disks that are not attached to a Virtual Machine
  • Deploying more capacity than a service needs

Monitoring can help you discover these inefficiencies, as can Azure Advisor.

Reliability

Reliability is the ability to keep an application or service running, to anticipate failures, and to have a plan to recover quickly from those failures.

Typically, a cloud application focuses reliability efforts on the ability to quickly recover from failure, rather than preventing failure. Often, we quantify a reliability target in terms of a Service Level Agreement (SLA), which is the promised percentage of time our service will be available. For example, our SLA may promise 99.99% uptime (often referred to as "4 9's), which promises the application will be down only .01% of the time, which equates to less than an hour per year. However, reliability can also refer to maintaining a level of performance in terms of speed and features. Degradation of either of these decreases reliability.

We can increase reliability by providing redundancy to reduce a single point of failure, failovers in case of trouble, and

Despite your best efforts, it is likely that your system may go down unexpectedly and that you may lose some data. Therefore, it is essential that you have a detailed and tested plan to restore both the system and the data.

Azure takes care of some of this for us via such things as Update Domains, Availability Sets, Availability Zones, and built-in backup tools; but it is still up to us to opt into these services and configure them.

It is important to recognize that our application may be dependent on other services, so we need to consider the reliability of those services when considering the SLA of our app.

Operational Excellence

Operational Excellence refers to the ability to deploy an application reliably and to verify that deployment. Automated deployment is your friend here. Infrastructure as Code tools, such as ARM templates allow you to declare the state of an environment after a deployment. Automated build tools, such as Continuous Integration and Continuous Deployment pipelines in GitHub and Azure DevOps allow you to consistently build, test, and deploy your code to an environment in a repeatable way. Using these tools, we can automate the initial deployment of our application and manage subsequent releases, even rolling back a release if something goes wrong.

Testing is crucial to ensure quality before deploying code. Monitoring can assure that it remains in a good state and alerts you when it is not.

These processes can and should be automated as much as possible to simplify assurance of Operational Excellence.

Security

Security is an important pillar when architecting any application, whether or not it is in Azure. It is also one of the more complex topics in software development.

A key principle to keep in mind when designing your application is "Zero Trust" - never assume you can trust the person or account accessing your application.

A good approach is to recognize the layers that a user must get through to access your data and to add protection at each layer.

Azure implements some security for you by default, such as encryption of data in storage accounts. But you must be aware of potential areas of attack and defend against them. Tools like Azure AD Single Sign, Privileged Identity Management, and Azure Key Vault allow you to implement a secure solution.

Performance efficiency

Planning for the demands of your application can help you determine how much capacity you need. However, application demand tends not to be constant over time. It may vary by day of the month or week or by hour of the day. It may even vary in response to expected or unexpected events. Ideally, we will constantly adjust our application's capacity based on the demand over time.

There are two ways to increase capacity: Scaling up and scaling out. Scaling up refers to using a more powerful virtual machine. Scaling out refers to deploying more instances of your application.

Crossover

These categories are pillars, but they are not silos. Addressing one pillar can have implications in other pillars. For example, there are cost considerations for almost everything we do. And how we implement Operational Excellence may affect our Performance Efficiency. And monitoring is a key to almost all these pillars.

When designing an Azure application, it is important to consider each pillar and note that some tradeoffs may be necessary.

Next steps

For more information, visit the Azure Well-Architected Framework home page.

Microsoft Assessments contains an Azure Well-Architected Review that walks you through a series of questions to determine how well you have addressed some or all of the pillars.

In this article, we described the Microsoft Azure Well-Architected Framework and briefly covered each of the five pillars covered by this framework.


GCast 127:

Building and Running a Docker Container

Learn how to create a Docker image, push it to a repository; then build and manage a container based on that image.


DavidGray2022It is not often that a singer acts as his own warmup band. But that is exactly what David Gray did Monday night at the Huntington Bank Pavilion on Northerly Island.

Gray promised to play every track from his classic album "White Ladder" two decades after its release. But before he did so, he and his band performed a collection of his hits. The crowd was small, but they enjoyed hearing favourites, such as "The Other Side" and "You're the World to Me". After nearly an hour, the band left the stage, returning 20 minutes later to perform the album he promised.

True to his word, Gray sang each of the ten tracks in the order they appeared on the original CD. David has a talent for making his live performance sound very much like the studio version of his songs, which delighted the audience. The first two songs: "Please Forgive Me" and "Babylon" brought everyone to their feet. He concluded the set with the final track "Say Hello Wave Goodbye" - a mellower version of a song originally recorded by the synthpop band "Soft Cell".

Gray opened his encore set with another Soft Cell cover - their biggest hit "Tainted Love". The arrangement was close to the original - a style not often embraced.

David then told a story of the week that he performed at the prestigious Glastonbury Festival. It was the same week that "White Ladder" cracked the top 5 in the UK and he and his dad had a chance to meet David Bowie. Bowie was a big star and very gracious to the young upstarts, which prompted Mr. Gray to include two of Mr. Bowie's songs ("Life on Mars" and "Oh! You Pretty Things") in tonight's encore.

This was my first time seeing David Gray in concert. My friend Chris introduced me to his music earlier this year, telling me it was a favourite of him and his wife. I sat with them at the show and felt the emotion and joy that David Gray brings to his audience through his music.


NittyGrittyDirtBandBannerThe Nitty Gritty Dirt Band has been performing and performing well for a long time.

They formed over 50 years ago in Long Beach, CA. Although the musicians in the band have come and gone, singer/guitarist Jeff Hanna and drummer Jimmie Fadden have remained since the beginning and keyboardist/accordionist Bob Carpenter has been in the group for 45 years.

Saturday night at the City Winery, they were joined by Ross Holmes (mandolin and violin), Jim Photoglo (bass guitar), and Jeff Hanna (guitar). Jeff is the son of founding member Jeff Hanna and his father has reason to be proud of his talent. Individually, they were great, and together they were something special.

The Dirt Band has enjoyed success recording originals and cover songs over the years; and on this night, they mixed them well. Their latest album - "Dirt Does Dylan" - is a collection of covers by the great songwriter Bob Dylan and they played three selections from this record: "Girl from the North Country", "Forever Young", and "I Shall Be Released". But much of the evening, they focused on their earlier songs, from the upbeat "An American Dream" to Jerry Jeff Walker's "Mr. Bojangles" - arguably their biggest hit. They have also been a source of material for other artists. Dirt won a songwriting Grammy for "Bless the Broken Road" after it was recorded by Rascal Flatts. Hanna joked that the original recording was bought only by friends and family and failed to achieve Platinum status, settling for "aluminum" status instead.

Other highlights of the evening were "Long Hard Road" - a song written by Rodney Crowell about his sharecropper father; two Hank Williams songs: "Jambalaya" and "Honky Tonkin'"; and "The Working Man" - an original song inspired by their performance at the original Farm Aid in Champaign, IL. Fadden wrote and sang the latter song. He impressed me by playing drums and harmonica simultaneously - something I have never seen before.

This band tends to drop names of famous people with whom they collaborated; but they have every right to, given the impressive array of talent with whom they worked over the past five decades.

The encore bought the sold-out audience to its feet and had many of them dancing in the aisle. They closed with stirring renditions of the traditional "Will the Circle be Unbroken" and the Band's "The Weight".

It was a night to remember and left many smiles.


My Photos


Ambitious goals are important for us to improve ourselves.

But, in his book "Atomic Habits", James Clear reminds us that long-term goals are not achieved all at once. They are the result of thousands of steps performed daily or nearly daily. To achieve our goals, we need to change our behavior; and the best way to change our behavior is to decide on what we want to do and to make a habit of that.

Setting Habits

Clear advocates four ways to make something a habit: Make it obvious, make it attractive, make it easy, and make it satisfying.

Make it obvious

Be explicit and aware of what you are trying to achieve.

Make it attractive

Control your environment. Pair your habit with a pleasurable activity. Surround yourself with people who will give you positive reinforcement.

Make it easy

Do not overcommit. Start slow and work your way up to your desired habit.

Consider automating your habits

Make it satisfying

This is what keeps you going over time.

Reinforce the habit with a reward.

Do not beat yourself up for missing a day; but never miss two days. This leads to a new undesirable habit.

Removing bad habits

We can reverse these same four ways to help break a bad habit: make it invisible, make it unattractive, make it difficult, and make it unsatisfying.

A caution

Clear cautions against relying solely on habits to achieve your goals. Habits become unconscious and discourage us from analyzing our behaviors, which inhibit progress. Step back from time to time and make sure you are still focusing enough to make progress. Only by doing so can we achieve greatness in an area.

In practice

Some of this book is common sense, but nearly all of it resonated with me. Too often, I have failed to achieve goals because I stopped doing the daily and weekly activities necessary for success.

Clear rightly points out that daily improvements increase exponentially, like compound interest. A 1% improvement every day adds up to a 3800% improvement over the course of a year. Of course, a 1% daily improvement in anything for a year is probably not sustainable (can you imagine losing 1% of your weight or getting 1% stronger every single day), but this idea is correct, even if the magnitude is exaggerated.

I used some of Clear's techniques to improve my daily exercise routine. I moved a yoga mat next to my desk and determined to do pushups, crunches, or stretches at regular intervals throughout the day. My health and strength have improved noticeably after just a few weeks. Next up, I will try to build a habit of practicing piano every day - something I have attempted several times in the past couple of years.

Conclusion

"Atomic Habits" is not a complex book. The writing is simple, and the ideas are presented in a straightforward manner with a summary at the end of each chapter. This simple style makes it easy to read and easy to adopt the principles contained therein.


Robert Jordan's "The Dragon Reborn" - book 3 of "The Wheel of Time" - largely ignored Rand al'Thor, even though he is the central character of the series and the title character of that book. In book 4 - "The Shadow Rising" - Rand takes center stage.

Rand has embraced his fate as the reincarnation of Lews Therin and his destiny to lead the forces of light in the coming battle against darkness. His mystical power increases and he begins to gather an army around himself. Meanwhile, various factions vie for power in an often violent way. The monstrous Trollocs and the fanatical Children of the Light and the farmers of the Three Rivers, the powerful Aes Sedai, and the warrior Aiel - now revealed as Rand's native people.

At 981 pages, this book is the longest in the series; but not by much. 7 Of the remaining 10 novels top the 850-page mark.

Each book follows the same formula: the protagonists split up and travel through the world and/or reunite and are attacked by the bad guys, climaxing in a battle between Rand and one of the "Forsaken", who have chosen to follow the demonic Dark One.

Jordan moves the story forward more rapidly than in the earlier volumes, but at a slower pace than I would like. As in the previous novels, he does a good job of developing the characters and the world. We learn the secret history of the Aiel; and a coup among the Ais Sedai, along with the fate of their leader of that order. In addition to Rand's evolution, Perrin comes into his own in this story, rising to the challenge of leading the defense of his village against an invading army. His arc was my favourite of this book.

The series still has me intrigued. I will continue.


If you work with Docker, the Docker Visual Studio Code extension from Microsoft is a good productivity tool.

Installation

To install the extension, launch Visual Code, click the "Extensions" button (Fig. 1) in the left toolbar and search for "Docker", as shown in Fig. 2.

vsc01-ExtensionsButton
Fig. 1

vsc02-DockerExtension
Fig. 2

Select the "Docker" extension published by Microsoft and click the [Install] button.

After installation completes, a "Docker" icon (Fig. 3) appears in the left toolbar.

vsc03-DockerButton
Fig. 3

Features

Some of the features of this extension are:

  • Color coding of Dockerfile syntax
  • Intellisense in Dockerfile
  • Display Docker objects
  • Right-click for quick Docker actions

Dockerfile support

With the extension installed, you get syntax color coding of a Dockerfile, as shown in Fig. 4

vsc04-Dockerfile
Fig. 4

Notice that the keywords are pink, literal strings are orange, and image repositories are green.

The extension also provides Intellisense for a Dockerfile. Press CTR+SPACE after a repository and see a list of tags within that repo, as shown in Fig. 5.

vsc05-Intellisense
Fig. 5

Right-click the Dockerfile within the Explorer to display a context menu. With this extension installed, the menu will include an option to "Build image…" as shown in Fig. 6.

vsc06-BuildImage
Fig. 6

Select this option to build an image based on this Dockerfile. This will prompt you for an image name, as shown in Fig. 7, and execute the "build image" command in the terminal window with the appropriate arguments.

vsc07-BuildImageTag
Fig. 7

The "Docker" tab of the left menu displays a list of containers, images, registries, networks, and volumes.

Right-click an image to display a context menu. Select the "Inspect" option, as shown in Fig. 8 to output JSON about that image, as shown in Fig. 9.

vsc08-InspectImage
Fig. 8

vsc09-InspectImageJson
Fig. 9

Select "Run" from the Image context menu to build a container based on this image, as shown in Fig. 10.

vsc10-RunImage
Fig. 10

This will execute the "build run" command in the Terminal window with the appropriate arguments. Any local containers will display in the "Docker" tab, as shown in Fig. 11.

vsc11-Containers
Fig. 11

You can right-click a container to display a context menu, as shown in Fig. 12.

vsc12-Right-Click
Fig. 12

From this menu, you can inspect the properties of the container, view logs, or open the default port in a web browser.

Conclusion

The Visual Studio Code Docker extension from Microsoft provides some helpful features to make your experience working with containers more productive.


Episode 711

Shane Jones on Writing an App for the Vision Impaired

Shane Jones and his team have built VocalScreen - a browser extension that reads HTML and integrates with the screen reader to provide audio and context for visually impaired users.

He talks about how and why he built it and how it works.

Links:
https://www.linkedin.com/in/shanedjones/
https://github.com/shanedjones
https://twitter.com/shanedjones


"I wonder whether it's just Paddington," he said. "Or whether all bears are born under a lucky star".

"Paddington Abroad" is Michael Bond's fourth book about the anthropomorphic bear adopted by the Brown family of London.

This is the most cohesive Paddington book so far in the series. It tells the story of the Brown family's vacation to the north of France. Rather than a collection of short stories, each chapter advances the tale of the vacation, as Paddington tries to navigate the bank and the airport and a fishing expedition and the Tour de France. In each case, the well-intentioned bear gets into and out of trouble in a humorous way.

This series continues to charm me.


In "House of Cards", Michael Dobbs introduced Francis Urquhart, the ruthless politician who rose to power through scheming, betrayal, and murder. In Dobbs's follow-up novel "To Play the King", Urquhart is now the Prime Minister of Great Britain - arguably the most powerful man in the country. His appointment as PM comes at the same time the country crowns a new King.

Urquhart has ambitions to maintain his powerful position for as long as possible and to make an indelible mark on history; but the idealistic King wants to focus his government's efforts and resources on the poor and underserved in his country. Urquhart sees this as an encroachment on his territory. Traditionally, the monarch is a figurehead who avoids policy and politics. The conflict forms the backbone of this story as the King tries to advance his agenda, while the PM uses his power and inside knowledge to turn the public against the Royal family and to force a crisis for which the public will blame the monarch.

It leads to a game between the powers of the Crown and Parliament. The weapons are politics and treachery, and the amoral Urquhart has a decided advantage in this arena. Francis pursues power relentlessly without regard for the cost to others and with little thought of how that power will benefit his country. The King is a newcomer when it comes to these battles and sometimes fades to insignificance - so much so that the author does not give him a name.

Dobbs is an excellent storyteller with a gift for building and evolving characters. Urquhart - once the unflappable politician - becomes seduced by his own authority and it changes his personality, making him more outwardly aggressive.

The conclusion to the conflict (and the novel) is satisfying, if a bit rushed.

I look forward to the final book in this trilogy.


GCast 126:

Getting Started with Docker

Learn the basics of containers and dockers and how to get started quickly.


Why Volumes?

In my last article, I showed how to create a Docker image and a container based on that image.

One nice thing about containers is that, if one fails, you can quickly create another one based on the same image. A disadvantage of this approach is that the new image will not contain any data saved to the container after it was created. If we want to maintain stateful data, we need to connect a container to a volume.

A volume is a folder on the host machine or virtual machine that is mounted within the container, so that the container and its applications can write to it. It will persist even if the container is destroyed. You can even share the same volume (and its data) among multiple containers.

Creating a Volume

To create a new volume, use the docker volume create command, followed by a name for that volume, as in the following example, which creates a volume named "vol1":

docker volume create vol1

By default, this will create a folder with the same name as the volume in the /docker-desktop-data/version-pack-data/community/docker/volumes/ folder (on Windows, this folder is \\wsl$\docker-desktop-data\version-pack-data\community\docker\volumes\)

A folder named “_data” inside each volume folder holds all the files written to that volume.

This folder is shown in Windows Explorer in Fig. 1

dv01-DataFolder

Fig. 1

You can view information about this volume with the command:

docker volume inspect volume_name

where volume_name is the name of the volume you just created.

Fig. 2 shows the output for the vol1 volume I created.

dv02-dockerinspect

Fig. 2

Attaching a Volume to a Container

Recall from the last article that the command to create a container from an image is

docker container run --name name_of_container -p external_port:internal_port image_tag

So, the following command, creates a container named "app1" based on the dgiard/app1:1.0 image with port 8000 mapped to the container's port 8080

docker container run –d --name app1 -p 8000:8080 dgiard/app1:1.0

You can attach a volume to a container when you create it using the -v switch. This switch accepts the name of a volume you created, followed by a colon, followed by the folder location to find the volume data inside the container.

The following command creates the same container above with the volume we created earlier attached and mapped to the container's /var/opt/project folder.

docker container run –d --name app1 -v vol1:/var/opt/project -p 8000:8080 dgiard/app1:1.0

Viewing the Volume's Data

We can see this by opening a bash shell on the container and writing a file into the volume folder.

To open a shell on the app1 container, execute the following command:

docker exec -it app1 sh

This changes your prompt and places you inside the container. Change folders to the volume folder assigned above  with the following bash command:

cd /var/opt/project

Now, use the following command to create a file in this folder:

echo "Hello world" > hello.txt

You can exit this Bash shell command by pressing CTRL+P+Q on your keyboard.

You can view this file on the host machine. On Windows, open \\wsl$\docker-desktop-data\version-pack-data\community\docker\volumes\vol1\data in Windows Explorer, as shown in Fig. 3.

dv03-VolumeWithData

Fig. 3

You can also view it in Docker Desktop. Click "Volumes" in the left menu and select the "Data" tab, as shown in Fig. 4

dv04-DockerDesktopVolumeData

Fig. 4

Other Useful Commands

Here are a few other useful commands when dealing with volumes

List all volumes: docker volume ls
Delete a volume: docker volume rm volume_name
Remove all unused volumes: docker volume prune

Conclusion

In this article, you learned how to create and manage volumes in order to maintain state within a container


June 2022 Gratitudes

Comments [0]

6/6

Today I am grateful to the man with the beautiful voice who sang in front of my building yesterday.

6/7

Today I am grateful for my new shower head

6/8

Today I am grateful for:

  • a conversation with Chander yesterday for the first time in years
  • an unexpected call of support from my cousin John

6/9

Today I am grateful to finally replace a faulty light switch in my guest bedroom.

6/10

Today I am grateful to attend the Chicago Blues Festival yesterday

6/11

Today I am grateful for a call from my sister Debbie yesterday.

6/12

Today I am grateful to see the Giordano Dance company last night at the Auditorium Theatre last night.

6/13

Today I am grateful for my personal trainer

6/14

Today I am grateful to sit on my balcony reading last night as the storm raged around me.

6/15

Today I am grateful:

- to present at the Hampton Roads .NET User Group last night

- to attend a presentation on Juneteenth and the city of Chicago yesterday afternoon

- to run into Thad on my bike ride last night and ride with him to 31st Street Beach

6/16

Today I am grateful for a new wallet

6/17

Today I am grateful to see "Top Gun: Maverick" last night at a Microsoft-sponsored event.

6/18

Today I am grateful to see "The Luckiest" at the Raven Theatre last night.

6/19

Today I am grateful to be a father

6/20

Today I am grateful to Tim for treating me to an Ethiopian dinner for Father's Day last night.

6/21

Today I am grateful

-to deliver 2 presentations yesterday to my old organization

-that the part was in stock, so my bike repair completed yesterday

6/22

Today I am grateful for lunch with Mitch yesterday

6/23

Today I am grateful for dinner with J. in New Buffalo yesterday

6/24

Today I am grateful for a White Sox game with my former team

6/26

Today I am grateful for a weekend visit from a group of friends I met my freshman year of college, decades ago.

6/27

Today I am grateful to visit the DuSable Museum of African American History for the first time

6/28

Today I am grateful for a free Chicago Symphony Orchestra concert last night at Millennium Park

6/29

Today I am grateful to see the Indigo Girls in concert last night

6/30

Today I am grateful to Eric for planning and running last night's Microsoft Build After-Party

7/1

Today I am grateful that a difficult Fiscal Year ended with optimism.

7/2

Today I am grateful to give away a lot of old furniture that I have held onto for decades

7/3

Today I am grateful to listen to the My Morning Jacket concert last night outside the venue gates.


IndigoGirls2022I was a big fan of the folk-rock duo The Indigo Girls during the 1990s (arguably their most creative period), but Tuesday evening at Cahn Auditorium in Evanston was the first time I saw them in concert, and it was as good as I hoped.

Amy Ray and Emily Saliers have been recording and touring all these years and have built an impressive catalog of music to share with us. Their concert mixed newer songs and fan favourites. I especially appreciated early classics like "Closer to Fine", "Galileo", and "Power of Two". I was disappointed not to hear some of my personal favourites, such as "Least Complicated" and their cover of "I Don't Wanna Talke About It", but I was not unsatisfied with their selection.
 
The Georgia natives met in elementary school, began playing together in high school, and formed The Indigo Girls in college. Decades later, they still sound good. Amy has always boasted the deeper, rougher voice, while Emily's was higher and gentler. Amy's vocal cords remain strong, while Emily has lost some range over the years, but it is when they harmonize that they sound their best. The two alternate singing lead and when they harmonize it is sometimes together and sometimes with one singing a countermelody to complement the main melody sung by her partner. Both work well, but they execute the melody/countermelody thing to perfection. They sound like friends who have been playing together for decades.

Ray and Saliers have long been advocates of the rights of women, LGBTQ, and other unrepresented groups and their audience reflected this support. The crowd was easily 75% female and many sported clothing with activist messages. Recent events in the US brought a more specific meaning to some of their songs and more passion from the crowd as they sang along. The band did not preach, but they let us know they are on our side.

The two were joined onstage by violinist Lyris Hung, who brought both talent and energy to her performance; and by Lucy Wainwright Roche, who also served as the warmup act, charming the audience with self-deprecating stories between songs. No drummer performed with the band, and she was not missed. The guitars provided all the rhythm necessary.

It was an unforgettable evening.

My Photos of The Indigo Girls

My Photos of Lucy Wainwright Roche


A container allows us to virtualize applications and data and host this on top of a host virtual machine.

Containers provide the following advantages:

  • It allows one VM to host multiple containers, potentially providing more efficient use of resources.
  • It allows us to isolate the applications in different containers, so they will not interfere with one another.
  • Containers allow us to split up an application physically, so that we can deploy, update, and scale each part of the application independently.

Docker is a tool designed to manage containers.

A container is based on an image. An image contains all the information to create a container in the same way that a class contains the information to instantiate an object and a blueprint contains the information to construct a building.

So, before you create a container, you must create an image and tell it what components will be in the container.

The steps are:

  1. Create the application source code and/or data in a folder and (optionally) its subfolders
  2. Create a Dockerfile that describes what goes into the image/container and what to do with it
  3. Use Docker to build the files into an Image
  4. Push the Image to a Registry
  5. Create and run a container based on that image

Setup

Before you begin, you must install Docker. A simple way to do this is to install Docker Desktop, which you can download here.

You will also need an account at an online registry, such as Docker Hub or Azure Container Service. In this article, I use Docker Hub.

Once you have everything installed and set up, we can walk through the steps listed above.

Create an Application

I created a simple node.js application, consisting of only a single file: app.js with the following code:

var http = require('http');

    var portNumber = 8081;

    http.createServer(function (req, res) {
    
    res.writeHead(200, {'Content-Type': 'text/html'});
    
    res.write('<h1>Hello World!</h1>');
    
    res.write('The time is ' + new Date());
    
    res.write("<h2>Count to 5</h2>");
    
    res.write('<ul>');
    
    for (var i = 1; i <=5 ; i++) {
    
      res.write('<li>' + i);
    
    }
    
    res.write('</ul>');
    
    res.write('<p>Done!</p>');
    
    res.end();
    
    }).listen(portNumber);
    
    console.log('Server running at http://localhost:' + portNumber);
    

This simply outputs some HTML on port 8081. When run, it will display some text, the current date/time, and a list of numbers.

Dockerfile

In the same folder, I created a file named "Dockerfile" (with no extension)

Dockerfile supports many instructions, but I have kept this one simple, as shown below:


FROM node:current-alpine
LABEL author="David Giard"
WORKDIR /src/app
COPY . /src/app
ENTRYPOINT ["node", "app.js"]


FROM tells Docker which image to begin with. The node:current-alpine is a Linux container with the latest version of alpine node installed. You can find a list of pre-built images at https://hub.docker.com/search 

LABEL is optional. We use it to add metadata to our image, as a name/value pair. Adding the author is common.

WORKDIR tells Docker to set the current working folder in the container.

COPY tells Docker to copy files from a folder on my location machine to a folder in the container. The first "." represents the current folder and the second "." represents the working directory in the container, so my command tells Docker to copy all files in the current folder (where Dockerfile is located) to the working folder.

ENTRYPOINT is a command or executable to run to start the container, along with any arguments, separated by commas.

["node", "app.js"]

You can read all about the tags in Dockerfile here.

Build an Image

We build an image from the files in the current folder with the following command:

docker image build -t image_name .

where image_name consists of three parts: the Docker registry name, the Docker repository name, and a tag (which is often used to define the version), using the following format:

registry_name/repository_name:tag

I have a registry on DockerHub named "dgiard", so I can use an image name like the one below to identify version 1.0 an image in my registry in a repository named "myapp":

dgiard/myapp:1.0

The following command creates an image named dgiard/myapp:1.0 (registry=dgiard; repository=myapp; tag=1.0)

docker image build -t dgiard/myapp:1.0 .

Push Image to Registry

After creating an image, we can push it to a registry with the following command:

docker image push image_name

Of course, we need write permission in the registry before we can push an image to it. If we are using DockerHub, we may need to log in first.

Create and run Container

Once it is in the registry, we can run it from any computer with access to the registry via the following command:

docker container run -d --name application_name –p local_port:port_in_container image_name

where:

  •      application_name is a name by which you want to identify this application
  •      local_port:port_in_container maps a port on the local computer with a port inside the container.
  •      image_name is the name assigned to the image when we built it.

Our sample app runs on port 8081, but we can map local port 8000 to 8081 in the container with the clause -p 8000:8081.

In our example above, the command to run a container locally becomes:

docker container run -d --name app1 -p 8000:8081  dgiard/myapp:1.0

We can test our app by opening a browser and entering the following in an address bar:

http://localhost:8000

This should run the application, as shown in Fig. 1.

cd01-Output
Fig. 1

Conclusion

This article showed how to create a Docker image; then, build, push, and run a container based on that image.

Here are the key Docker commands we executed for our example:

docker build -t dgiard/myapp:1.0 .

docker image push dgiard/app1:v1 

docker container run -d --name app1 -p 8000:8081  dgiard/myapp:1.0


A container allows us to virtualize applications and data and host this on top of a host virtual machine.

Containers are similar to Virtual Machines in that they virtualize some of your application. The difference is that a Virtual Machine abstracts away the hardware and networking, while a container abstracts away more. Because a container sits on top of a Virtual Machine, it also abstracts away the operating system, which is handled by the VM. Just as one physical machine can host multiple Virtual Machines, one Virtual Machine can host multiple containers.

Containers provide the following advantages:

  • They allow one VM to host multiple containers, potentially providing more efficient use of resources.
  • They allow us to isolate the applications in different containers, so they will not interfere with one another.
  • Containers allow us to split up an application physically, so that we can deploy, update, and scale each part of the application independently.

A container is based on an image. An image contains all the information to create a container in the same way that a class contains the information to instantiate an object and a blueprint contains the information to construct a building.

Docker is a tool designed to manage containers.

A simple way to install Docker locally is to install Docker Desktop, which you can download here for Windows, Mac, or Linux.

To share images with other users, other computers, or remote platforms (e.g., cloud providers), you need to publish them to a repository. Docker Hub allows you to create repositories. You can create a free account on Docker Hub and create one or more repositories within that account. A repository contains images and containers that you can share. Often all the images in a given repository are related; for example, you may publish images with different versions of the same software and store them all in one repository.

Docker provides some repositories and images that you can use for free. You can use these to learn how to use Docker. For example, you can open a command prompt and type the following:

docker run –d –p 3000:80 docker/getting-started

This will create and run a container hosted in the “getting-started” repository of the “docker” registry. This is a sample container that contains a web application that runs on port 80. Let’s walk through the parts of the above command.

docker run tells Docker to download the container and run it.

docker/getting-started tells Docker where to find the container. In this case it is in the “docker” registry and in the “getting-started” repository.

-d tells Docker to run this container in “detached” mode. This means that Docker will run it asynchronously and immediately return you to the command prompt. Alternatively, you can run the container in “interactive” mode using the –it switch. This will change your command prompt and place you inside the container, rather than your host machine.

-p 3000:80 is used for port mapping. The web application inside the container runs on port 80. We need to tell Docker which port to expose on the local machine to access that port. In this example, we are mapping the local machine’s port 3000 to port 80 in the container.

The output after running the above command is shown in Fig. 1.

cb01-dockerrun
Fig. 1

After you run the command, you can view all running containers using the command docker container ls, as shown in Fig. 2.

cb02-dockercontainerls
Fig. 2

After successfully executing the docker run command, we can view the container’s web application in a browser on our local machine by navigating to http://localhost:3000. This should render the container’s web app, as shown below.

cb03-localhost3000
Fig. 3

In this article, I explained the fundamentals of images, containers, and Docker; and showed some basic Docker commands.

In the next article, I will show you how to create your own image and publish it to a repository.


The Microsoft Word Spelling and Grammar checker is an impressive tool that has saved me from embarrassment many times.

But, there are times when it gets in the way.

For example, I often write articles that include code samples. I do not want to check spelling in my code because it includes key words and variable names that are not part of the English language.

Microsoft Word includes a feature that allows me to continue using Spellcheck on the document, while suppressing it for sections of text that I identify.

In Fig. 1  is a section of a Word document I recently wrote for a technical article. I want Word to check most of the document, but not the code (the part that begins with ".create-or-alter" and ends with "tostring(location);}")

ws01-SampleDocSection
Fig. 1

To exclude this section from the Spellcheck, I first highlight, as shown in Fig. 2.

ws02-SelectSection
Fig. 2

With the text highlighted, I select the [Language] dropdown on the "Review" ribbon and click "Set Proofing Language", as shown in Fig. 3.

ws03-LanguageButton
Fig. 3

The "Language" dialog displays, as shown in Fig. 4.

ws04-LanguageDialog
Fig. 4

Click the "Do not check spelling or grammar" checkbox and click the [OK] button to close the dialog.

You can repeat this for multiple sections in your document.

The next time you run Spellchecker (Fig. 5), this section(s) will be ignored.

ws05-SpellingGrammarButton
Fig. 5

This is a simple process that can make checking your documents more efficient.


Adi Polak on LakeFS

Comments [0]

Episode 710

Adi Polak on LakeFS

Adi Polak is the VP of Developer Experience at Treeverse.

She describes how data scientists and developers can use LakeFS to manage Data Lakes, using tools familiar with git developers.

Links:
https://lakefs.io/
https://github.com/treeverse/lakeFS
https://www.linkedin.com/in/polak-adi/


"Paddington Helps Out" is Michael Bond's third collection of short stories about Paddington - a good-hearted bear who emigrated from "Darkest Peru" and was adopted by a family in London.

The stories follow a familiar theme established by Bond in earlier collections: Paddington tries to do something kind, but invariably messes up things through his clumsiness or ignorance; yet things always work out well in the end.

We get stories of the bear trying to figure out an auction and a laundromat and a movie theater on his first visit to each. Paddington struggles trying to build a woodworking project and make dinner for his adoptive parents.

With each collection, Bond ties together the stories more tightly. In this volume, each tale leads naturally into the next and has a reference to the one before. This gives cohesion to the entire book, which takes place over only a few days.

The stories are funny and charming and a pleasure to read, regardless of your age.


Michael Dobbs is a British Lord, Margaret Thatcher's former Chief of Staff, and an author specializing in stories about British politics.

His first novel - "House of Cards" - tells the story of Frances Urquhart. In his role as Chief Whip of the UK Conservative Party, Francis works behind the scenes to persuade members to vote in the party's interests; but Urquhart has ambitions beyond his current role; and he uses his influence and his knowledge of personal secrets to manipulate the government, the media, popular opinion, and elections to advance his own career. In his climb to the top, he conspires to eliminate each of his rivals. Everyone has secrets and Urquhart knows those secrets and is able and willing to exploit them. If a rival has no damaging secrets, he will invent one. Either way, the leaks are enough to destroy or limit careers.

The story is filled with politicians and other influential people drunk on their power but doomed by their arrogance and hubris. Urquhart stands apart as the ultimate Machiavellian, manipulating events people - treating them as objects to use as pawns in his own climb. His charming facade invites others to trust him, but his cunning nature is to betray anyone when that betrayal will advance his goals.

It is also the story of Mattie Storin a beautiful and energetic young female reporter who admires Urquhart's knowledge and what she perceives as his leadership skills. He manipulates her, as well.

"House of Cards" is a political thriller, filled with intrigue and political infighting and ruthless manipulation. It focuses on the appeal of power and the corruption inherent in striving for that power. It has launched two successful television series (I have only seen the BBC version, so far) and shines a light on the darker side of politics.

I loved it!


A Parable

John spent days writing a software component. He tested and double-checked his code, and he was satisfied that it worked properly, according to the requirements he was given, so he checked it into source control. A few weeks later, a new version of the software that included his code was released to production. A user discovered a bug caused by John's changes. The user tweeted about the bug, and this was retweeted thousands of times. Before long, word got back to John. An edge case that John had not considered was causing problems in production. He fixed the bug and checked his changes back into source control. And he waited. Hoping for the best.

June spent days writing a software component. She tested and double-checked her code, and she was satisfied that it worked properly, according to the requirements she was given, so she checked it into source control. June's team had a policy that required a code review prior to merging any code with the main branch. During the code review process, one of June's peers pointed out a bug in her code. It was an edge case that June had not considered. She fixed the bug and checked her changes back into source control. The code was reviewed again and merged with the main branch. June slept well that night.

The story of June and John illustrates some of the advantages of code reviews. Catching June's bug during a code review resulted in a faster and cheaper fix and resulted in less public embarrassment than catching John's bug in production. The two bugs were of equal severity, but one was less costly to fix.

What is a Code Review?

Why do we do code reviews? They take up time that could be spent writing code, designing features, or otherwise directly driving forward a project, so there is a cost. The answer is that the benefits of a good code review far outweigh the costs.

When I think of a code review, I think of a formal process in which one person reviews code written by another and provides written or oral feedback to the author, approving that code only after they deem it acceptable.

There are two parties in a code review: The Code Author and the Code Reviewer.

The steps in a code review are:

  1. The Code Author makes changes to an application and checks those changes into a code repository
  2. The author sends a description of changes to the Code Reviewer. The changes are known as a "Change Set"; the description of those changes is a "Change List"; many Application Lifecycle Management tools (e.g., GitHub and Azure DevOps) support a "Pull Request", which combines the two with the source code and is a formal entry point for the Reviewer to begin reviewing the code changes. I often use these three terms interchangeably because they are so closely related
  3. The Code Reviewer retrieves the code, examines it, and (if necessary) provides feedback on changes that the author must make before the code can be merged with the main branch
  4. If the code requires changes, the Reviewer sends the feedback to the Author
  5. The Author responds to the feedback and makes any necessary changes
  6. The Author re-sends to the Reviewer the code with these updates
  7. Steps 3-6 are repeated until no more changes are required
  8. When no more changes are required, the Reviewer approves the changeset
  9. The code is merged with the main branch in the repository

Code Review Goals

A good code review will accomplish the following:

  • Validate code
  • Help make engineering decisions
  • Share knowledge
  • Increase code ownership

Let's discuss each of these goals.

Validate code

The most obvious reason to review code is to validate that it does what it is supposed to do. Generally, we look at this from an external point of view. For example, if we provide a given set of inputs to a function, we verify that the function returns the expected output. We can pull the code from source control and make sure it compiles and runs successfully. We can execute automated tests and validate that they all pass.

But we also want to validate the code from an internal point of view. If our team has coding standards, does the code adhere to those standards? While reviewing code, the reviewer looks for and calls out potential problems. Even if the code works well, there may be potential areas for improvement. For example, the reviewer may suggest ways to make the code more efficient, faster, or more readable. The reviewer should point out these as well.

Help make engineering decisions

Sometimes, a code review can drive engineering decisions. If there is confusion or inconsistency about how the application is accessing data or dividing services or testing code, code reviews can raise these issues and prompt a discussion. If different developers have different coding standards, it may indicate a gap in the team's standards and drive discussion around this.

Effective teams have published a set of coding guidelines that may describe everything from naming conventions to required test coverage. Developers must be aware of these guidelines and make an effort to adhere to them; but often non-compliant code slips through. A code review is a good place to catch this before the code is committed to the main branch.

Sharing knowledge

Another benefit of Code Reviews is that it allows sharing of knowledge.

There are two parties involved in a code review process: the code author and the code reviewer. By reviewing the code, the reviewer has a chance to improve the code itself and to address any weaknesses or knowledge gaps in the developer. Similarly, the reviewer can address his or her own weaknesses by seeing someone else's approach to a coding challenge.

The reviewer gains knowledge about a part of the system that someone else wrote. By reading the code, they may also learn something about the language in which it was written; or about a framework or a design pattern or an algorithm implemented by the author; or about the business cases and requirements of the application.

In addition, the code author can learn by reading feedback from the reviewer, who may suggest improvements that the coder did not consider.

Increase code ownership

I have worked on too many systems in which one developer possessed all knowledge about a part of that system. Confusion reigned when that developer left the team. No one understood how to maintain the orphaned code. By conducting regular code reviews, team members have a chance to understand parts of the system on which they are not actively working. This shared knowledge benefits the whole team, allowing flexibility in staffing and removing the danger of all knowledge departing when a team member departs.

Catch Problems Sooner

The Shift-Left Principle states that the cost of fixing a problem in software goes up exponentially as time goes on. Regular code reviews allow us to find and fix issues earlier in the development life cycle. Fixing them during the internal review process is much cheaper (and less embarassing) than fixing them after the code goes to production.

This does not imply that the Code Review process is the furthest left we can shift our error checking. By implementing pair programming or mob programming, we are likely to find issues even sooner. This also does not mean we should eliminate testing downstream from the code review process. No step is perfect and errors can always slip through. Still, a good code review process can be an important part of increasing software quality.

Code Review Process

The process of a code review is simple: The author checks code changes into a repository and announces that it is available for review. A reviewer looks at and runs the code and provides feedback. This feedback can be either written or verbal. Most Application Lifecycle Management systems (e.g., GitHub and Azure DevOps) support this process through a Pull Request. In these systems, the code of a Pull Request does not get merged into the main branch until one or more reviewers have approved it. We can configure these systems, setting specific rules about who must approve code before it is merged.

This process works best when everyone involved believes in it and considers code review time to be well-spent. Support from upper management can help encourage the process; but, public buy-in from the team's most respected developers is an even more effective way to get others to buy into this process.

Making It Better

A Code Review can sometimes be a painful process. Software developers often feel a personal attachment to their code and may feel that criticism of their code is a criticism of themselves. Reviewing code takes time and attention and human beings do not have an unlimited supply of either.

The good news is that it does not have to be that way. There are things we can do to make a code review less painful.

There are two parties in a code review: The Author and the Reviewer. I described the code review process above and listed reasons why it is worth the time and effort to do them. Let’s now discuss things that each party can do to improve the code review process.

How Can a Code Reviewer Improve the Code Review Process?


Do Not Wait to Review

If you can begin reviewing a Pull Request immediately, it saves a lot of time and trouble. The sooner you begin, the sooner you can return any feedback and the better the chance that the code will still be fresh in the mind of the author.

In addition, it is likely the author will begin making other changes to the system after submitting a Pull Request. It is usually easier to merge code if fewer changes exist between the two branches, so a quicker turnaround makes code merges easier.

Beginning your review also shows respect for the process and for the code written by the author, improving your relationships.

Work High Level to Low Level

Always begin your evaluation by looking at high-level decisions in the code, such as class structures and method interfaces. Often, changes made at this level will address issues at a lower level, such as the implementation of the business logic.

Use the Computer where you can

You can use a computer to automate many of the mundane tasks of a code review. The computer can compile the code and run all the unit tests. A linter can validate that the style is correct.

Create a Style Guide

Speaking of style, many organizations adopt a set of style guidelines to which they expect all code to adhere. The guidelines chosen are less important than the fact that everyone is using the same style, so that code is consistent and easy to read.

You can create your own guide from scratch or start with an existing one, such as Google's style guide (google.github.io/styleguide)

Arguing over code style is usually a waste of time. Simply point to the style guide to settle any arguments. If the style guide does not cover a case, modify it to include this. This guide can evolve over time, as the team writes code and discovers areas of ambiguity in the guide.

Include Code Examples

A code example is a nice way to communicate a change to an author. This is particularly true if you suggest a pattern with which the author may be unfamiliar.

Do Not Make It Personal

Programmers often take great pride in their work and sometimes internalize critical feedback, as if criticism of the code equates to criticism of the coder.

You cannot control the way the code author thinks, but you can minimize this feeling of attack by avoiding anything personal in your feedback. If you find yourself writing "You" in your comments (for example, "You need to initialize this variable"), consider replacing it with "We".

You can soften your feedback by using a passive voice (this is one of the few times I will recommend the passive voice in written communication). For example, instead of saying "You should split this into two functions", say "This function should be split into two functions".

Another way to soften feedback is to phrase it as a request, rather than a command. For example, "Can we make this function private?" is less confrontational than "Make this function private" and is less likely to trigger a defensive reaction.

Finally, avoid advice based solely on your opinion. Instead, cite a software principal to support a suggested change. "I think this should be split into two classes" is less compelling than "This class does two different things, which violates the Single Responsibility Principle. Consider splitting it into two classes".

Prefix review comments with labels

I recently read about a team that adds a prefix to many of their feedback comments. Here are some suggestions.

Issue: A problem with the code that needs to be addressed
Suggestion: A possible way of addressing an issue
Question: A request for clarification. Useful if the reviewer is unsure if something is an issue
Nit: A trivial change
Thought: An idea for improving the code that the author may or may not choose to implement
Praise: Point out something good in the code

You can read more about this idea here.

Praise Sincerely

I love the idea of adding praise in the reviewer's feedback. So often, we think of feedback as only negative, but it is also a chance to call out something positive.

Goal: Improve Code

Some reviewers insist that every issue needs to be fixed before they approve a PR. This can lead to very long review cycles and bitter feelings between the author and reviewer.

There are a few ways to avoid these long review cycles.

One way is to set a goal to improve the code, rather than to make it perfect. Blogger Michael Lynch uses the phrase "Aim to bring the code up a letter grade or two" to describe this. If we receive code that is a "C" grade, and we can bump it up to a "B", that is a win, even if there are still issues to be addressed. Chances are the code author will learn something from the feedback and their next set of code will start closer to a "B", making it easier to move it to an "A" in a review. Of course, we want to prioritize the most critical issues to fix.

If only trivial fixes remain in a PR, it is OK to approve it.

Finally, if a PR contains a large number of changes, suggest splitting it into multiple PRs to make it more manageable. Suggesting where to split the code is very helpful in this case.

Avoid Repeating Feedback

It is not uncommon for the same issue to appear multiple times in the same PR. Do not waste time re-typing the same comment. A line like "See naming convention comment above" will suffice.

Consider the Scope of the Review

As a general rule, you should only review and provide feedback on those lines that the author changed. This helps to limit the review cycle.

There are some exceptions to this rule, in my opinion:

  • If a change affected a line that did not itself change (for example, the code in a method was modified and the name of the method no longer reflects what it does)
  • If a change is trivial and easy to fix (for example, you spot a spelling error in a line of code that did not change)

Stalemates

Sometimes, a Code Review process gets stuck as the Author and Reviewer argue over whether something needs to change. This can prevent the review from moving forward; but, it can also result in tension between the two parties, which may hinder future reviews.

When you recognize a stalemate occurs, the first step should be to discuss it verbally. Code Review communication is usually written, which can sometimes be misinterpreted. Walk over to the other party's desk or schedule a virtual call to talk about the conflict and how to resolve it.

For disagreements on fundamental design decisions, you may need to schedule a formal design review. This was likely something that was missed during the original design.

Consider whether your opinion is worth blocking a PR. Software development contains very little dogma and often there are multiple correct answers to the same problem. If the other party's solution will work, consider conceding your point.

As a last resort, you may need to escalate the conflict to an architect or manager and allow them to resolve it.

The last thing you want is for a Code Review to hold up a Pull Request merge indefinitely.

How Can a Code Author Improve the Code Review Process?

Test Your Code

This should go without saying, but you should always verify that the code works before submitting it for review.

Spend time validating that your code works. Manually run your code. Write automated tests and run them as you make changes to your code. Vary the inputs and consider edge cases and unexpected user actions as you do. A small change can break things unexpectedly and automated tests are great insurance against this.

Become a Reviewer

Code Reviews take time and effort, and you should respect the time and effort that the Reviewer commits to the process. A final scan of your code often reveals obvious problems, such as spelling errors and redundant or unnecessary code. It can even reveal more fundamental problems, such as a bug you missed on the first pass. Taking a few minutes to review your code reduces the time and effort required by the Reviewer. As a bonus, your code will look better to the Reviewer, making them more efficient and encouraging a better relationship.

Communicate clearly

A Pull Request consists of a set of changes to the code. It should always contain a description of those changes. If you write a clear description of those changes, the Reviewer will know what to look for and their feedback will be more useful.

When responding to feedback, always communicate what you changed in response to that feedback. This will give the Reviewer an idea of what to look for and make it easier for them to read and evaluate your changes.

If anything is unclear in the feedback, solicit more information - either through comments in the PR, via email, or with a verbal conversation. Written communication is sometimes flawed and requires clarification.

Use the computer

As mentioned earlier, you should test your code before submitting it to a reviewer. Much of this can be done automatically using the computer: Compile the code; run all automated unit tests; and use a linter to check the code style against a set of pre-established rules.

Answer questions with code

The clearer you make your code, the easier it will be to understand. Code comments can be useful, but you must take care to always keep them up to date with the code. The best way to clarify your code is to make it self-documenting. Well-written, self-documenting code will almost always communicate its intent better than code comments.

Spend some time refactoring your code to make it more readable. Here are some examples:

If you have lines of code that perform a property tax calculation, consider putting this into a method with a name like "CalculatePropertyTax". Calling this method is probably much clearer than trying to understand what the calculations do.

If you have a number or code with a specific meaning (for example, a tax rate or department id), assign that value to a constant, a variable, or an enum. It is much easier to read and understand this:

var taxDue = revenue * TAX_RATE

than this:

var taxDue = revenue * 0.23

Your goal should be to make the code as readable as possible. Consider questions the Reviewer might have and strive to make the code answer those questions.

Keep it Simple

I have seen too many Pull Requests that make a plethora of changes. It is best to create a Pull Request that only makes one change to the system (although you may choose to implement that change using multiple functions). If you are adding a new feature and fixing a bug, split these into two PRs. If you are changing two distinct parts of the system, split these into two PRs. Large PRs are confusing and overwhelming. The time and effort to review two PRs is almost always less than the time to review one large PR.

Breaking up large changesets can narrow the scope of your change, making each one easier to understand and review.

Sometimes, we create Pull Requests for non-functional changes, such as changing the formatting of our code. These often affect every line in a file. These should always be submitted as their own changeset. If we combine these changes with functional changes, it makes it nearly impossible to determine which lines had a functional change.

Stay Cool

Code reviews can be a source of conflict. Code Authors often feel an ownership of the code they write to the point that they perceive any criticism of their code as a criticism of themselves. Avoid this outlook. Separate yourself from your code and do not take constructive feedback personally. It will be better for your mental health, and it will allow you to look more objectively at how you can improve your code. Respond graciously to the Reviewer's feedback. You both have the same goal: to improve the quality of the codebase. Keeping your cool can be especially difficult when you know the Reviewer is mistaken. Reviewers are human and they are allowed to be wrong sometimes and you should be patient when this happens. Consider that a lack of clarity in your code may be a source of a Reviewer's mistake and strive to address this.

Recognize there are multiple right ways to do almost everything in software development. If you are both correct, it will save time and effort to skip the debate and agree with the Reviewer.

Respond quickly

This is similar to advice to the Code Reviewer. Delaying the time between receiving feedback and responding/working on the feedback slows down the entire process. The sooner you work on changes, the fresher will be the original code in your mind. The sooner you re-submit your changes, the more fresh will be the feedback in the mind of the Reviewer. This can be a challenge if you have begun some other work; but recognize that there are significant benefits to responding quickly to code review feedback.

How Can a Manager Improve the Code Review Process?

Among a manager’s responsibilities are training their employees, delivering a high-quality product, and establishing the team culture.

We have established that code reviews can improve code and product quality. Using tools like GitHub and Azure DevOps, management can establish rules that require pull requests and code reviews before any code is merged with the main branch.

By requiring each code author to sometimes serve as a reviewer, they can disseminate knowledge of the business rules, the code, and the technology throughout the team, avoiding isolated silos of information. I recommend that reviewers rotate whose code they are reviewing. If Joe always reviews Jean’s code, Jean will not get the perspective of others on the team.

Most importantly, they can push for a culture that fosters cooperation and emphasizes that code reviews are not adversarial, but are an opportunity for code authors and reviewers to work toward a common goal. Organizations tend to work best and achieve more when everyone cooperates.

Conclusion

A Code Review is no guarantee of quality software. Careful coding, hiring qualified developers, and automated testing also contribute to the quality of your end product. But a good Code Review process is a good step in making everything better. Code Reviews have become an important part of most of the projects on which I work, yet I remember a time before I even knew such a thing existed.

These days, code reviews are almost ubiquitous on my software projects. They help us address weaknesses among developers and reviewers, enforce compliance with coding standards, and improve the quality of our codebase. They map well to the fast feedback loop emphasized by many agile methodologies.

If we can catch bugs before they go into production, we can save ourselves embarrassment, time, and money. A good code review process helps us achieve that.

There are challenges to a good code review, but these challenges can be addressed with a bit of effort on the part of both the author and the reviewer.


Note: Some of the ideas in this article were drawn from the following articles by Michael Lynch: "How to Make Your Code Reviewer Fall in Love with You" and "How to Do Code Reviews Like a Human". Derivation of these ideas are used under the CC BY 4.0 License.


<< Older Posts | Newer Posts >>