
Episode 572
Whitney Griffith on Azure Blockchain as a Service
Whitney Griffith describes Blockchain, how it is implemented on Azure, and how her team used it to solve a transportation problem.
Episode 572
Whitney Griffith on Azure Blockchain as a Service
Whitney Griffith describes Blockchain, how it is implemented on Azure, and how her team used it to solve a transportation problem.
 Charles Smithson was a member of England's upper class in Victorian England. He was wealthy to the point of being idle rich and poised to inherit a title and fortune from his bachelor uncle. He became engaged to wealthy Ernestina Freeman, who is pretty, but simple and self-centered.
Everyone in the small, seaside town of Lyme Regis believes that Sarah Woodruff is mad. She spends her days, staring at the sea, waiting for the return of the French officer who jilted her years before.
Smithson's future seems set, until he meets the Sarah and takes an interest in her tragic paste.
At first glance, it seems a classic love triangle with a gentleman forced to choose between the lady to whom he is promised and a fallen woman. But Sarah is not what she seems, and everything becomes more complicated.
The reader is given clues about Sarah's motivations, but we never fully understand her actions. On the other hand, Fowles explores Charles in depth - his prejudices and his frustrations and his fears and his flaws. We follow him on his path of self-destruction, and weep for his arrogance of thinking he is benevolent toward Sarah by treating her (sometimes) as a human being.
We are shown other characters, very few of whom are likeable. They display hypocrisy and dishonest and spoiled and are almost universally self-serving.
The story does a good job of establishing the stark contrasts of Victorian society: between the traditional, Charles and the rebellious Sarah; between the upper and lower classes and the often hostile relationships between them; between the gender roles of men and women; and between the perception and reality of Victorian sexual mores.
Fowles has no qualms about injecting himself into the story, reminding the reader that he controls the actions of the fictional characters. He cuts in with long asides about the differences between sexual attitudes in the 19th and 20th century; or the life of Thomas Hardy; or the role of a writer in a novel. It's a risk; but, for the most part, he pulls it off, thanks to his cleverness and excellent prose. This only becomes an issue when he presents multiple possible endings to the story, which struck me as a cop-out.
Despite this weakness, The French Lieutenant's Woman by John Fowles is a very good story that will make you think.
 Possession by A.S. Byatt is not a straightforward tale. It tells of an affair between Victorian-era poets Randolph Ash and Christabel LaMotte.
But the romance is revealed largely through letters and journals and essays and poems written by Ash and LaMotte and those around them; and it is slowly uncovered by present-day scholars Roland Michell and Maud Bailey - whose own romance is growing.
Near the beginning of the novel, I questioned the frequent context switching between the present and the mid-19th century. I wondered why we should bother with the present-day characters. But, as the book progressed, the two stories became more intertwined. I began to enjoy the historical discoveries, as Roland and Maud made them; I appreciated the ethical dilemmas Byatt presented of learning about the past, while respecting the privacy of the dead; and I was intrigued by the academic rivalries, as others heard of these discoveries and raced to uncover details more quickly.
Mostly through Roland and Maude's eyes, we watch the growth of the relationship between Randolph and Christabel and the effects of those relationships. Ash has a wife and LaMotte has a lesbian partner and both learn of the relationship and are profoundly altered by it.
I enjoyed Byatt's poetry, which she attributed to her fictional authors/lovers. Byatt does a good job of giving different voices to the writings of each character, including the styles of their poetry.
I really liked the ending, which revealed much about the lives of Randolph and Christabel, much of which was never discovered by Roland, Maud, and their contemporaries.
Possession is a good book for fans of poetry, detective stories, and historical romances.
From its earliest days, Microsoft Cognitive Services has had the ability to convert pictures of text into text - process known as Optical Character Recognition. I wrote about using this service here and here.
Recently, Microsoft released a new service to perform OCR. Unlike the previous service, which only requires a single web service call, this service requires two calls: one to pass an image and start the text recognition process; and other to ask the status of that text recognition process and return the transcribed text.
To get started, you will need to create a Computer Vision key, as described here.
Creating this service gives you a URI endpoint to call as a web service, and an API key, which must be passed in the header of web service calls.
The first call is to the Recognize Text API. To call this API, send an HTTP POST to the following URL:
https://lllll.api.cognitive.microsoft.com/vision/v2.0/recognizeText?mode=mmmmm
where:
lllll is the location selected when you created the Computer Vision Cognitive Service in Azure; and
mmmmm is "Printed" if the image contains printed text, as from a computer or typewriter; or "Handwritten" if the image contains a picture of handwritten text.
The header of an HTTP request can include name-value pairs. In this request, include the following name-value pairs:
| Name | Value |
|---|---|
| Ocp-Apim-Subscription-Key | The Computer Vision API key (from the Cognitive Service created above) |
| Content-Type | "application/json", if you plan to pass a URL pointing to an image on the public web; "application/octet-stream", if you are passing the actual image in the request body. Details about the request body are described below. |
You must pass the image or the URL of the image in the request body. What you pass must be consistent with the "Content-Type" value passed in the header.
If you set the Content-Type header value to "application/json", pass the following JSON in the request body:
{"url":"http://xxxx.com/xxx.xxx"}
where http://xxxx.com/xxx.xxx is the URL of the image you want to analyze. This image must be accessible to Cognitive Service (e.g., it cannot be behind a firewall or password-protected).
If you set the Content-Type header value to "application/octet-stream", pass the binary image in the request body.
You will receive an HTTP response to your POST. If you receive a response code of "202" ("Accepted"), this is an indication that the POST was successful, and the service is analyzing the image. An "Accepted" response will include the "Operation-Location in its header. The value of this header will contain a URL that you can use to query if the service has finished analyzing the image. The URL will look like the following:
https://lllll.api.cognitiveservices.microsoft.com/vision/v2.0/textOperations/gggggggg-gggg-gggg-gggg-gggggggggggg
where
lllll is the location selected when you created the Computer Vision Cognitive Service in Azure; and
gggggggg-gggg-gggg-gggg-gggggggggggg is a GUID that uniquely identifies the analysis job.
After you call the Recognize Text service, you can call the Get Recognize Text Operation Result service to determine if the OCR operation is complete.
To call this service, send an HTTP GET request to the "Operation-Location" URL returned in the request above.
In the header, send the following name-value pair:
| Name | Value |
|---|---|
| Ocp-Apim-Subscription-Key | The Computer Vision API key (from the Cognitive Service created above) |
This is the same value as in the previous request.
An HTTP GET request has no body, so there is nothing to send there.
If the request is successful, you will receive an HTTP "200" ("OK") response code. A successful response does not mean that the image has been analyzed. To know if it has been analyzed, you will need to look at the JSON object returned in the body of the response.
At the root of this JSON object is a property named "status". If the value of this property is "Succeeded", this indicates that the analysis is complete, and the text of the image will also be included in the same JSON object.
Other possible statuses are "NotStarted", "Running" and "Failed".
A successful status will include the recognized text in the JSON document.
At the root of the JSON (the same level as "status") is an object named "recognitionResult". This object contains a child object named "lines".
The "lines" object contains an array of anonymous objects, each of which contains a "boundingBox" object, a "text" object, and a "words" object. Each object in this array represents a line of text.
The "boundingBox" object contains an array of exactly 8 integers, representing the x,y coordinates of the corners an invisible rectangle around the line.
The "text" object contains a string with the full text of the line.
The "words" object contains an array of anonymous objects, each of which contains a "boundingBox" object and a "text" object. Each object in this array represents a single word in this line.
The "boundingBox" object contains an array of exactly 8 integers, representing the x,y coordinates of the corners an invisible rectangle around the word.
The "text" object contains a string with the word.
Below is a sample of a partial result:
{
  "status": "Succeeded",
  "recognitionResult": {
    "lines": [
      {
        "boundingBox": [
          202,
          618,
          2047,
          643,
          2046,
          840,
          200,
          813
        ],
        "text": "The walrus and the carpenter",
         "words": [
          {
            "boundingBox": [
               204,
              627,
              481,
              628,
              481,
              830,
              204,
               829
            ],
            "text": "The"
           },
          {
            "boundingBox": [
              519,
              628,
              1057,
              630,
               1057,
              832,
              518,
               830
            ],
           "text": "walrus"
          },
          ...etc...
In this article, I showed details of the Recognize Text API. In a future article, I will show how to call this service from code within your application.

GCast 56:
Azure Web App Deployment Slots
Deployment slots allow you to test changes to your web application in a production-like environment before deploying to production.
Azure Databricks is a web-based platform built on top of Apache Spark and deployed to Microsoft's Azure cloud platform that provides a web-based interface that makes it simple for users to create and scale clusters of Spark servers and deploy jobs and Notebooks to those clusters. Spark provides a general-purpose compute engine ideal for working with big data, thanks to its built-in parallelization engine.
In the last article in this series, I showed how to create a new Databricks Cluster in a Microsoft Azure Databricks Workspace.
In this article, I will show how to create a notebook and run it on that cluster.
Navigate to the Databricks service, as shown in Fig. 1.
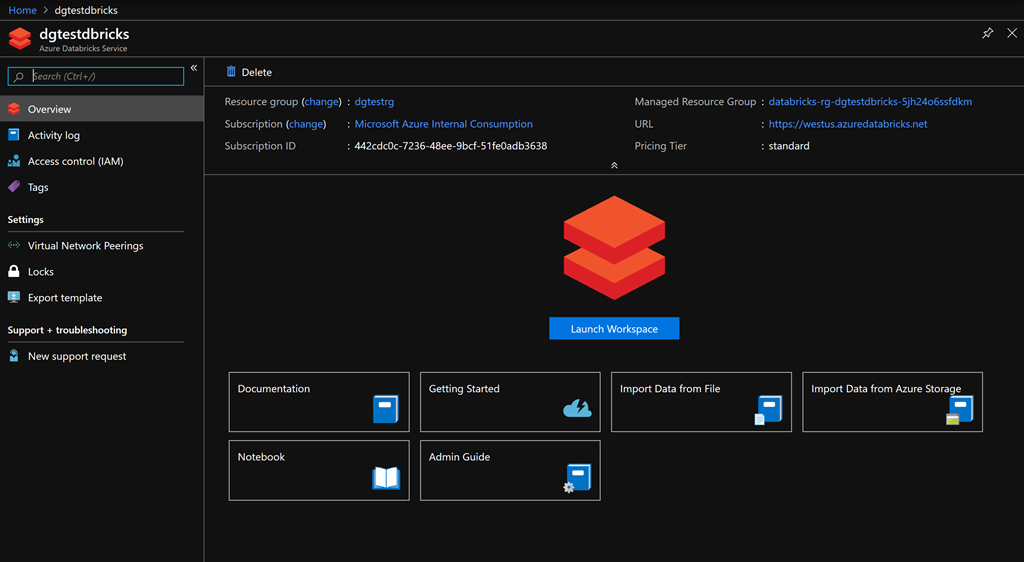
Fig. 1
Click the [Launch Workspace] button (Fig. 2) to open the Azure Databricks page, as shown in Fig. 3.
Fig. 2

Fig. 3
Click the "New Notebook" link under "Common Tasks" to open the "Create Notebook" dialog, as shown in Fig. 4.
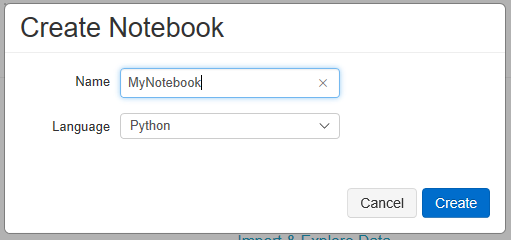
Fig. 4
At the "Name" field, enter a name for your notebook. The name must be unique within this workspace.
At the "Language" dropdown, select the default language for your notebook. Current options are Python, Scala, SQL, and R. Selecting a language does not limit you to only using that language within this notebook. You can override the language in a given cell.
Click the [Create] button to create the new notebook. A blank notebook displays, as shown in Fig. 5.

Fig. 5
Fig. 6 shows a notebook with some simple code added to the first 2 cells.

Fig. 6
You can add, move, or manipulate cells by clicking the cell menu at the top right of an existing cell, as shown in Fig. 7.
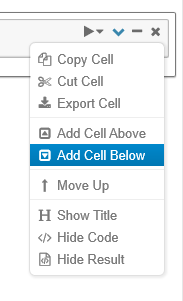
Fig. 7
In order to run your notebook, you will need to attach it to an existing, running cluster. Click the "Attach to" dropdown and select from the clusters in the current workspace, as shown in Fig. 8. See this article for information on how to create a cluster.
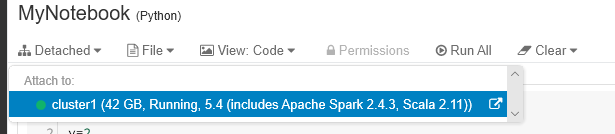
Fig. 8
You can run all the cells in a notebook by clicking the "Run all" button in the toolbar, as shown in Fig. 9.

Fig. 9
Use the "Run" menu in the top right of a cell to run only that cell or the cells above or below it, as shown in Fig. 10.
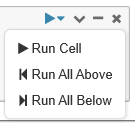
Fig. 10
Fig. 11 shows a notebook after all cells have been run. Note the output displayed below each cell.
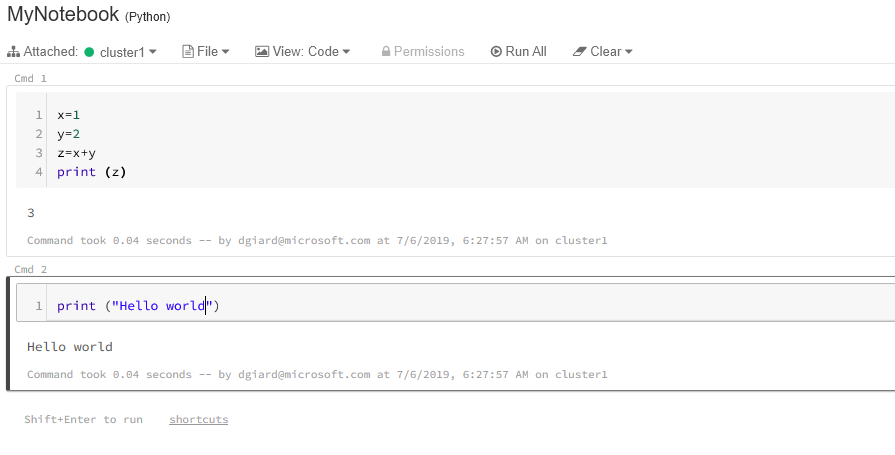
Fig. 11
In this article, I showed how to create, run, and manage a notebook in an Azure Databricks workspace.
Azure Databricks is a web-based platform built on top of Apache Spark and deployed to Microsoft's Azure cloud platform that provides a web-based interface that makes it simple for users to create and scale clusters of Spark servers and deploy jobs and Notebooks to those clusters. Spark provides a general-purpose compute engine ideal for working with big data, thanks to its built-in parallelization engine.
In the last article in this series, I showed how to create a new Databricks service in Microsoft Azure.
A cluster is a set of compute nodes that can work together. All Databricks jobs run in a cluster, so you will need to create one if you want to do anything with your Databricks service.
In this article, I will show how to create a cluster in that service.
Navigate to the Databricks service, as shown in Fig. 1.
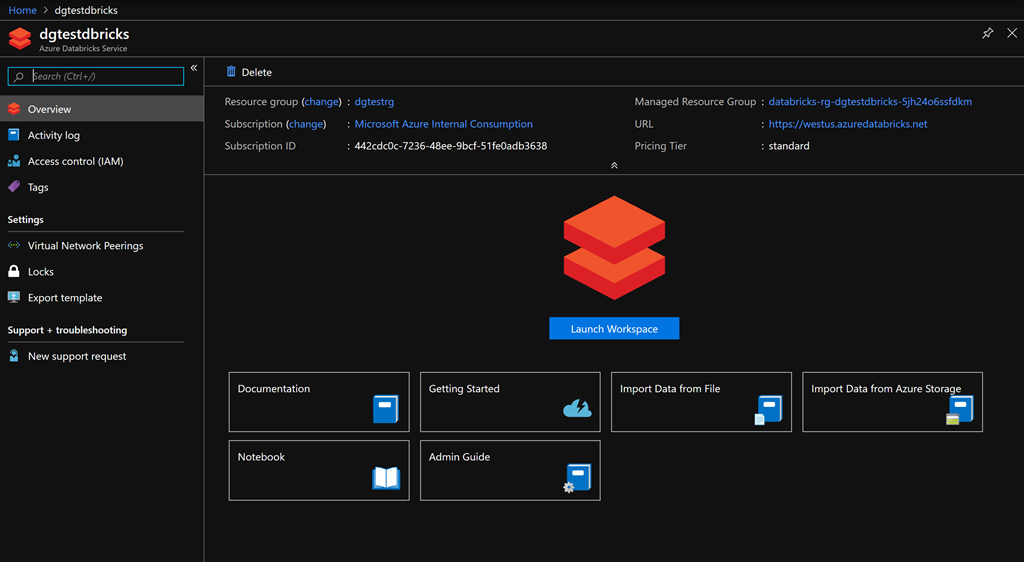
Fig. 1
Click the [Launch Workspace] button (Fig. 2) to open the Azure Databricks page, as shown in Fig. 3.
Fig. 2

Fig. 3
Click the "New Cluster" link to open the "Create Cluster" dialog, as shown in Fig. 4.
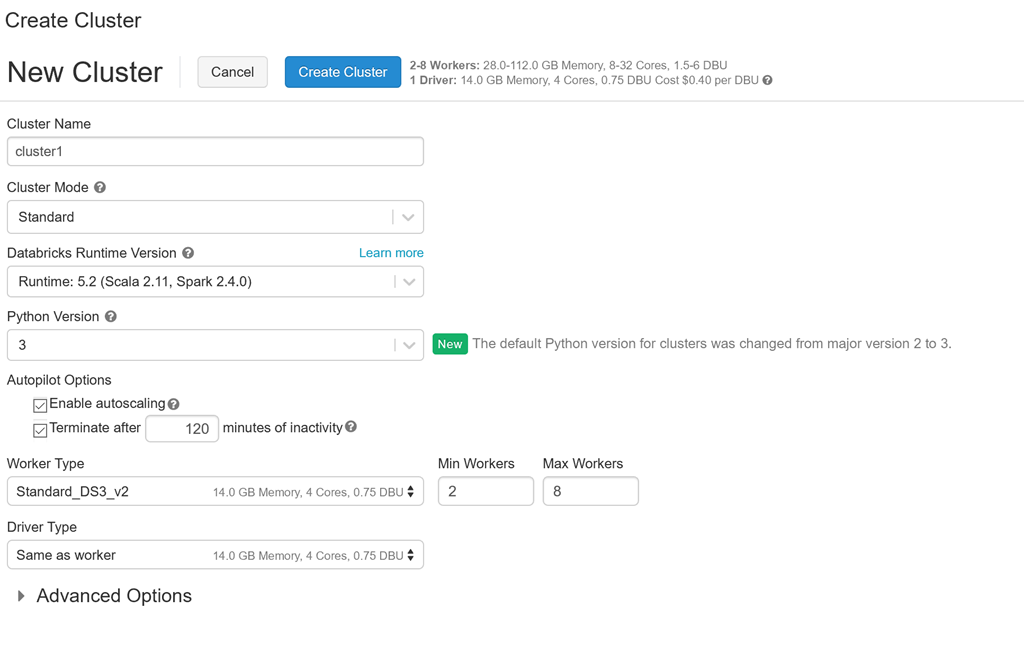
Fig. 4
At the "Cluster Name" field, enter a descriptive name for your cluster.
At the "Cluster Mode" dropdown, select "Standard" or "High Concurrency". The "High Concurrency" option can run multiple jobs concurrently.
At the "Databricks Runtime Version" dropdown, select the runtime version you wish to support on this cluster. I recommend selecting the latest non-beta version.
At the "Python Version" dropdown, select the version of Python you wish to support. New code will likely be written in version 3, but you may be running old notebooks written in version 2.
I recommend checking the "Enable autoscaling" checkbox. This allows the cluster to automatically spin up the number of nodes required for a job, effectively balancing cost and performance.
I recommend checking the "Terminate after ___ minutes" checkbox and including a reasonable amount of time (I usually set this to 60 minutes) of inactivity to shut down your clusters. Running a cluster is an expensive operation, so you will save a lot of money if you shut them down when not in use. Because it takes a long time to spin up a cluster, consider how frequently a new job is required before setting this value too low. You may need to experiment with this value to get it right for your situation.
At the "Worker Type" node, select the size of machines to include in your cluster. If you enabled autoscaling, you can set the minimum and maximum worker nodes as well. If you did not enable autoscaling, you can only set the number of worker nodes. My experience is that more nodes and smaller machines tends to be more cost-effective than fewer nodes and more powerful machines; but you may want to experiment with your jobs to find the optimum setting for your organization.
At the "Driver Type" dropdown, select "Same as worker".
You can expand the "Advanced Options" section to pass specific data to your cluster, but this is usually not necessary.
Click the [Create Cluster] button to create this cluster. It will take a few minutes to create and start a new cluster.
When the cluster is created, you will see it listed, as shown in Fig. 5, with a state of "Running".
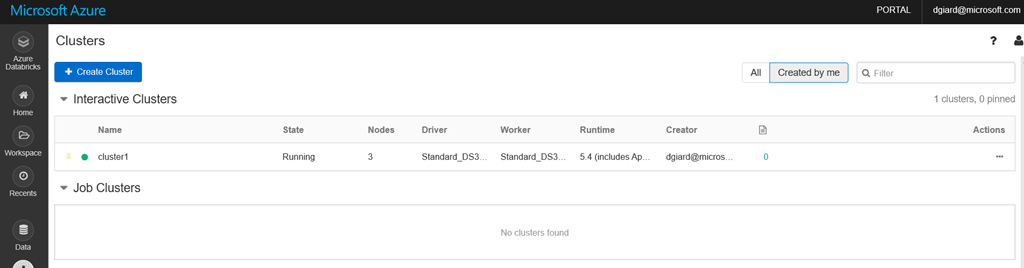
Fig. 5
You are now ready to create jobs and run them on this cluster. I will cover this in a future article.
In this article, you learned how to create a cluster in an existing Azure Databricks workspace.
Episode 571
Jon Galloway on the .NET Foundation
The .NET Foundation recently expanded its board and its goals. Jon Galloway discusses what the Foundation does and what it strives to do.
7/7
Today I am grateful for my first visit to the Chicago Architectural Center yesterday.
7/6
Today I am grateful for my first visit to the National Museum of Mexican Art yesterday.
7/5
Today I am grateful for an afternoon at the Lincoln Park Zoo.
7/4
Today I am grateful I was born in the United States.
7/3
Today I am grateful for trivia night at the Twisted Hippo.
7/2
Today I am grateful for a late Father's Day dinner celebration last night with my son and his girlfriend.
7/1
Today I am grateful for all the parks in the city of Chicago.
6/29
Today I am grateful for a bike ride around downtown St. Joseph yesterday.
6/28
Today I am grateful for a good personal trainer.
6/27
Today I am grateful to attend my first Chicago Sky WNBA game yesterday.
6/26
Today I am grateful to see the Rolling Stones in concert last night - the first time I've seen them in my life.
6/25
Today I am grateful for nice weather.
6/24
Today I am grateful for my first visit to Traverse City in 21 years.
6/23
Today I am grateful to celebrate Kristen and Scott's wedding with them in Traverse City yesterday.
6/22
Today I am grateful for breakfast yesterday with Austin in Amsterdam. We had not seen one another in decades.
6/21
Today I am grateful to spend yesterday at the Van Gogh Museum and the Reijksmuseum in Amsterdam.
6/20
Today I am grateful for a boat ride last night along the Amsterdam canals with Brent.
6/19
Today I am grateful that my son's Achilles tendon surgery went well yesterday.
6/18
Today I am grateful for dinner at a French restaurant in Amsterdam with my international team last night.
6/17
Today I am grateful for dinner with Mike in Amsterdam last night.
6/16
Today I am grateful to visit Amsterdam for the first time.
6/15
Today I am grateful to kick off a new project with a new customer yesterday.
6/14
Today I am grateful for a chiropractor and masseuse across the street from my home.
6/13
Today I am grateful for a graduation celebration dinner last night.
6/12
Today I am grateful to attend Larissa's high school graduation ceremony yesterday.
6/11
Today I am grateful to work on my balcony on a beautiful summer morning.
6/10
Today I am grateful for a walk around North Park Village Nature Center yesterday.
6/9
Today I am grateful for:
-Hearing some great live music with Thad at the Chicago Blues Festival
-A visit to the Printers Row Lit Fest
6/8
Today I am grateful for new furniture on my balcony.
6/7
Today I am grateful that my son's injury is not as severe as we originally thought.
6/6
Today I am grateful that Raffaele and the folks at IT Camp are thinking of me in Transylvania.
6/5
Today I am grateful to receive an email with some kind words yesterday.
6/4
Today I am grateful to discover the exhibits at the Chicago Public Library yesterday.
6/3
Today I am grateful to visit the Fabyan Japanese Gardens and Fox River in Batavia, IL yesterday.
 Housekeeping by Marilynne Robinson is filled with water and filled with tragedy.
It opens with a train crash into a lake, killing hundreds, including the grandfather of Ruthie and Lucille. Later, Lucille and Ruthie's mother commits suicide by driving her car into the same lake. Abandoned years earlier by their father, the girls grow up under the care of their grandmother and aunts until eccentric Aunt Silvie shows up and moves in.
Silvie is a former transient, who sometimes falls asleep on park benches. She is not cut out for motherhood and the girls withdraw into one another, skipping schools and making no friends, other than one another. They skip school and the local authorities begin to question their situation, forcing everyone in this family to make a choice.
Housekeeping is a simple story, built on the strength of the characters. Robinson presents humor and tragedy in an eloquent style that keeps the reader engaged. For such a short novel, we see a full picture of the three main characters. It is worth the time to read.
Azure Databricks is a web-based platform built on top of Apache Spark and deployed to Microsoft's Azure cloud platform.
Databricks provides a web-based interface that makes it simple for users to create and scale clusters of Spark servers and deploy jobs and Notebooks to those clusters. Spark provides a general-purpose compute engine ideal for working with big data, thanks to its built-in parallelization engine.
Apache Spark is open source and Databricks is owned by the Databricks company; but, Microsoft adds value by providing the hardware and fabric on which these tools are deployed, including providing capacity on which to scale and built-in fault tolerance.
To create an Azure Databricks environment, navigate to the Azure Portal, log in, and click the [Create Resource] button (Fig. 1).

Fig. 1
From the menu, select Analytics | Azure Databricks, as shown in Fig. 2.
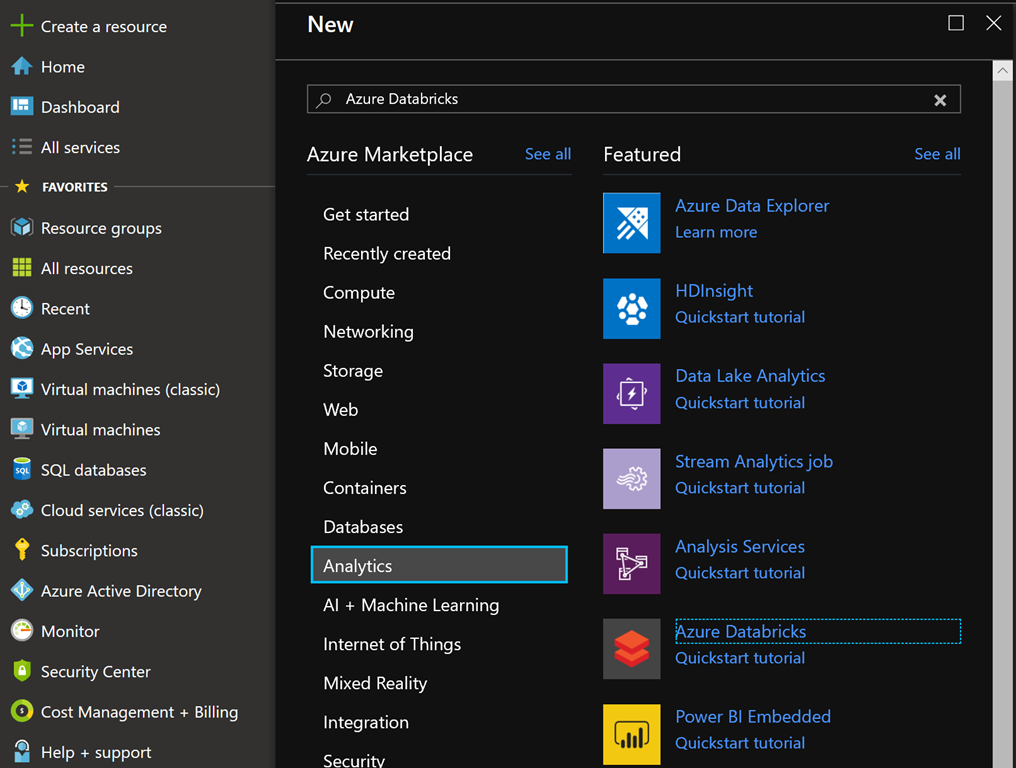
Fig. 2
The "Azure Databricks service" blade displays, as shown in Fig. 3.
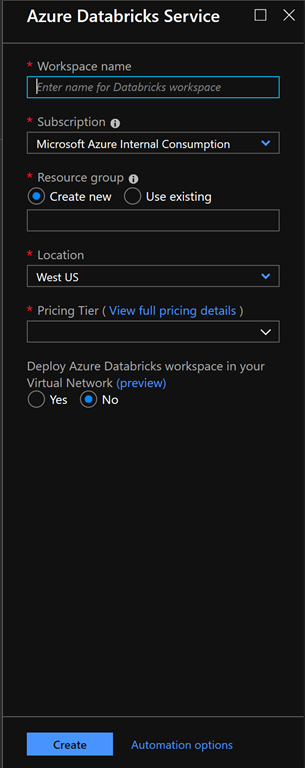
Fig. 3
At the "Workspace name" field, enter a unique name for the Databricks workspace you will create.
At the "Subscription" field, select the subscription associated with this workspace. Most of you will have only one subscription.
At the "Resource group" field, click the "Use existing" radio button and select an existing Resource Group from the dropdown below; or click the "Create new" button and enter the name and region of a new Resource Group when prompted.
At the "Location" field, select the location in which to store your workspace. Considerations include the location of the data on which you will be working and the location of developers and users who will access this workspace.
At the "Pricing Tier" dropdown, select the desired pricing tier. The Pricing Tier options are shown in Fig. 4.

Fig. 4
If you wish to deploy this workspace to a particular virtual network, select "Yes" radio button at this question.
When completed, the blade should look similar to Fig. 5.
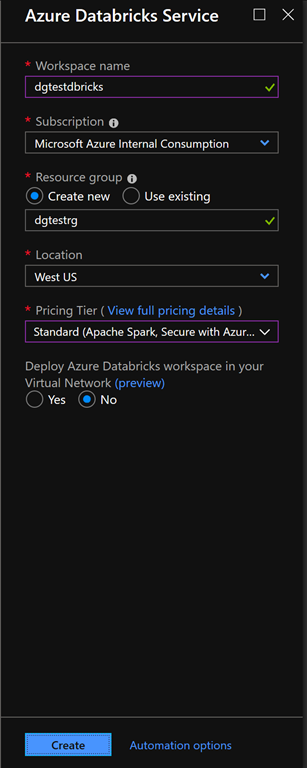
Fig. 5
Click the [Create] button to create the new Databricks service. This may take a few minutes.
Navigate to the Databricks service, as shown in Fig. 6.
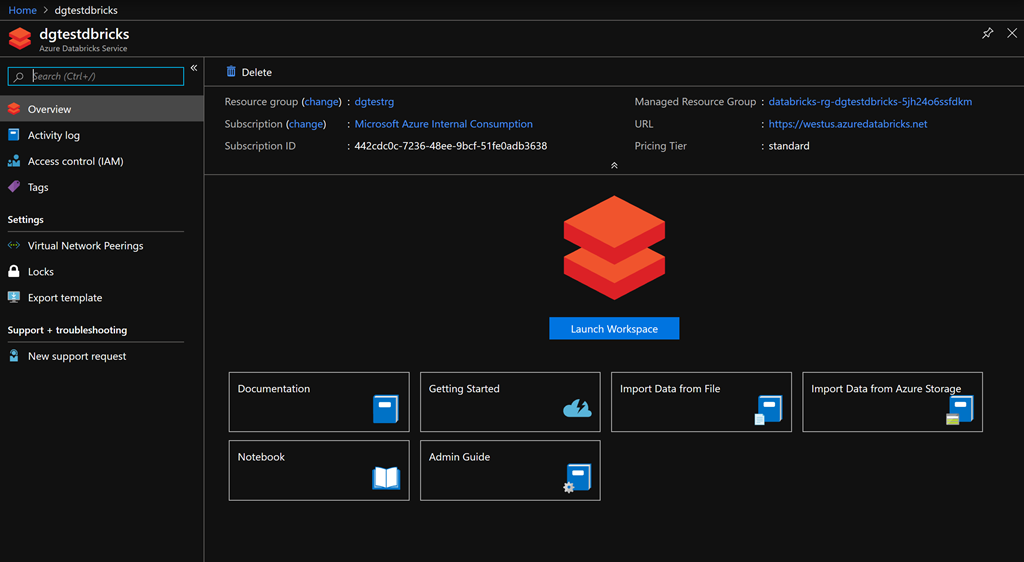
Fig. 6
Click the [Launch Workspace] button (Fig. 7) to open the Azure Databricks page, as shown in Fig. 8.

Fig. 7
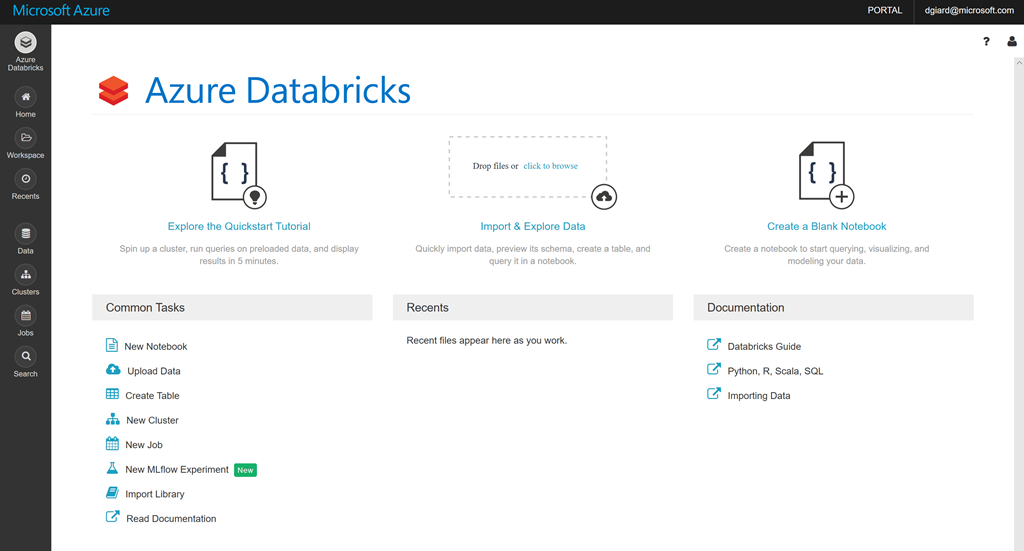
Fig. 8
In this article, I showed you how to create a new Azure Databricks service. In future articles, I will show how to create clusters, notebooks, and otherwise make use of your Databricks service.
GCast 55:
GitHub Deployment to an Azure Web App
Learn how to set up automated deployment from a GitHub repository to an Azure Web App
Source control is an important part of software development - from collaborating with other developers to enabling continuous integration and continuous deployment to providing the ability to roll back changes.
Azure Data Factory (ADF) provides the ability to integrate with source control systems GitHub or Azure DevOps.
I will walk you through doing this, using GitHub.
Before you get started, you must have the following:
A GitHub account (Free at https://github.com)
A GitHub repository created in your account, with at least one file in it. You can easily add a "readme.md" file to a repository from within the GitHub portal.
Create an ADF service, as described in this article.
Open the "Author & Monitor" page (Fig. 1) and click the "Set up Code Repository" button (Fig. 2)
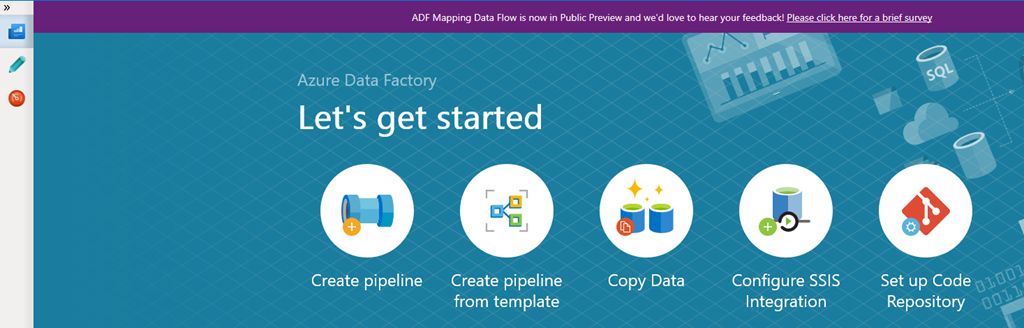
Fig. 1
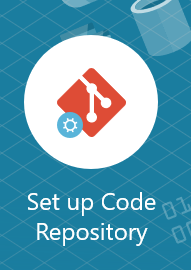
Fig. 2
The "Repository Settings" blade displays, as shown in Fig. 3.

Fig. 3
At the "Repository Type", dropdown, select the type of source control you are using. The current options are "Azure DevOps Git" and "GitHub". For this demo, I have selected "GitHub".
When you select a Repository type, the rest of the dialog expands with prompts relevant to that type. Fig. 4 shows the prompts when you select "GitHub".
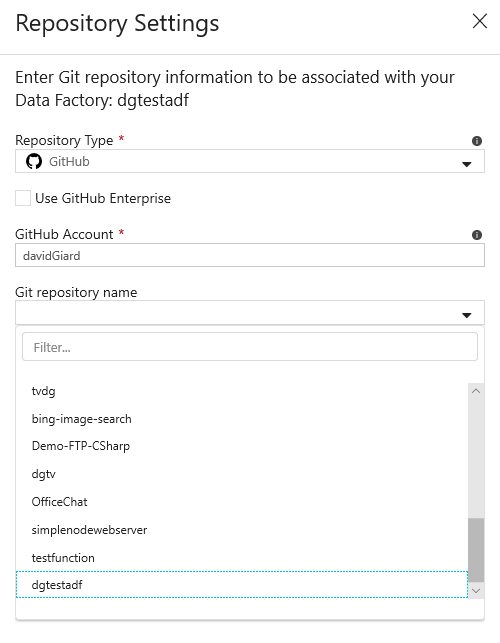
Fig. 4
I don't have a GitHub Enterprise account, so I left this checkbox unchecked.
At the "GitHub Account" field, enter the name of your GitHub account. You don't need the full URL - just the name. For example, my GitHub account name is "davidgiard", which you can find online at https://github.com/davidgiard; so, I entered "davidgiard" into the "GitHub Account" field.
The first time you enter this account, you may be prompted to sign in and to authorize Azure to access your GitHub account.
Once you enter a valid GitHub account, the "Git repository name" dropdown is populated with a list of your repositories. Select the repository you created to hold your ADF assets.
After you select a repository, you are prompted for more specific information, as shown in Fig. 5

Fig. 5
At the "Collaboration branch", select "master". If you are working in a team environment or with multiple releases, it might make sense to check into a different branch in order control when changes are merged. To do this, you will need to create a new branch in GitHub.
At the "Root folder", select a folder of the repository in which to store your ADF assets. I typically leave this at "/" to store everything in the root folder; but, if you are storing multiple ADF services in a single repository, it might make sense to organize them into separate folders.
Check the "Import existing Data Factory resources to repository" checkbox. This causes any current assets in this ADF asset to be added to the repository as soon as you save. If you have not yet created any pipelines, this setting is irrelevant.
At the "Branch to import resources into" radio buttons, select "Use Collaboration".
Click the [Save] button to save your changes and push any current assets into the GitHub repository.
Within seconds, any pipelines, linked services, or datasets in this ADF service will be pushed into GitHub. You can refresh the repository, as shown in Fig. 6.

Fig. 6
Fig. 7 shows a pipeline asset. Notice that it is saved as JSON, which can easily be deployed to another server.
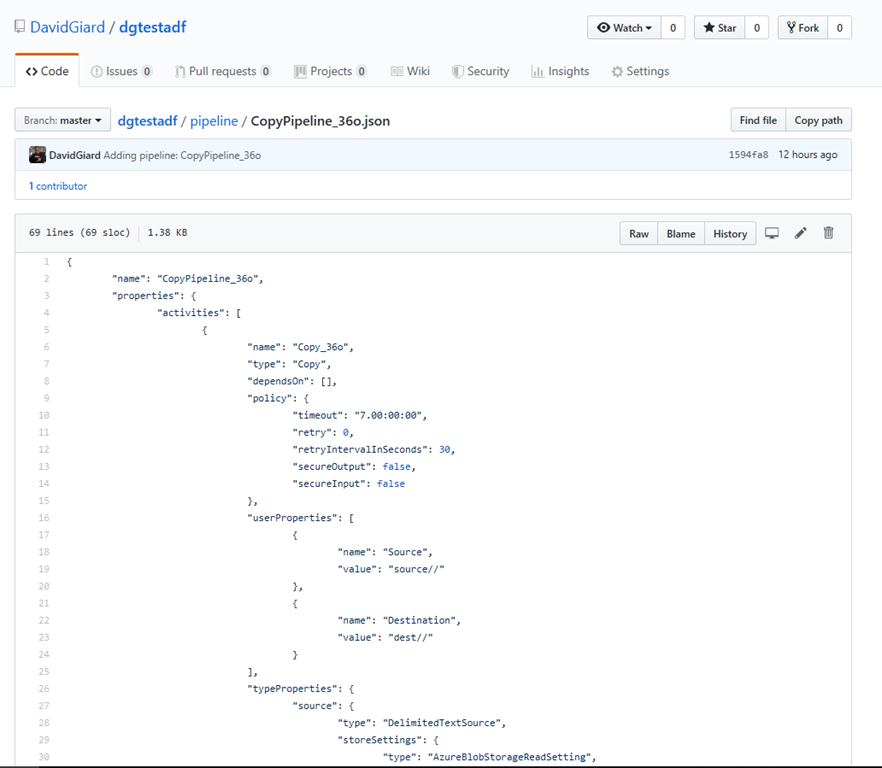
Fig. 7
In this article, you learned how to connect your ADF service to a GitHub repository, storing and versioning all ADF assets in source control.
GitHub provides a good way to create and manage source code repository.
But, how do you delete a repository when you no longer need it? I found this to be non-intuitive when I needed to delete one.
Here are the steps.
Log into GitHub and open your repository, as shown in Fig. 1.
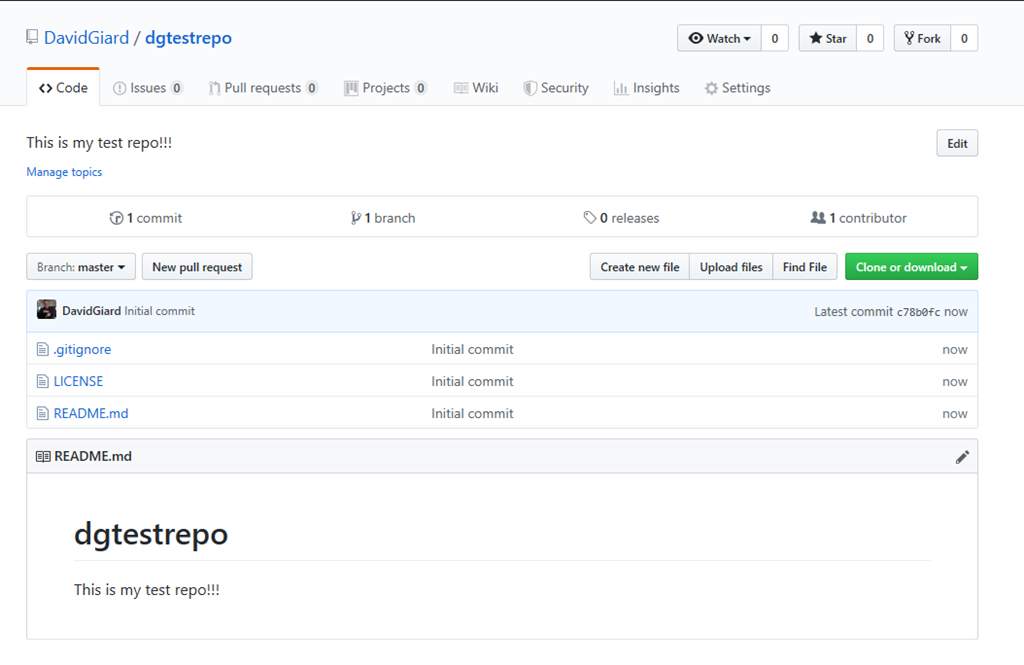
Fig. 1
Click the [Settings] tab (Fig. 2) near the top of the page.

Fig. 2
The "Settings" page displays, as shown in Fig. 3
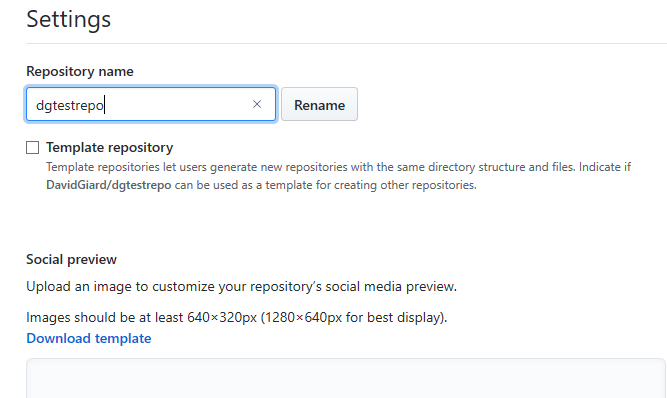
Fig. 3
Scroll to the "Danger Zone" section at the bottom of the "Settings" page, as shown in Fig. 4.
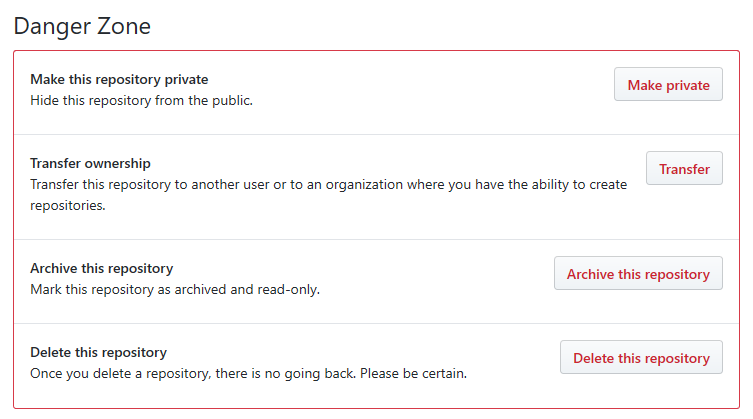
Fig. 4
Click the [Delete this repository] button.
A confirmation popup (Fig. 5) displays, warning you that this action cannot be undone (which is why it is in the Danger Zone).
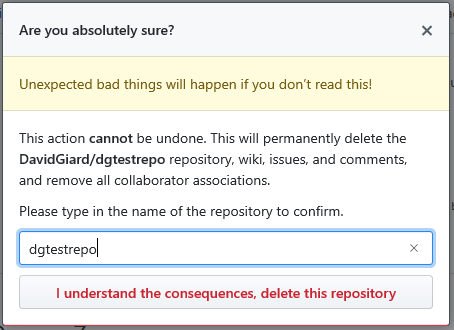
Fig. 5
If you are sure you want to delete this repository, type the repository name in the textbox and click the [I understand the consequences, delete this repository] button.
If all goes well, a confirmation message displays indicating that your repository was successfully deleted, as shown in Fig. 6.

Fig. 6
Congratulations! Your repository is no more! It is an ex-repository!
Episode 570
Laurent Bugnion on Migrating Data to Azure
Laurent Bugnion describes how he migrated from on-premise MongoDB and SQL Server databases to CosmosDB and Azure SQL Database running in Microsoft Azure, using both native tools and the Database migration service.
 From a distance, you would swear he was half his 75 years. You would never guess he underwent heart surgery two months ago. Only the cracks in his face revealed Mick Jagger's age. Not his body, which gyrated and strutted and danced for 2 hours as the legendary Rolling Stones performed before an overflowing Soldier Field in Chicago Tuesday night.
Most viewers saw him from a distance in the cavernous stadium. But the energy was high, and the audience sang and danced along with the band. Mick, Keith Richards, Ron Wood, and Charlie Watts have been recording and touring together for decades. People may think of them as the new member's, but Darryl Jones (of south Chicago), who joined the band when bassist Bill Wyman retired in 1993; and Chuck Leavell, former Allman Brothers keyboardist, who has been with the band since 1982 also have a tenure longer than most bands exist. Yet, they are newbies when compared with thier septuagenarian teammates.
This was my first time seeing the Stones and it may be their last visit to Chicago. Now in their 50th year, this year's "No Filter" tour will take them to 13 cities in the U.S. And they chose to open in Chicago, after Jagger's illness forced them to reshuffle the tour schedule.
To the delight of the crowd, they heard many references to Chicago. Mick noted the band had played the city nearly 40 times. And he introduced the new Chicago mayor and governor, who were in attendance, noting that Governor Pritzker had signed legislation that day legalizing cannabis in January. "Some of you may have jumped the gun," he quipped.
Of course, the Rolling Stones drew heavily from their catalog of hit songs - from opening with "Jumpin' Jack Flash" and "It's Only Rock 'n' Roll" to their encores: "Gimme Shelter" and "Satisfaction". But they included a few deeper album tracks, like "Bitch" and "Slipping Away".
It was mostly an evening of high energy rock and roll and blues; but a highlight of the night was when Mick, Keith, Ron, and Charlie brought their instruments (including a small drum kit) to a platform that extended 30 yards out into the audience to play two acoustic numbers: "Play with Fire" and "Sweet Virginia".
When the evening ended, it felt like they had given all they had and all we needed.
After 50 years, the band knew every note by heart, but still brought energy and made us feel they were having a good time after all this time.
.jpg "Amsterdam (32)") Last month, I visited Copenhagen, Denmark for the first time and thinking that I'd never seen a city as bicycle-friendly.
Last month, I visited Copenhagen, Denmark for the first time and thinking that I'd never seen a city as bicycle-friendly.
But Amsterdam has Copenhagen beat by far in this regard. During morning rush hour, bicycle commuters easily outnumber automobiles; and I was told that Amsterdam has more bicycles than people.
I was mostly on foot, but I kept my head on a swivel as I walked around town, looking one way for cars and in the other direction for bicycles each time I ventured across the street.
It was my first visit to Amsterdam, and I came to work at an OpenHack - workshop designed to teach a specific technology via problem-solving and hands-on experience. The OpenHack was a great success for everyone. Nearly all the feedback we received was positive and people seemed to appreciate my coaching and enjoyed a presentation I delivered on Azure Data Factory. In addition, I led two "Envisioning Sessions" - an exploration of a project a customer is considering that involves use of cloud technology.
.jpg "Amsterdam (17)") I arrived Sunday and spent most of the day resting before meeting up with Mike Amundsen, an old friend from Cincinnati, who happened to be in Amsterdam to speak at the GOTO conference.
I arrived Sunday and spent most of the day resting before meeting up with Mike Amundsen, an old friend from Cincinnati, who happened to be in Amsterdam to speak at the GOTO conference.
The next two days consisted of hard work during the day, followed by dinners with my teammates in the evening. I made up for the rich food by walking around miles the city.
When the OpenHack wrapped up on Day 3, I headed over to the museum area and spent about an hour exploring the Stedelijk Museum of Modern Art, before meeting Brent and David at an Indonesian restaurant. The Indonesian food was amazing, consisting of samples of dozens of different dishes.
After dinner, Brent and I took a boat ride along the canals. It featured a pre-recorded guided tour of the city. Because the canals cover almost all of Amsterdam, we got to see nearly all the city in this way.
.jpg "Amsterdam (39)") Friday I had to myself, so I bought tickets to 2 museums: The Van Gogh Museum, which features the works of the famous Dutch painter, along with those who influenced him; and the Rijksmuseum, which primarily features works of classic European artists from the Middle Ages to the present. It has a particularly impressive Rembrandt collection.
Friday I had to myself, so I bought tickets to 2 museums: The Van Gogh Museum, which features the works of the famous Dutch painter, along with those who influenced him; and the Rijksmuseum, which primarily features works of classic European artists from the Middle Ages to the present. It has a particularly impressive Rembrandt collection.
Friday morning, I had a special treat as I learned that Austin Haeberle - a friend I grew up with - was arriving in Amsterdam the same morning I was flying home. We had not seen each other in 30 years, so we met at the airport for breakfast and picked up where we left off.
If I had more time and energy, I could have spent days just exploring museums. I did not see the house where Anne Frank famously hid from the Nazis and wrote in her diary, nor the National Maritime Museum. I also did not get a chance to view Amsterdam's (in)famous Red-Light district. When I return, I will try to visit these places, as well as the rest of Amsterdam, which is a small enough country that one could drive across it in a couple hours.
The point is that I would love to return.
.jpg "Amsterdam (2)")
Azure Data Factory (ADF) is an example of an Extract, Transform, and Load (ETL) tool, meaning that it is designed to extract data from a source system, optionally transform its format, and load it into a different destination system.
The source and destination data can reside in different locations, in different data stores, and can support different data structures.
For example, you can extract data from an Azure SQL database and load it into an Azure Blob storage container.
To create a new Azure Data Factory, log into the Azure Portal, click the [Create a resource] button (Fig. 1) and select Integration | Data Factory from the menu, as shown in Fig. 2.
Fig. 1
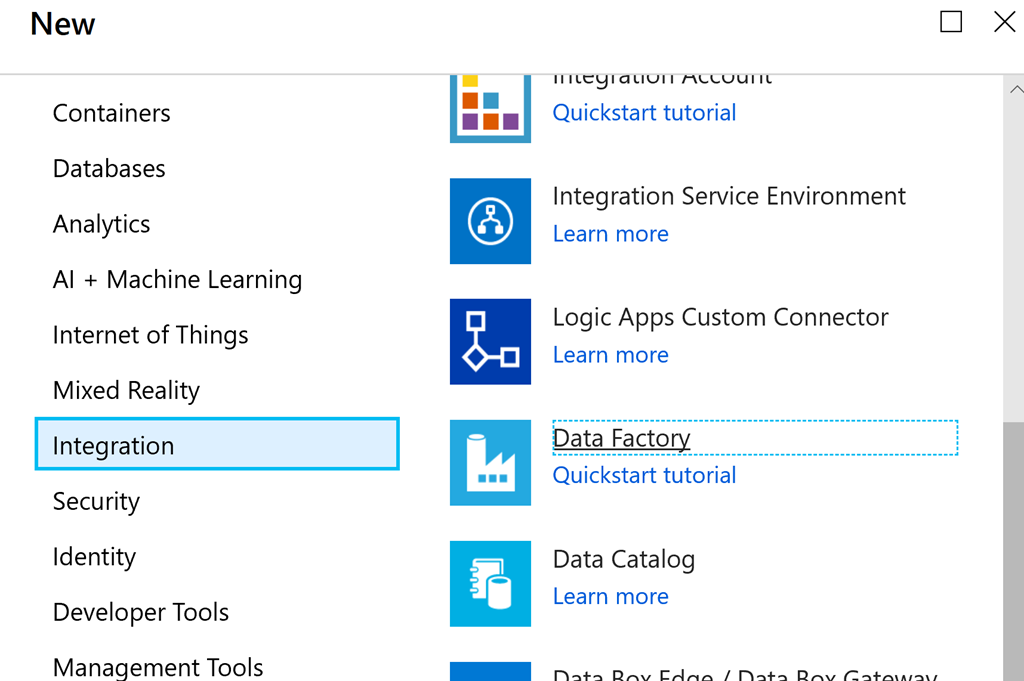
Fig. 2
The "New data factory" blade displays, as shown in Fig. 3.
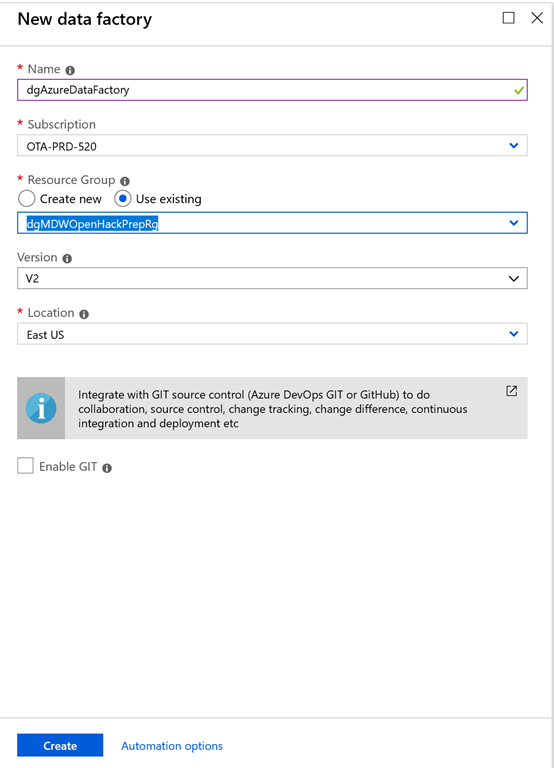
Fig. 3
At the "Name" field, enter a unique name for this Data Factory.
At the Subscription dropdown, select the subscription with which you want to associate this Data Factory. Most of you will only have one subscription, making this an easy choice.
At the "Resource Group" field, select an existing Resource Group or create a new Resource Group which will contain your Data Factory.
At the "Version" dropdown, select "V2".
At the "Location" dropdown, select the Azure region in which you want your Data Factory to reside. Consider the location of the data with which it will interact and try to keep the Data Factory close to this data, in order to reduce latency.
Check the "Enable GIT" checkbox, if you want to integrate your ETL code with a source control system.
After the Data Factory is created, you can search for it by name or within the Resource Group containing it. Fig. 4 shows the "Overview" blade of a Data Factory.
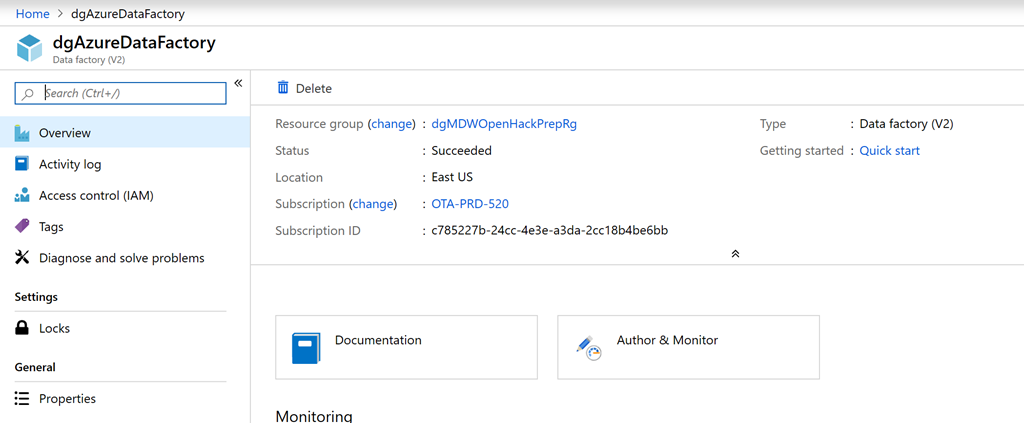
Fig. 4
To begin using the Data Factory, click the [Author & Monitor] button in the middle of the blade.
The "Azure Data Factory Getting Started" page displays in a new browser tab, as shown in Fig. 5.
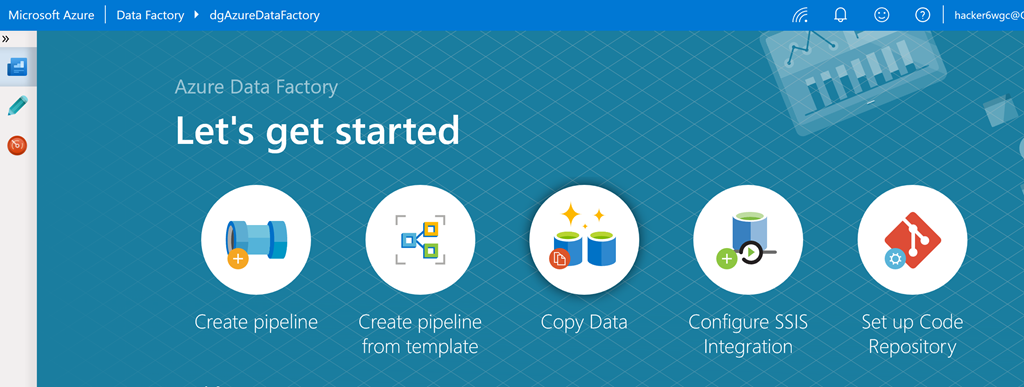
Fig. 5
Click the [Copy Data] button (Fig. 6) to display, the "Copy Data" wizard, as shown in Fig. 7.
Fig. 6
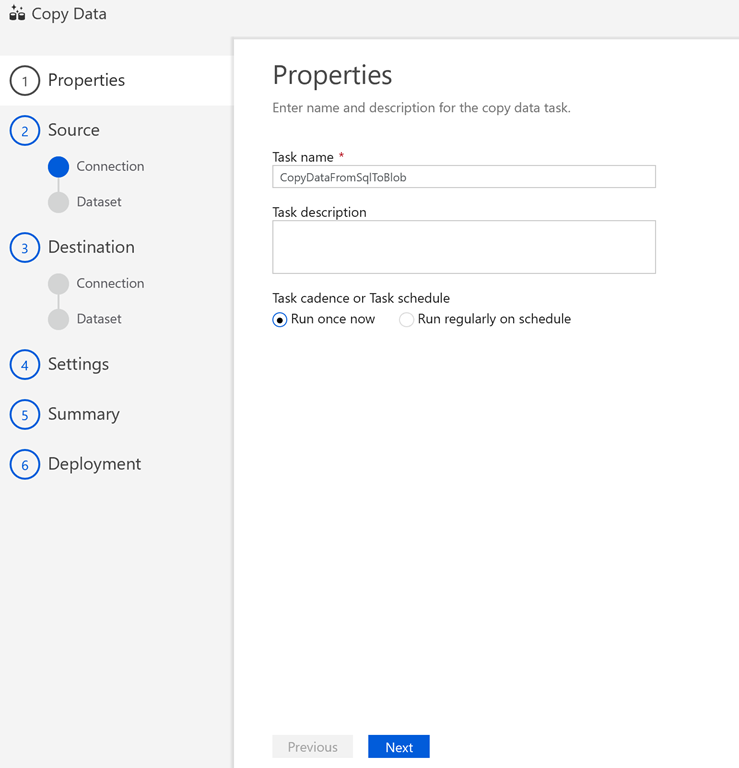
Fig. 7
This wizard steps you through the process of creating a Pipeline and its associated artifacts. A Pipeline performs an ETL on a single source and destination and may be run on demand or on a schedule.
At the "Task name" field, enter a descriptive name to identify this pipeline later.
Optionally, you can add a description to your task.
You have the option to run the task on a regular or semi-regular schedule (Fig. 8); but you can set this later, so I prefer to select "Run once now" until I know it is working properly.
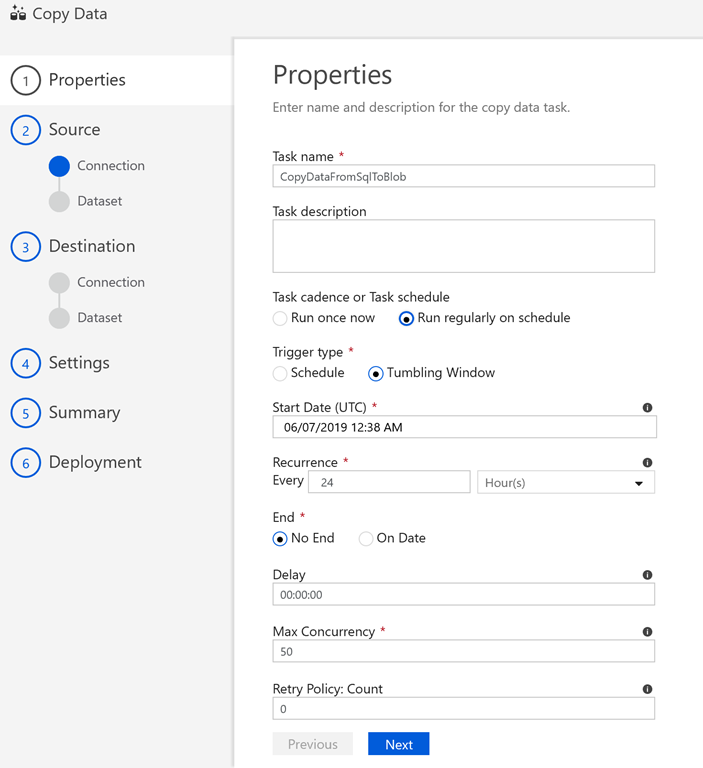
Fig. 8
Click the [Next] button to advance to the "Source data store" page, as shown in Fig. 9.
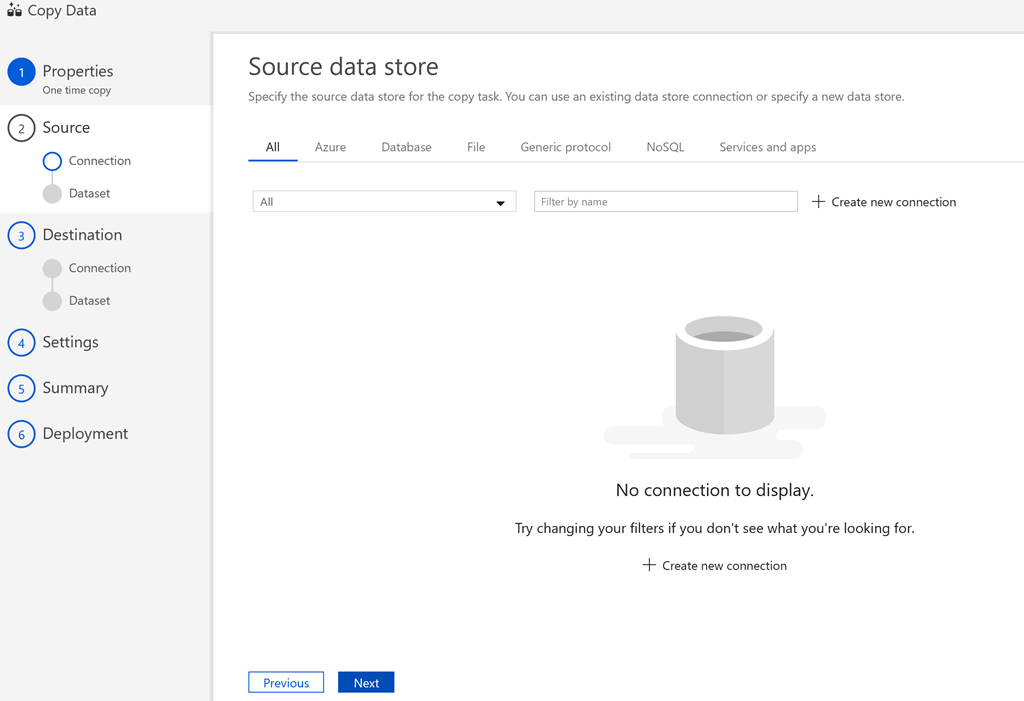
Fig. 9
Click the [+ Create new connection] button to display to the "New Linked Service" dialog, as shown in Fig. 10.
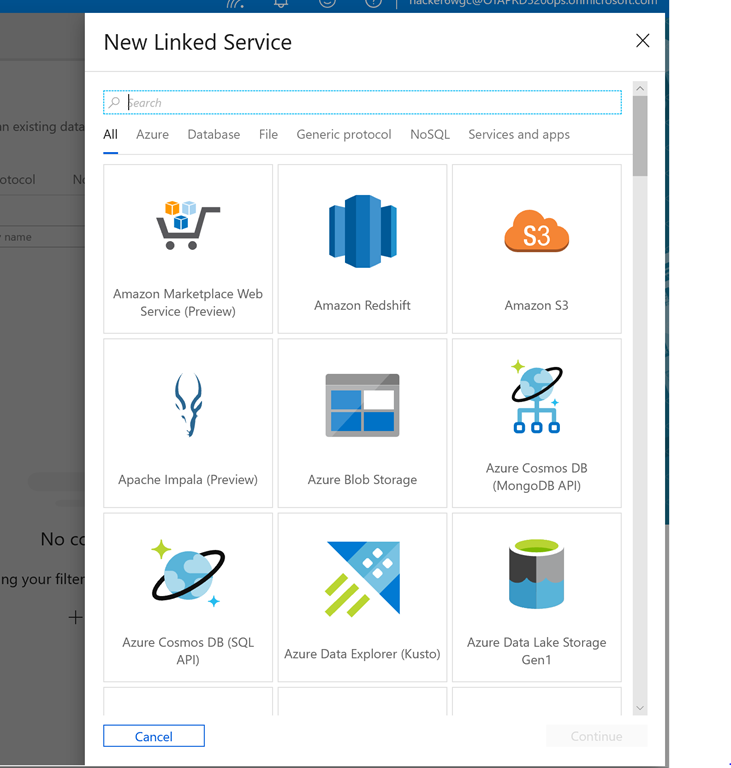
Fig.10
This dialog lists all the supported data stores.
At the top of the dialog is a search box and a set of links, which allow you to filter the list of data stores, as shown in Fig. 11.
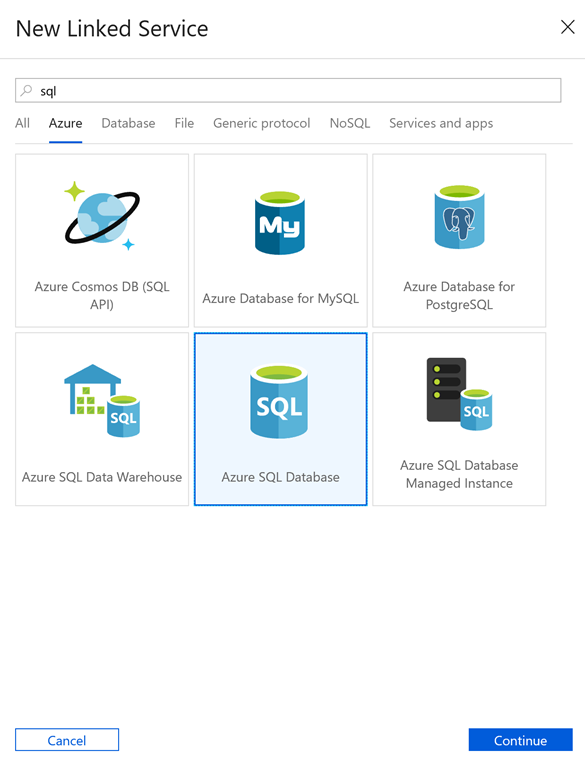
Fig. 11
Fig. 12 shows the next dialog if you select Azure SQL Database as your data source.
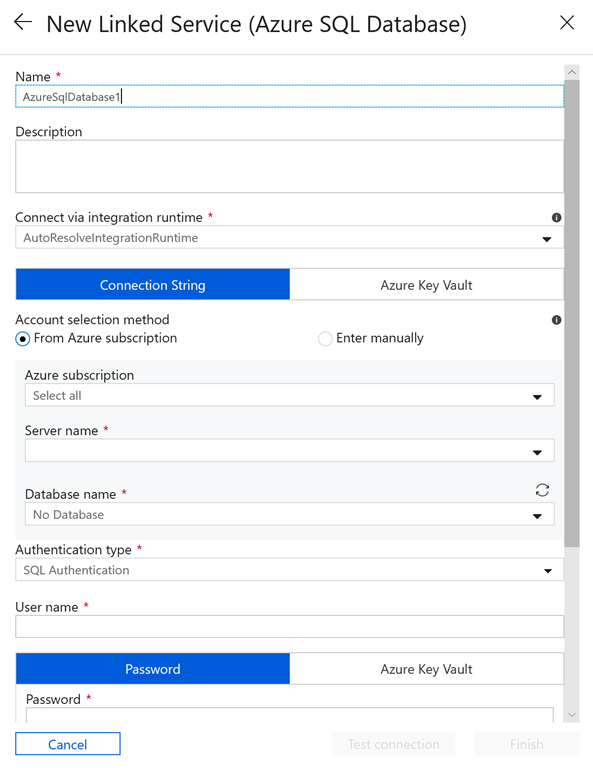
Fig. 12
In this dialog, you can enter information specific to the database from which you are extracting data. When complete, click the [Test connection] button to verify your entries are correct; then click the [Finish] button to close the dialog.
After successfully creating a new connection, the connection appears in the "Source data store" page, as shown in Fig. 13.
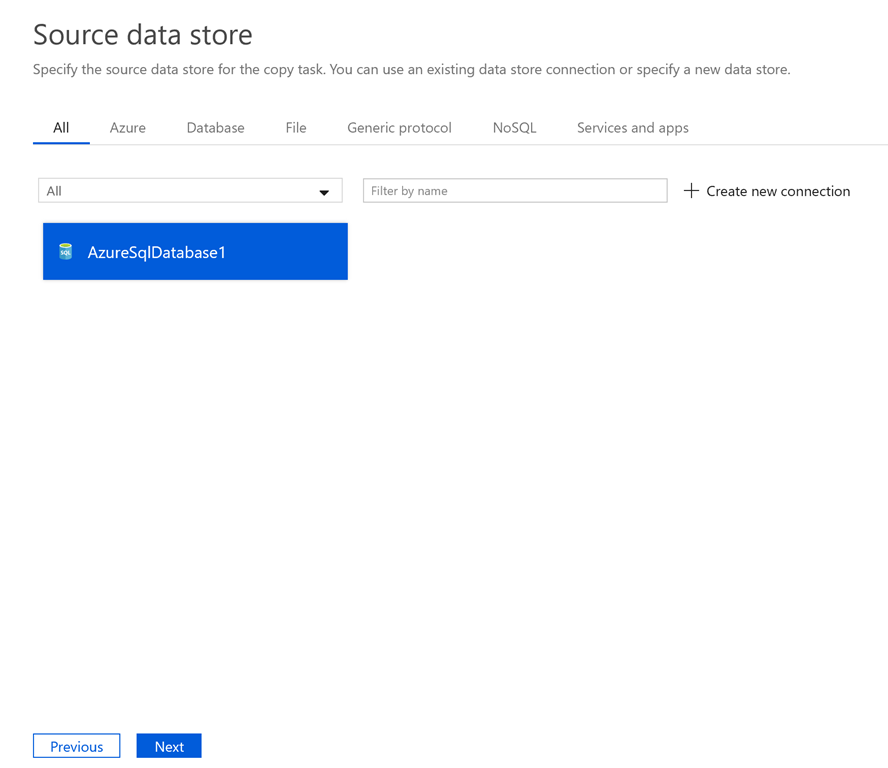
Fig. 13
Click the [Next] button to advance to the next page in the wizard, which asks questions to specific to the type of data in your data source. Fig. 14 shows the page for Azure SQL databases, which allows you to select which tables to extract.
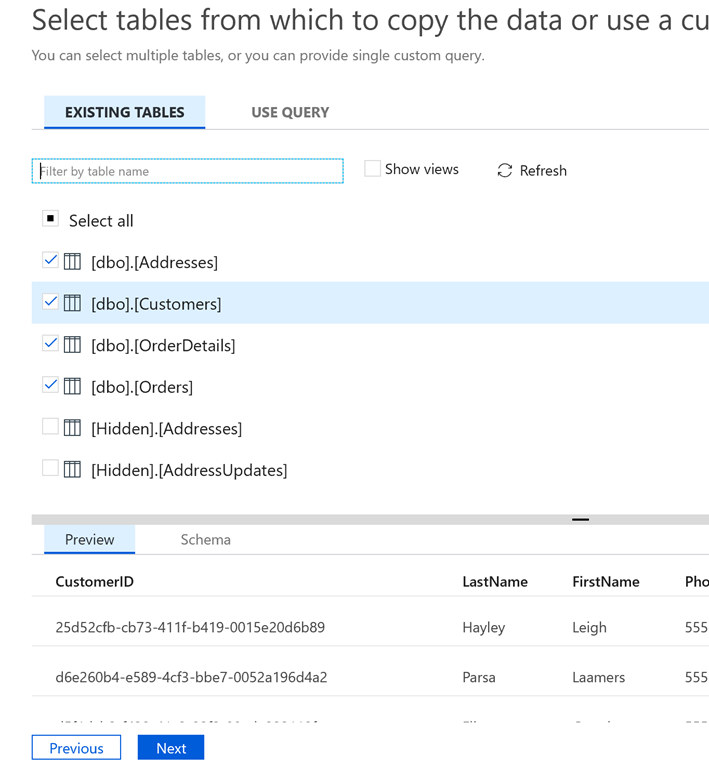
Fig. 14
Click the [Next] button to advance to the "Destination data store", as shown in Fig. 15.

Fig. 15
Click the [+ Create new connection] button to display the "New Linked Service" dialog, as shown in Fig. 16.
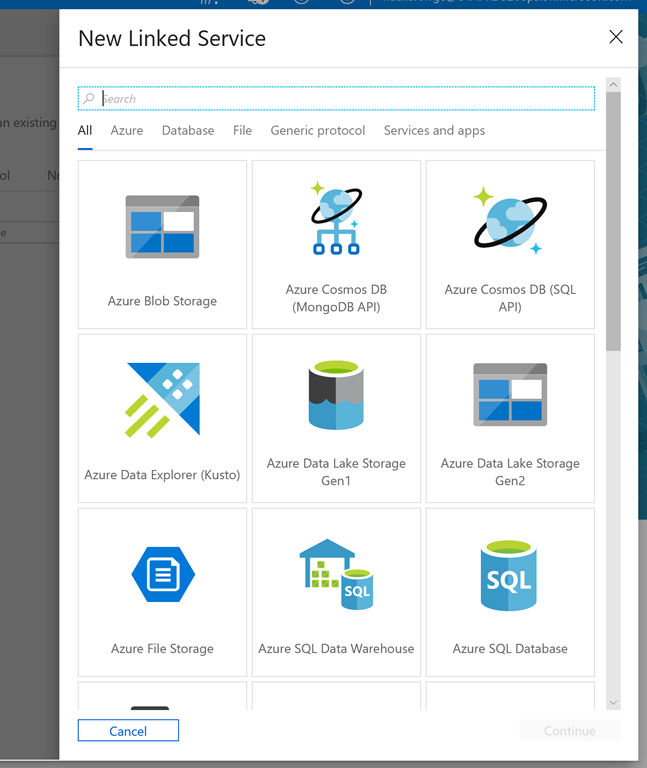
Fig. 16
As with the source data connection, you can filter this list via the search box and top links, as shown in Fig. 17. Here we are selecting Azure Data Lake Storage Gen2 as our destination data store.
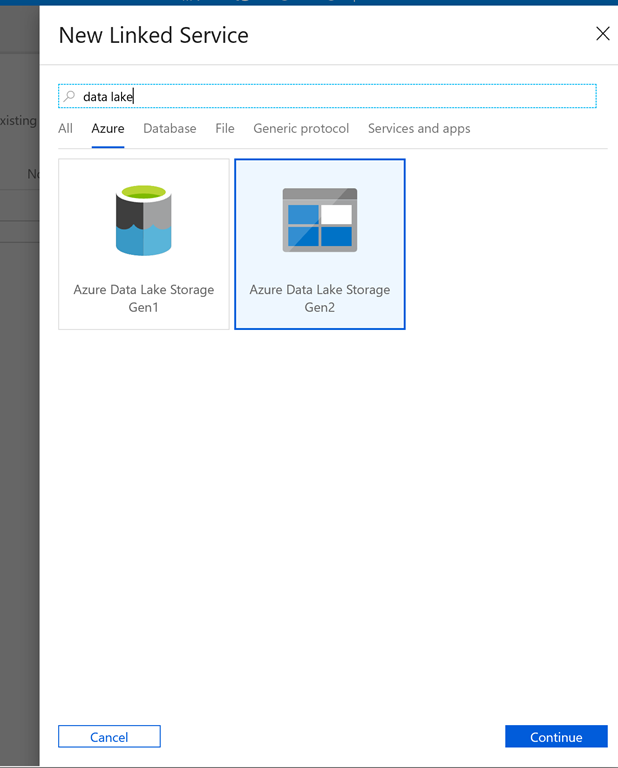
Fig. 17
After selecting a service, click the [Continue] button to display a dialog requesting information about the data service you selected. Fig. 18 shows the page for Azure Data Lake. When complete, click the [Test connection] button to verify your entries are correct; then click the [Finish] button to close the dialog.
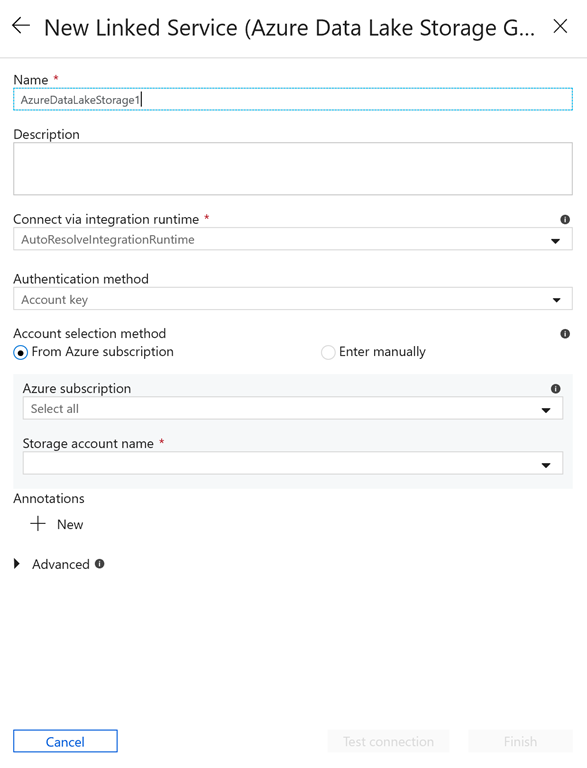
Fig. 18
After successfully creating a new connection, the connection appears in the "Destination data store" page, as shown in Fig. 19.
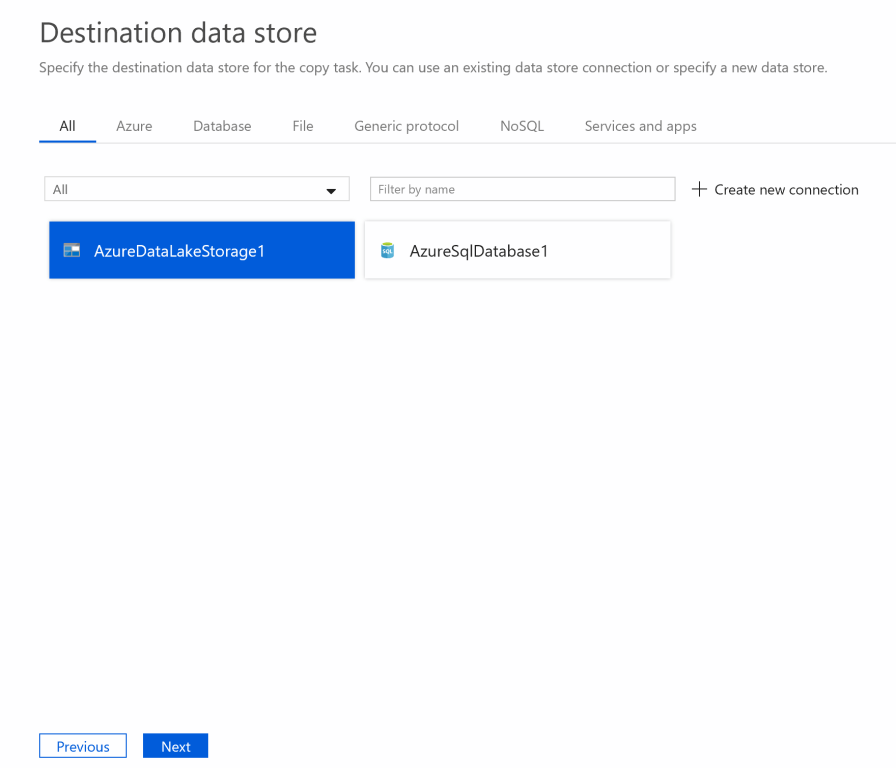
Fig. 19
Click the [Next] button to advance to the next page in the wizard, which asks questions to specific to the type of data in your data destination. Fig. 20 shows the page for Azure Data Lake, which allows you to select the destination folder and file name.
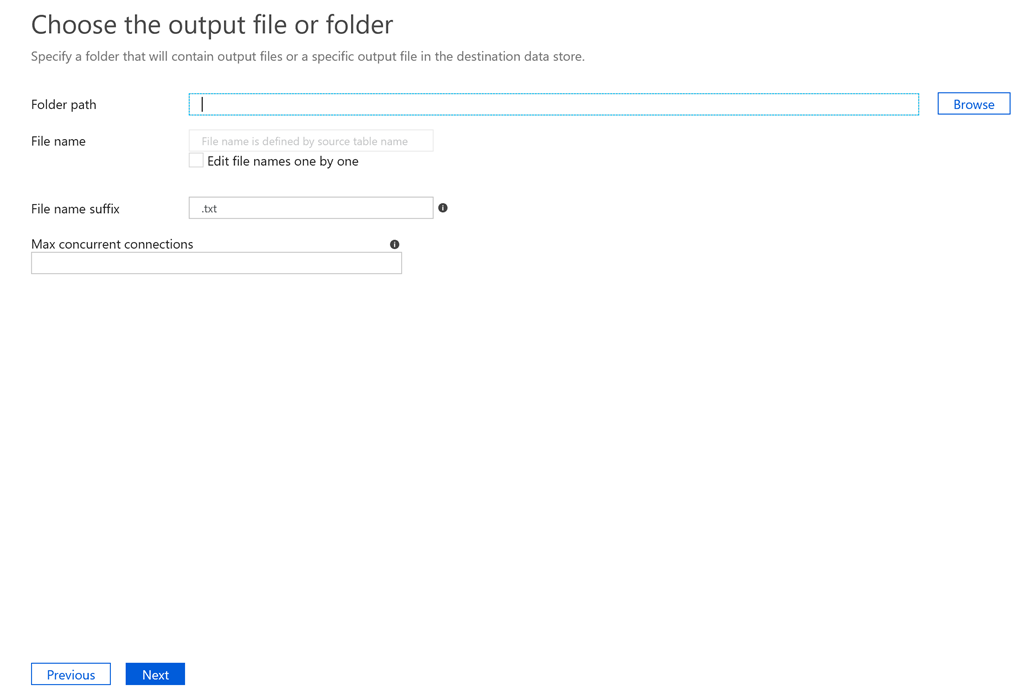
Fig. 20
Click the [Next] button to advance to the "File format settings" page, as shown in Fig. 21.
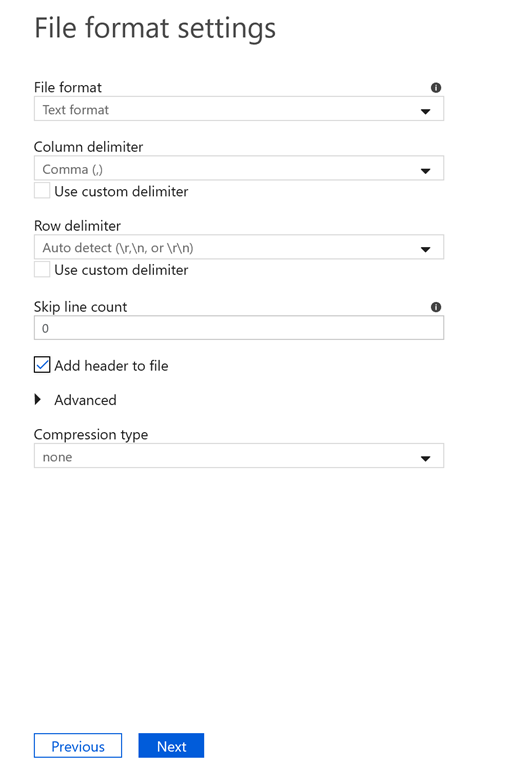
Fig. 21
At the "File format" dropdown, select a format in which to structure your output file. The prompts change depending on the format you select. Fig. 21 shows the prompts for a Text format file.
Complete the page and click the [Next] button to advance to the "Settings" page, as shown in Fig. 22.
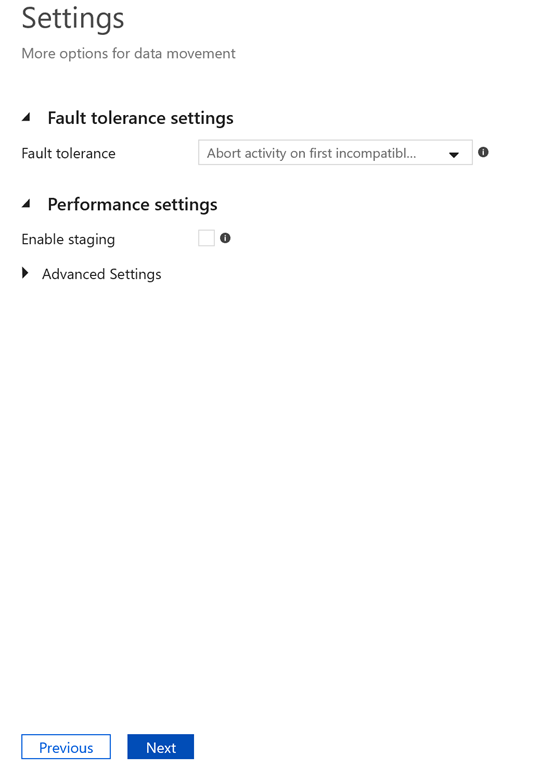
Fig. 22
The important question here is "Fault tolerance". When an error occurs, do you want to abort the entire activity, skipping the remaining records or do you want to log the error, skip the bad record, and continue with the remaining records.
Click the [Next] button to advance to the "Summary" page as shown in Fig. 23.
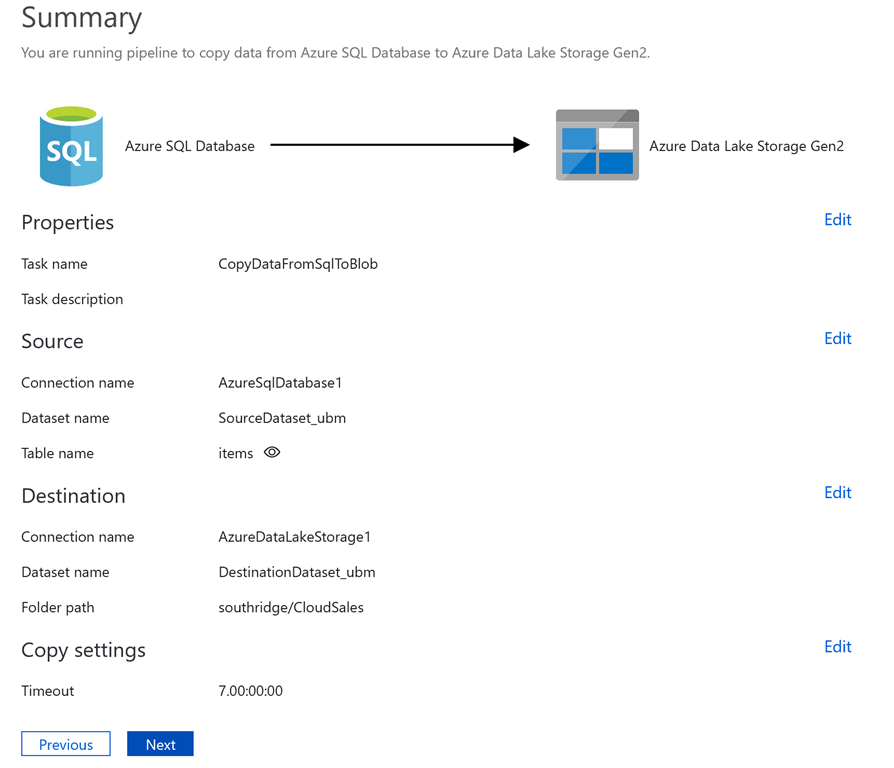
Fig. 23
This page lists the selections you have made to this point. You may edit a section if you want to change any settings. When satisfied with your changes, click the [Next] button to kick off the activity and advance to the "Deployment complete" page, as shown in Fig. 24.
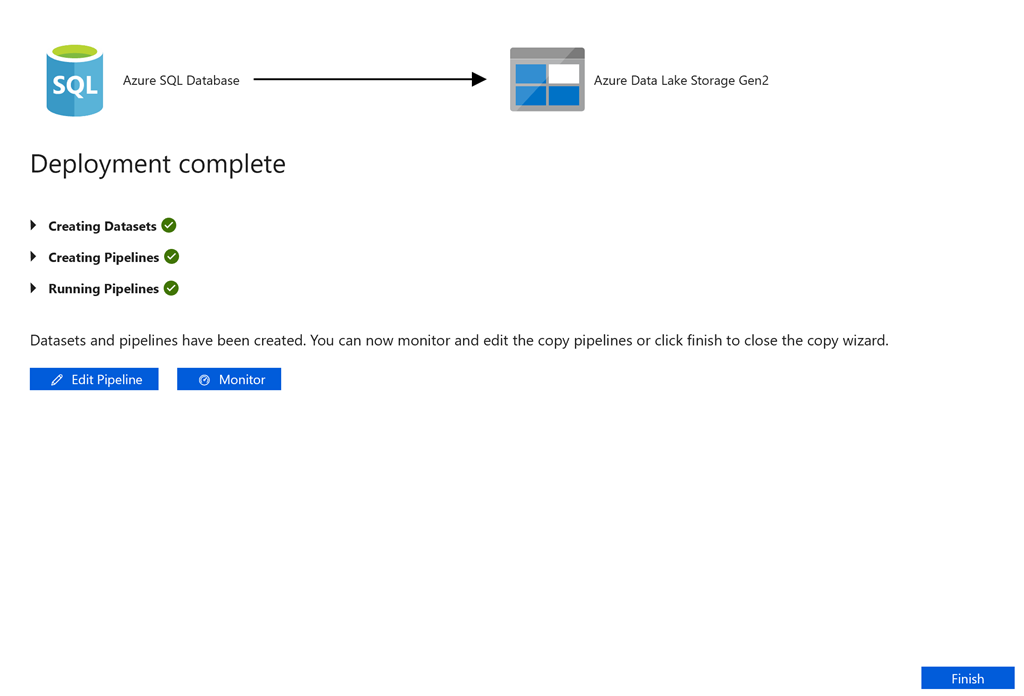
Fig. 24
You will see progress of the major steps in this activity as they run. You can click the [Monitor] button to see a more detailed real-time progress report or you can click the [Finish] button to close the wizard.
In this article, you learned about the Azure Data Factory and how to create a new data factory with an activity to copy data from a source to a destination.
GCast 54:
Learn about the data replication options in Azure Storage and how to set the option appropriate for your needs.
Azure IoT Hub allows you to route incoming messages to specific endpoints without having to write any code.
Refer to previous articles (here, here, and here, to learn how to create an Azure IoT Hub and how to add a device to that hub.
To perform automatic routing, you must
Navigate to the Azure Portal and log in.
Open your IoT Hub, as shown in Fig. 1.
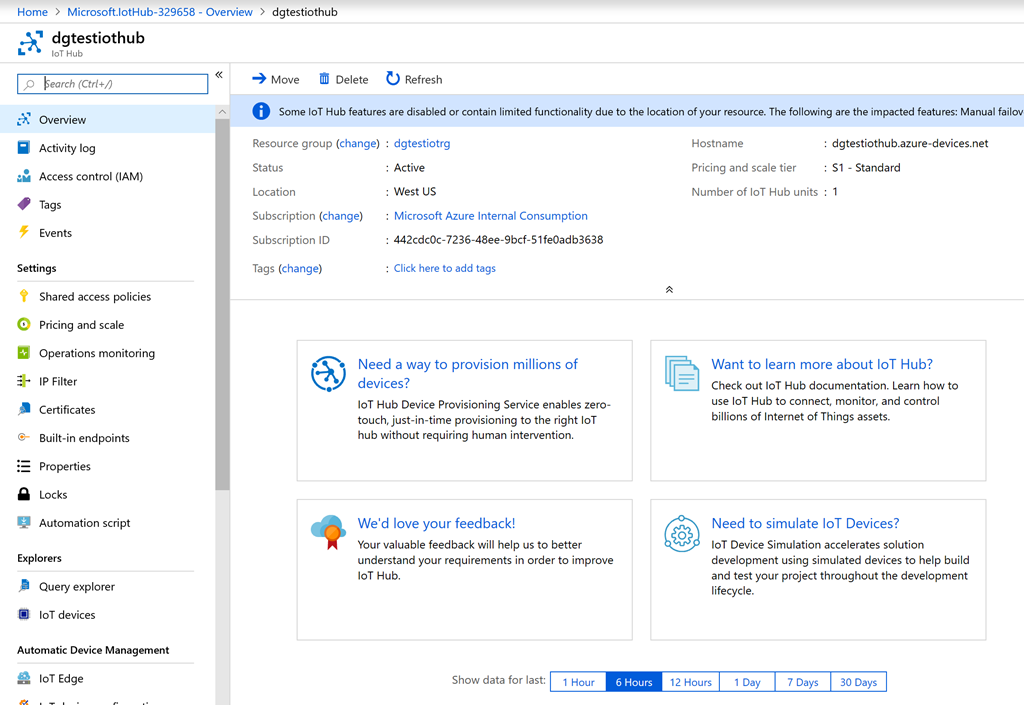
Fig. 1
Click the [Message routing] button (Fig. 2) under the "Messaging" section to open the "Routing" tab, as shown in Fig. 3

Fig. 2
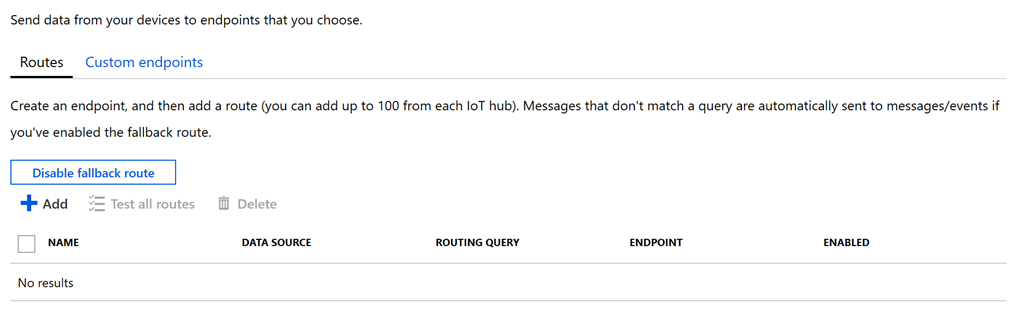
Fig. 3
Click the [Add] button to open the "Add a route" blade, as shown in Fig. 4.
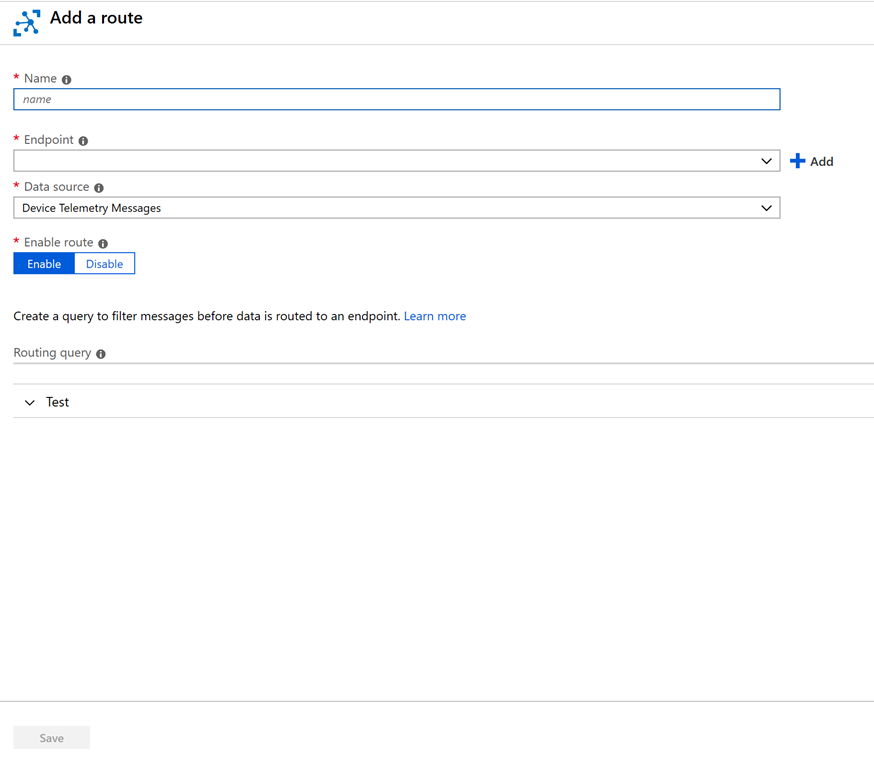
Fig. 4
At the "Name" field, enter a name for your route. I like to use something descripting, like "SendAllMessagesToBlobContainer".
At the "Endpoint" field, you can select an existing endpoint to which to send messages. An Endpoint is a destination to send any messages that meet the specified criteria. By default, only the "Events" endpoint exists. For a new hub, you will probably want to create a new endpoint. To create a new endpoint, click the [Add] button. This displays the "Add Endpoint" dialog, as shown in Fig. 5.

Fig. 5
At the "Endpoint" dropdown, select the type of endpoint you want to create. Fig. 6 shows the "Add a storage endpoint" dialog that displays if you select "Blob Storage".
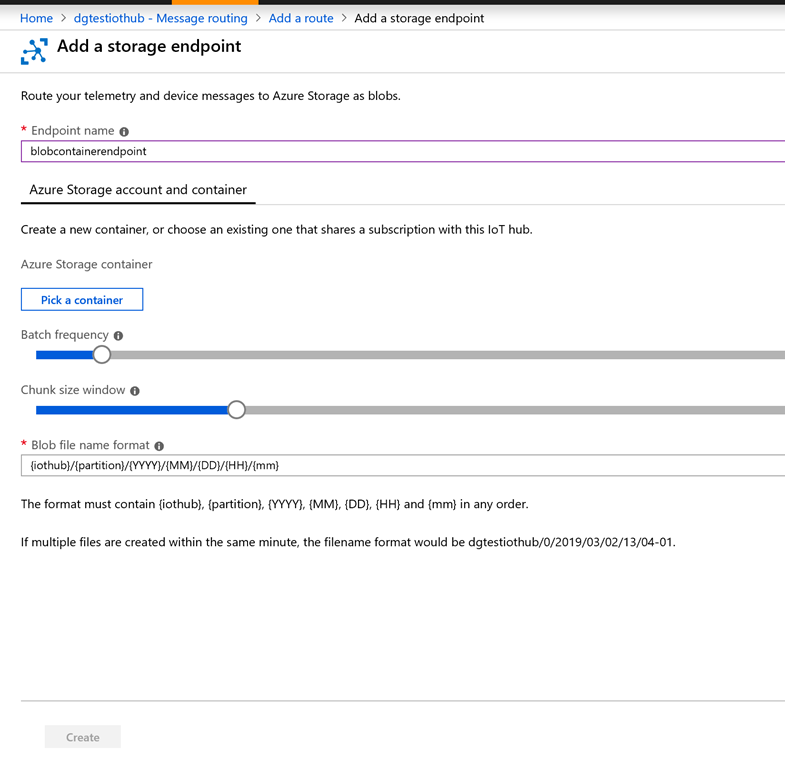
Fig. 6
At the "Endpoint name", enter a descriptive name for the new endpoint.
Click the [Pick a container] button to display a list of Storage accounts, as shown in Fig. 7.
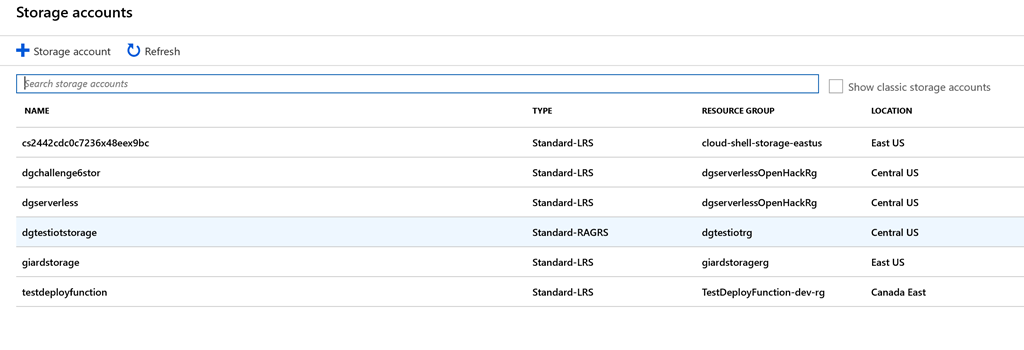
Fig. 7
Select an existing storage account or click the [+ Storage account] button to create a new one. After you select a storage account, the "Containers" dialog displays, listing all blob containers in the selected storage account, as shown in Fig. 8.
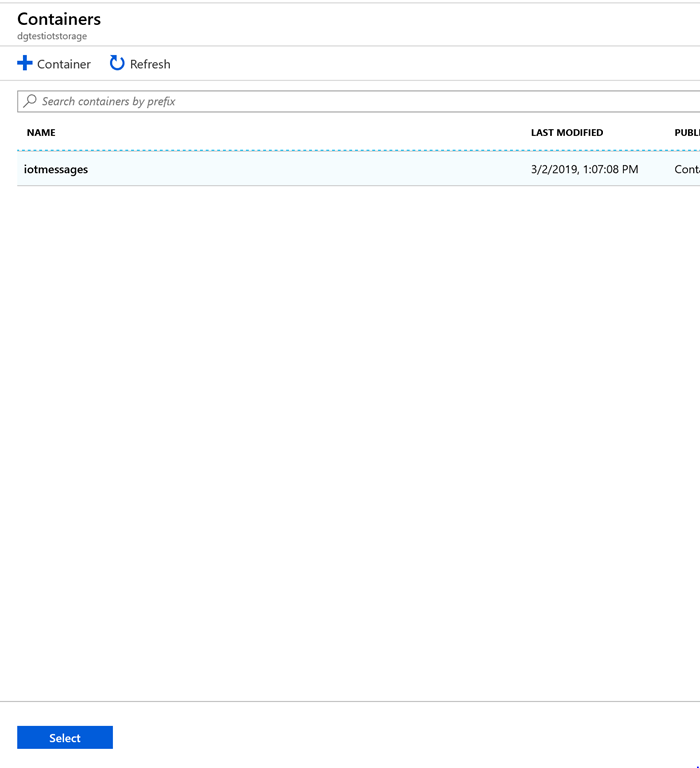
Fig. 8
Select an existing container or click the [+Container] button to create a new container. Messages matching the specified criteria will be stored in this blob container.
Back at the "Add a storage endpoint" dialog (Fig. 6), you have options to set the Batch frequency, Chunk size window, and Blob file name format.
Multiple blob messages are bundled together into a single blob.
The Batch frequency determines how frequently messages get bundled together. Lowering this value decreases latency; but doing so creates more files and requires more compute resources.
Chunk size window sets the maximum size of a blob. If a bundle of messages would exceed this value, the messages will be split into separate blobs.
The Blob file name format allows you to specify the name and folder structure of the blob. Each value within curly braces ({}) represents a variable. Each of the variables shown is required, but you can reorder them or remove slashes to change folders into file name parts or add more to the name, such as a file extension.
Click the [Create] button to create the endpoint and return to the "Add a route" blade, as shown in Fig. 9.
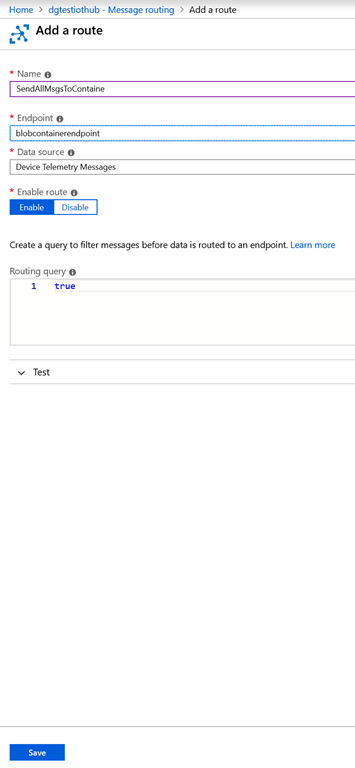
Fig. 9
At the "Endpoint" dropdown, select the endpoint you just created.
At the "Data source" dropdown, you can select exactly what data gets routed to the endpoint. Choices are "Device Telemetry Messages"; "Device Twin Change Events"; and "Device Lifecycle Events".
The "Routing query" field allows you to specify the conditions under which messages will be routed to this endpoint.
If you leave this value as 'true', all messages will be routed to the specified endpoint.
But you can filter which messages are routed by entering something else in the "Routing query" field. Query syntax is described here.
Click the [Save] button to create this route.
In this article, you learned how to perform automatic routing for an Azure IoT Hub.
Data Lake storage is a type of Azure Storage that supports a hierarchical structure.
There are no pre-defined schemas in a Data Lake, so you have a lot of flexibility on the type of data you want to store. You can store structured data or unstructured data or both. In fact, you can store data of different data types and structures in the same Data Lake.
Typically a Data Lake is used for ingesting raw data in order to preserve that data in its original format. The low cost, lack of schema enforcement, and optimization for inserts make it ideal for this. From the Microsoft docs: "The idea with a data lake is to store everything in its original, untransformed state."
After saving the raw data, you can then use ETL tools, such as SSIS or Azure Data Factory to copy and/or transform this data in a more usable format in another location.
Like most solutions in Azure, it is inherently highly scalable and highly reliable.
Data in Azure Data Lake is stored in a Data Lake Store.
Under the hood, a Data Lake Store is simply an Azure Storage account with some specific properties set.
To create a new Data Lake storage account, navigate to the Azure Portal, log in, and click the [Create a Resource] button (Fig.1).

Fig. 1
From the menu, select Storage | Storage Account, as shown in Fig. 2.
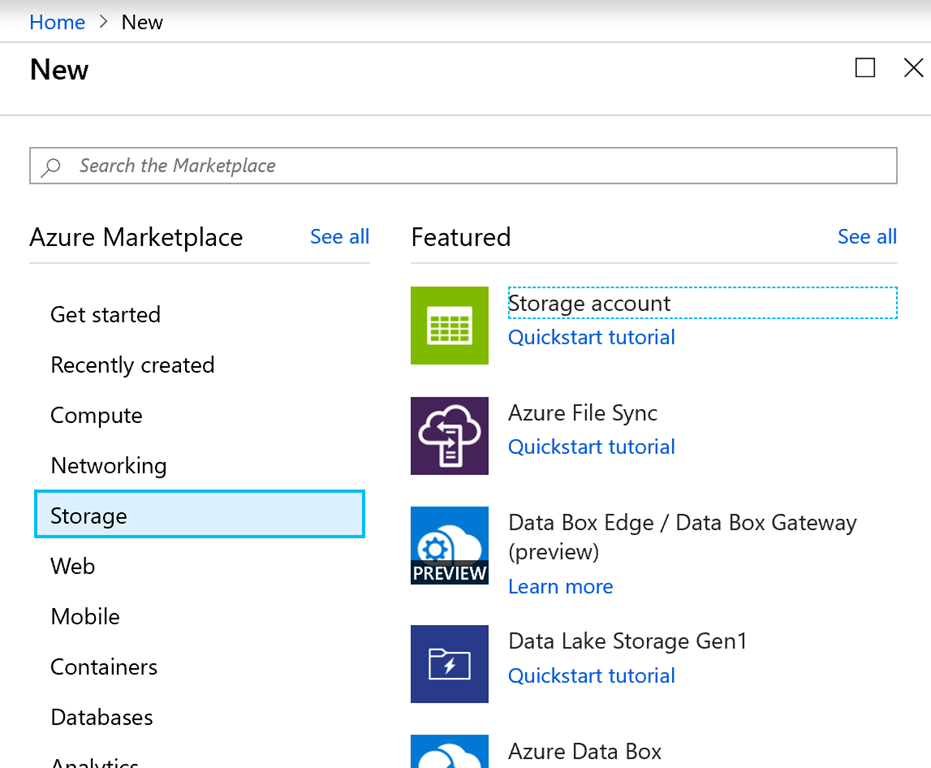
Fig. 2
The "Create Storage Account" dialog with the "Basic" tab selected displays, as shown in Fig. 3.
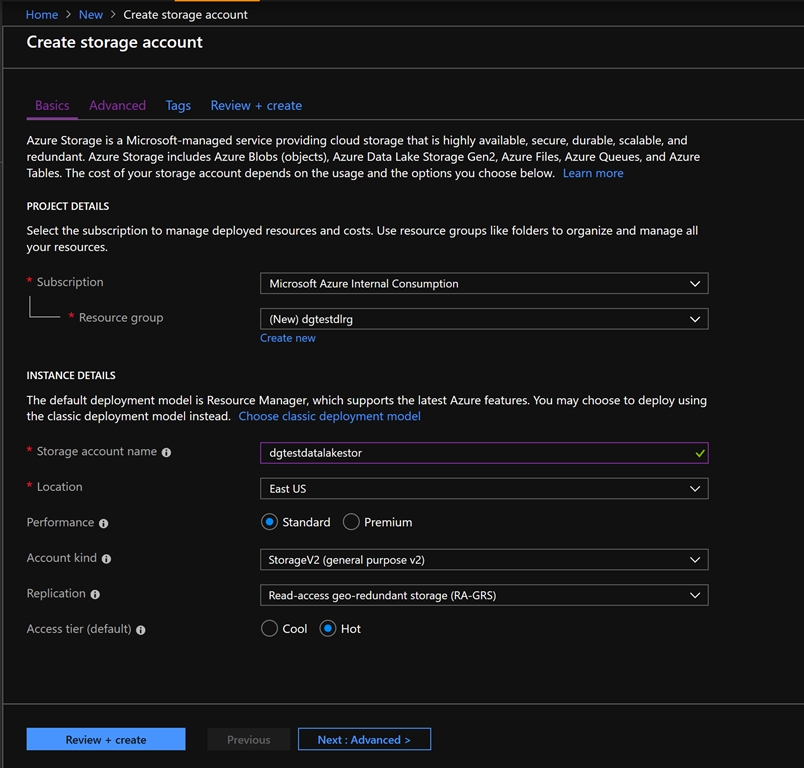
Fig. 3
At the “Subscription” dropdown, select the subscription with which you want to associate this account. Most of you will have only one subscription.
At the "Resource group" field, select a resource group in which to store your service or click "Create new" to store it in a newly-created resource group. A resource group is a logical container for Azure resources.
At the "Storage account name" field, enter a unique name for the storage account.
At the "Location" field, select the Azure Region in which to store this service. Consider where the users of this service will be, so you can reduce latency.
At the "Performance" field, select the "Standard" radio button. You can select the "Premium" performance button to achieve faster reads; however, there may be better ways to store your data if performance is your primary objective.
At the "Account kind" field, select "Storage V2"
At the "Replication" dropdown, select your preferred replication. Replication is explained here.
At the "Access tier" field, select the "Hot" radio button.
Click the [Next: Advanced>] button to advance to the "Advanced" tab, as shown in Fig. 4.

Fig. 4
The important field on this tab is "Hierarchical namespace". Select the "Enabled" radio button at this field.
Click the [Review + Create] button to advance to the "Review + Create" tab, as shown in Fig. 5.
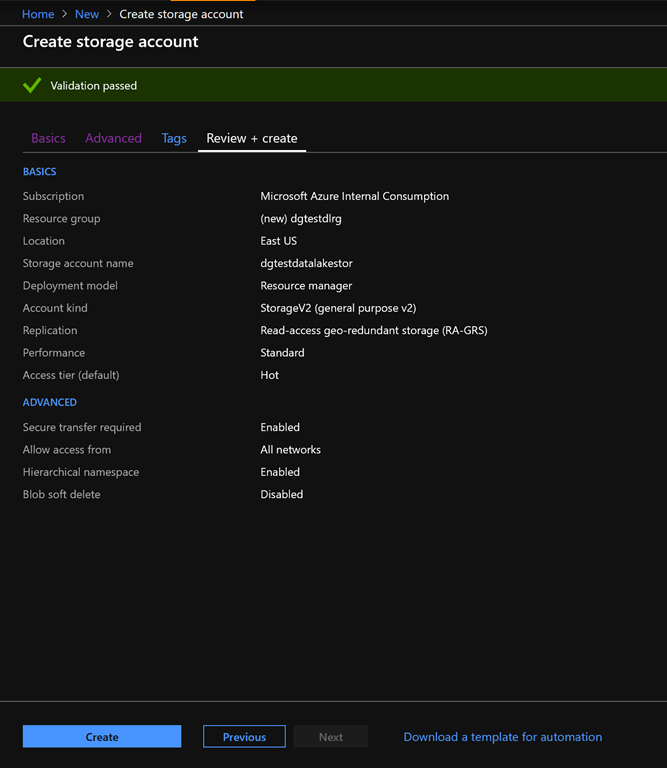
Fig. 5
Verify all the information on this tab; then click the [Create] button to begin creating the Data Lake Store.
After a minute or so, a storage account is created. Navigate to this storage account and click the [Data Lake Gen2 file systems] button, as shown in Fig. 6.
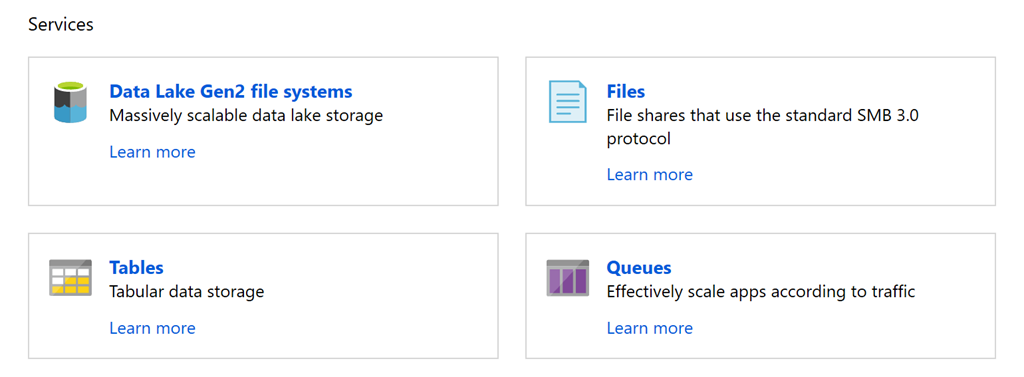
Fig. 6
The "File Systems" blade displays, as shown in Fig. 7.
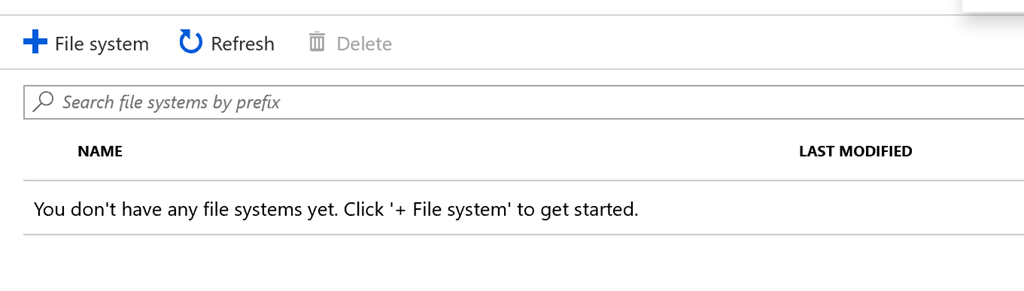
Fig. 7
Data Lake data is partitioned into file systems, so you must create at least one file system. Click the [+ File System] button and enter a name for the file system you wish to create, as shown in Fig. 8.
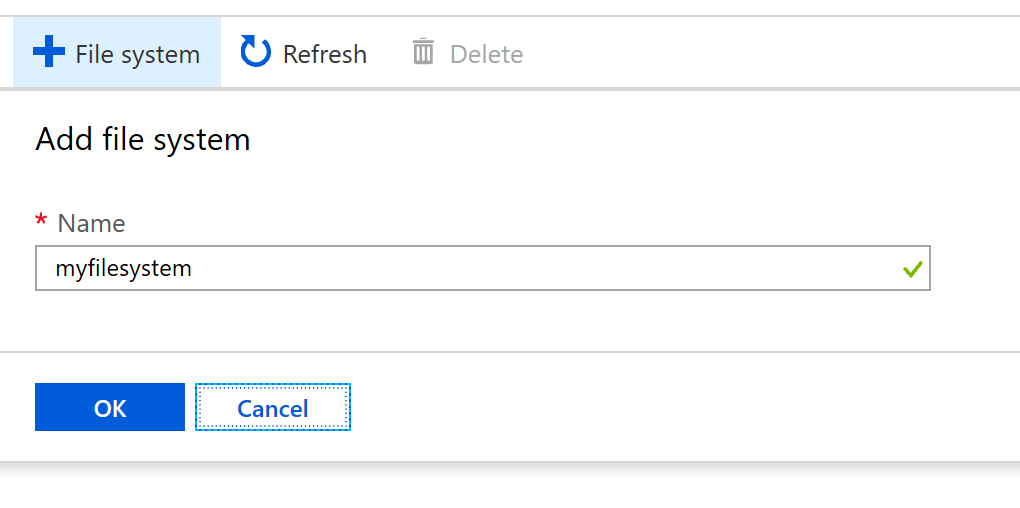
Fig. 8
Click the [OK] to add this file system and close the dialog. The newly-created file system displays, as shown in Fig. 9.
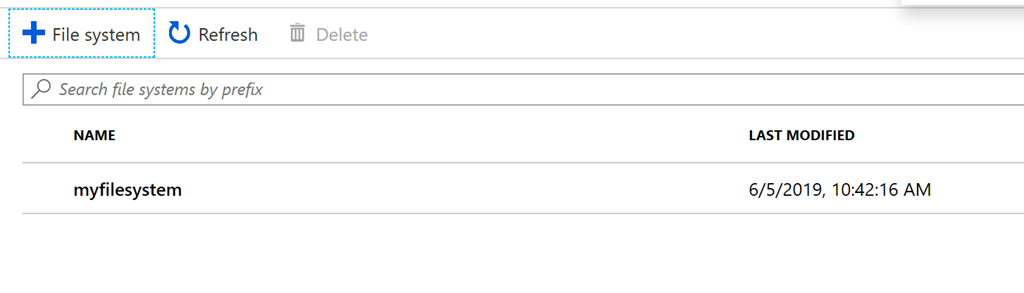
Fig. 9
If you double-click the file system in the list, a page displays where you can set access control and read about how to manage the files in this Data Lake Storage, as shown in Fig. 10
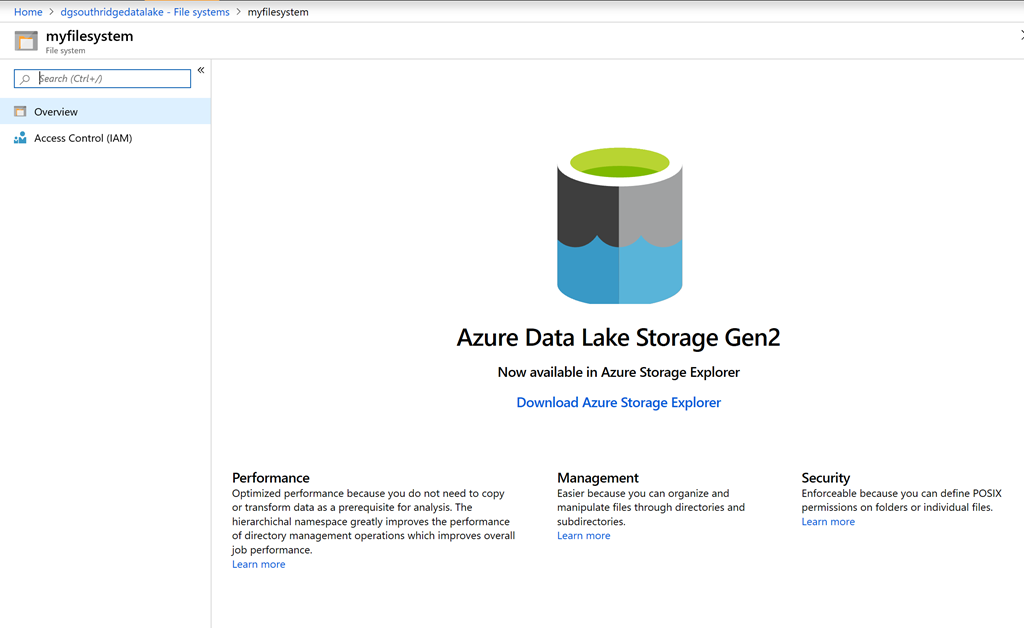
Fig. 10
In this article, you learned how to create a Data Lake Storage and a file system within it.
Episode 569
John Alexander describes how .NET developers can use ML.NET to build and consume Machine Learning solutions.
Frank and April Wheeler were living the 1950s American dream. Frank had a steady - if unfulfilling - job in New York City, April was the attractive wife he always wanted, and they owned a large home in a quiet neighborhood in suburban New Jersey.
But, like nearly all their neighbors, the Wheelers were far from happy.
They were bored suburbanites, working dead-end jobs, in loveless marriages, talking about their dreams.
They talked of how they didn't belong - of how they were so much better than the rest of the sheep who surrendered to the conformity of the world. But they take no action to correct their circumstances. The fact is that they are not as much "better" as they believe.
April suggests that the Wheelers move to Paris and start a new life, so that Frank can explore his potential. But Frank is not interested in his potential or in self-exploration. He likes the low expectations that come with his job. And, when he is given an opportunity at a promotion, he leaps at the chance.
Frank and April are self-aware enough to believe they are superior to their neighbors and co-workers, but not self-aware enough to realize they are not. They either don't know themselves or they refuse to see themselves.
They are under the illusion that their problems are easily fixable - move to Paris; get a promotion; have an affair. New flash: They are not.
Instead they continue their pretentious life of drunken lunches and adultery and deluding themselves that they are destined for more. No one takes responsibility for his or her own actions, choosing instead to blame others or the expectations of society.
The only honest person in the book is John Givings, a son of the Wheelers' neighbors, who has been literally certified insane and institutionalized. But John is so shockingly rude that it's difficult for anyone to listen to him or to take him seriously.
Inevitably, the story ends in tragedy, with no lessons learned and everyone continuing to face their troubles alone.
Don't read Revolutionary Road by Richard Yates to feel good about yourself. Read it as a warning about buying too much into the American dream. The sad part is how relevant this warning feels today.
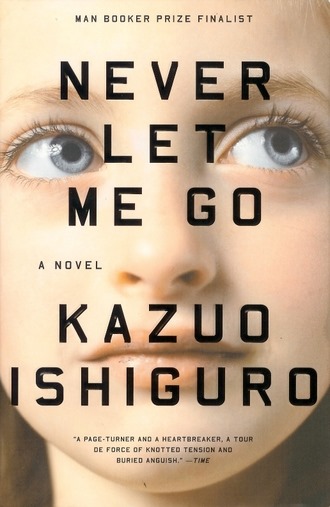 It isn't obvious until well into Never Let Me Go by Kazuo Ishiguro that this is a story of a dystopian society. Ishiguro drops hints throughout the story, slowly revealing the situation in which the characters find themselves. Words like "donations", "Possible", and "Completion" are introduced, and we know they have some mysterious meaning, but are not told that meaning until much later.
Kathy H is a 31-year-old “Carer” looking back on her life - particularly her time at Hailsham - a boarding school in rural England. Life is good at Hailsham, but the students are secluded and are given almost no knowledge of the outside world, other than being told they will someday have a special place in it.
Everyone has a name like "Kathy H" or "Tommy D". At first, I thought this was a literary device, with the author pretending to protect identities; but, on reflection, I think the students were not given last names one more way to dehumanize them.
Never Let Me Go is a story of false hope; of what it means to be human and to have a soul; and of how much control each of us has over our destiny. It is told in a believable manner in a world not very different from ours and referencing technology that does not sound far-fetched.
It is a dystopian nightmare, disguised as a coming-of-age story.
GCast 53:
Creating a Data Warehouse in Azure
Learn how to create a new SQL Sever data warehouse in Microsoft Azure.
CTRL+V has been in Windows since the beginning: After copying something to the Windows clipboard (via CTRL+C or some other method), hold down the CTRL key and press V to insert that something at the current cursor location.
But I learned today about a new feature: WINDOWS + V.
Hold down the WINDOWS key (Fig. 1) and press V.

Fig. 1
This will bring up a context menu, listing the last few items added to the clipboard, as shown in Fig. 2.
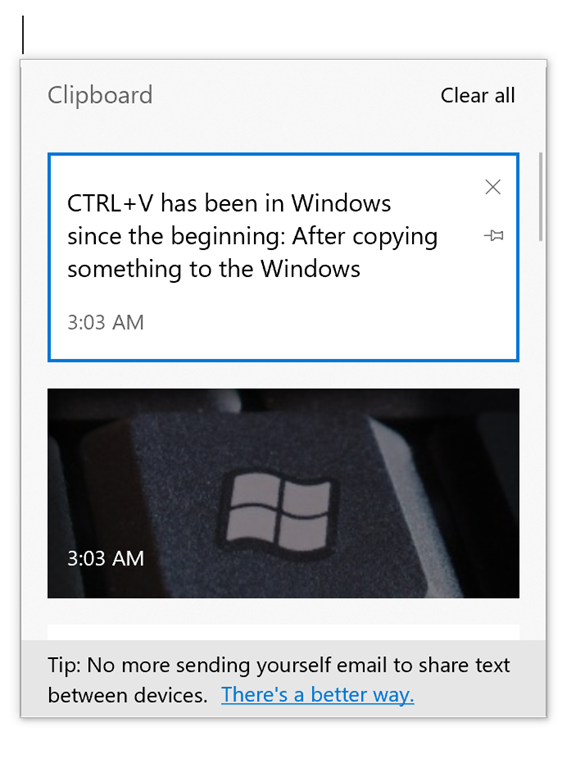
Fig. 2
You can then select from this list which item to insert at the current cursor position.
The context menu even lists the time the item was added to the clipboard.
This is useful if you need to copy several items before pasting them. But, the most useful use case is when you accidentally copy something to the clipboard without thinking you might overwrite a previous item copied there. Now you have some time to still use that previously overwritten item.
I'm unclear how long items stay in this clipboard list, but I like this advantage.
Episode 568
Heather Wilde on Anticipatory Design
Heather Wilde discusses how to machine learning with user interfaces and user experience to craft a more personalized experience between a person and the products and services they use.
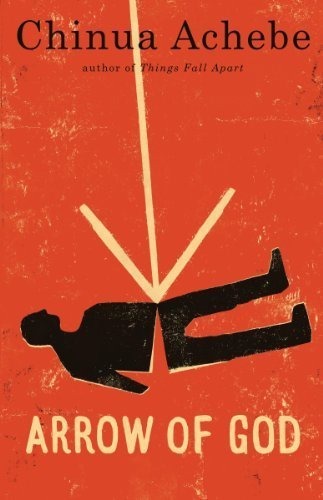 Arrow of God is part of Chinua Achebe's African Trilogy. Although it is Achebe's third novel, chronologically, it is second in the trilogy. The first book - Things Fall Apart - took place as the English colonizers were arriving in west Africa; book 2 - No Longer At Ease - takes place near the end of the colonization period; and "Arrow of God"'s story happens in the 1920's - at the height of European colonization.
Unlike the first two books, this one does not focus on Okonkwo or his descendants.
Arrow of God tells the story of Ezeulu, a high priest of the god Ulu in colonial Nigeria. Ezeulu's tribe goes to war with another tribe - a result of a perceived insult and a dispute over land ownership. The British governor steps in, ends the conflict, and burns everyone's guns. It is this assertion of control by the British over the local population that is at the heart of the novel.
The British are in Africa to implement their legal system and their culture and their religion on the native population and they use any means to do so. They implement "Local Rule", installing an African in a position of authority, but controlling that man so he works in their interests.
The British government bureaucracy makes them terribly inefficient, making their job harder; but the infighting among individuals, villages, and tribes of the Africans makes them easier to manipulate. As part of England's efforts at influencing the local population, missionaries are trying to convert the natives to Christianity. Many resist this change in culture; but they are aided when a failure of the yam crop leads to famine and praying to the god Ulu does not help. The religious conversions are a microcosm of the colonizers' efforts to implement their culture on the Africans, subsuming the existing culture.
Ezeulu stands in the center of it all. He wants to better understand the British and sends his son to work with them to gain more information; but he rejects their offer to make him a Local Ruler. Still, his own people are suspicious of his motives, feeling he has given too much to the white invaders. There is conflict between Ezeulu and
Arrow of God is the story of conflict and influence; of people trying to hold onto their traditions in the face of a tidal wave of change; and of the hope on which people place their faith; of how culture was supplanted in a short time. It is the story of toe loss of the Igbo cultural identity.
Achebe was probably the first English language writer to portray events in Africa from the point of view of the Africans.
The book is told in an eloquent style, peppered with many African proverbs. This one sums it up best:
"When brothers fight to death a stranger inherits their father's estate"
 Sometimes, I dream about traveling to new places with no responsibilities and no worries about money.
The Sheltering Sky by Paul Bowles may have cured me of that dream.
"The Sheltering Sky" tells the story of 3 idle rich people - husband and wife, Port and Kit, along with their friend Tunner - who decide to explore north Africa after World War II. They don't have a plan and so drift from city to city seeing the sites and trying to overcome their boredom. They insist this makes them "travelers", rather than "tourists". They drift through a land of sweltering temperatures and dust storms and bedbugs and lice and biting flies.
The story turns tragic as the trio splits up, Port falls gravely ill, and Kit becomes lost in the desert. But this book isn't defined by plot twists or great character developments. It is an existential tale about people who appear to be drifting through life, with no purpose and no direction. What did this trio contribute to the world on their travels? What did they gain for themselves? What meaning did their lives have? They are searching for something, but even they don't know what that is. And none of them ever finds it.
Every character seems bent on self-destruction in this story. Almost everyone we meet is unlikable - from the 3 main characters to the constantly-arguing-and-probably-incestuous young man and his mother they encounter to a traveler who kidnaps and rapes Kit before adding her to his harem. Port and Kit are each unfaithful to one another during their trip, but only Kit feels any guilt about it.
Some will take offense at Kit's reaction to her rape (she accepts it and even comes to enjoy it), but I saw this as evidence of her decreasing mental stability.
If you are looking for a good travelogue of Algeria and Morocco, skip this one. If you want a commentary on the state of the human condition, this is a pretty good one.
In the last few articles, I introduced the OCR Service of the Cognitive Services Computer Vision API. The OCR service is a general-purpose tool for detecting text in an image. But this tool is only useful if you want to do something with that text. Often it is easier to figure out how to process recognized text if you know something about the image.
Enter receipt-api - an open source project that builds on the Cognitive Services API to recognize information in a store receipt.
You can download this project at https://github.com/nzregs/receipt-api.
Compile and run it in Visual Studio and you have a web service that you can call by submitting an HTTP POST to the following URL:
http://localhost:xxxxx/api/values
where xxxxx is the port number on which the web service is running. You can spot this port easily because a browser launches when the app runs and the port number is in the URL, as shown in Fig. 1.

Fig. 1
In order to test the API, you will need an image of a receipt. You can take a photo with your phone and copy it to your computer.
You will also need to create a Computer Vision service in Azure, as described here.
Finally, you will also need to make a change to the receipt-api project. Open the solution and rename Sample-Secrets_cs.txt to Secrets.cs. The code in this file is shown in listing 1.
Listing 1:
public class Secrets

{
    // rename this file to Secrets.cs
    // update the constants below with your API Key and API Endpoint
    public const string apikey = "28737opek;jwlbjksgui3y2[pik";
    public const string apiendpoint_ocr = @"https://australiaeast.api.cognitive.microsoft.com/vision/v1.0/ocr";
}
Replace the key and api endpoint with the key and endpoint in the service associated with your cognitive service.
A simple way to test any API is with Postman, a free tool available at https://www.getpostman.com/.
Download, install, and run Postman.
With the receipt-api service running, create a new request in Postman consisting of a POST to the receipt-api service URL, as shown in Fig. 2.

Fig. 2
On the "Headers" tab, add a header row with NAME = Content-Type and VALUE = application/octet-stream, as shown in Fig. 3.

Fig. 3
On the "Body" tab, click the [Select File] button and select the photo of the receipt from your computer, as shown in Fig. 4.

Fig. 4
Click the [Send] and wait for a response to appear. If all goes well, you will see something like Fig. 5.

Fig. 5
If you have used the OCR service, you will notice that this response looks identical to the response from that service. But scroll to the bottom, as shown in Fig. 6 and you will see information specific to receipts.

Fig. 6
This is from the receipt shown in Fig. 7.

Fig. 7
The solution works by first calling the Cognitive Services OCR service; then, looping through each line and word, looking for patterns. It uses regular expressions to find these patterns. Below is the code to find the date in the recognized text:
Listing 2:
static string ExtractDate(string line) { string receiptdate = ""; // match dates "01/05/2018" "01-05-2018" "01-05-18" "01 05 18" "01 05 2018" string pat = @"\s*((31([-/ .])((0?[13578])|(1[02]))\3(\d\d)?\d\d)|((([012]?[1-9])|([123]0))([-/ .])((0?[13-9])|(1[0-2]))\12(\d\d)?\d\d)|(((2[0-8])|(1[0-9])|(0?[1-9]))([-/ .])0?2\22(\d\d)?\d\d)|(29([-/ .])0?2\25(((\d\d)?(([2468][048])|([13579][26])|(0[48])))|((([02468][048])|([13579][26]))00))))\s*"; foreach (Match in Regex.Matches(line, pat)) { receiptdate = match.Value.Trim(); receiptdate = receiptdate.Replace("-", "/"); receiptdate = receiptdate.Replace(".", "/"); receiptdate = receiptdate.Replace(" ", "/"); } // didnt find date? now we'll try searching with month names. 03 OCT 2017, 03 October 2017 etc if (receiptdate == "") { pat = @"((31(??|Apr(il)?|June?|(Sep(?=\b|t)t?|Nov)(ember)?)))|((30|29)(?![-/ .]Feb(ruary)?))|(29(?=[-/ .]Feb(ruary)?[-/ .](((1[6-9]|[2-9]\d)(0[48]|[2468][048]|[13579][26])|((16|[2468][048]|[3579][26])00)))))|(0?[1-9])|1\d|2[0-8])[-/ .](Jan(uary)?|Feb(ruary)?|Ma(r(ch)?|y)|Apr(il)?|Ju((ly?)|(ne?))|Aug(ust)?|Oct(ober)?|(Sep(?=\b|t)t?|Nov|Dec)(ember)?)[-/ .]((1[6-9]|[2-9]\d)\d{2})"; foreach (Match in Regex.Matches(line, pat, RegexOptions.IgnoreCase)) { receiptdate = match.Value.Trim(); receiptdate = receiptdate.Replace("/", "-"); receiptdate = receiptdate.Replace(".", "-"); receiptdate = receiptdate.Replace(" ", "-"); } } return receiptdate; }
This tool is not perfect.
It is incomplete. Although the model supports a Business Name and a Tax Total, it looks like the logic to extract this information has not yet been written.
Note that it is an Open Source project and you are welcome to contribute and submit a Pull Request. If this logic is important to your project, write it and share it with the world.
The solution is also limited by the capabilities of the OCR service it calls. However, my experience is that this service becomes more accurate as time goes on.
The results are best with a clear, high-contrast receipt. If your receipt is wrinkled or faded or has a watermark, the OCR will be degraded, effecting any analysis of the recognized text.
The receipt-api project does provide several advantages:
The receipt-api open source project provides a simple way to extract data from a receipt.
GCast 52:
Using hilite.me to Format Code as HTML
The online tool at hilite.me allows me to format code in just about any language and paste it into my blog.
In a previous article, I showed how to use the Microsoft Cognitive Services Computer Vision API to perform Optical Character Recognition (OCR) on a document containing a picture of text. We did so by making an HTTP POST to a REST service.
If you are developing with .NET languages, such as C# Visual Basic, or F#, a NuGet Package makes this call easier. Classes in this package abstract the REST call, so can write less and simpler code; and strongly-typed objects allow you to make the call and parse the results more easily.
To get started, you will first need to create a Computer Vision service in Azure and retrieve the endpoint and key, as described here.
Then, you can create a new C# project in Visual Studio. I created a WPF application, which can be found and downloaded at my GitHub account. Look for the project named "OCR-DOTNETDemo". Fig. 1 shows how to create a new WPF project in Visual Studio.
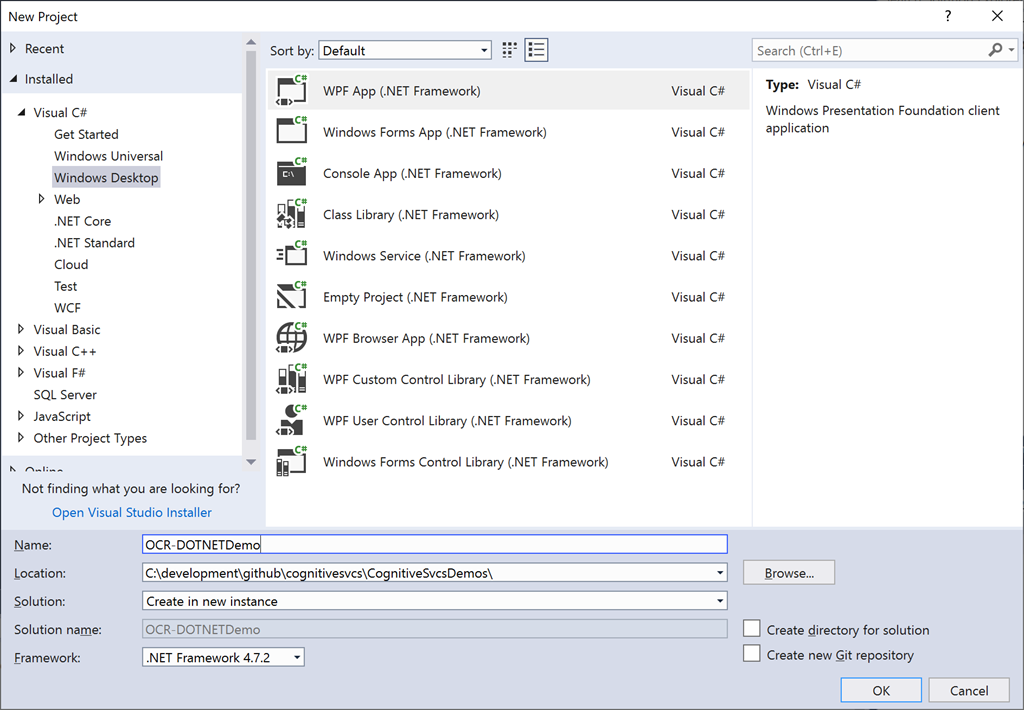
Fig. 1
In the Solution Explorer, right-click the project and select "Manage NuGet Packages", as shown in Fig. 2.
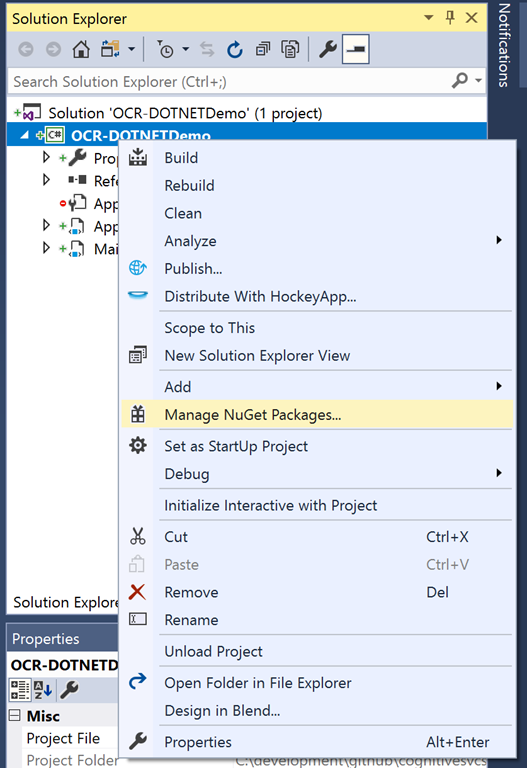
Fig. 2
Search for and install the "Microsoft.Azure.CognitiveServices.Vision.ComputerVision", as shown in Fig. 3.

Fig. 3
The important classes in this package are:
Create a new class in the project named "OCRServices" and make its scope "internal" or "public"
Add the following "using" statements to the top of the class:
using Microsoft.Azure.CognitiveServices.Vision.ComputerVision;
using Microsoft.Azure.CognitiveServices.Vision.ComputerVision.Models;
using System.IO;
Add the following methods to this class:
Listing 1:
internal static async TaskUploadAndRecognizeImageAsync(string imageFilePath, OcrLanguages language) { string key = "xxxxxxx"; string endPoint = "https://xxxxx.api.cognitive.microsoft.com/"; var credentials = new ApiKeyServiceClientCredentials(key); using (var client = new ComputerVisionClient(credentials) { Endpoint = endPoint }) { using (Stream imageFileStream = File.OpenRead(imageFilePath)) { OcrResult ocrResult = await client.RecognizePrintedTextInStreamAsync(false, imageFileStream, language); return ocrResult; } } } internal static async Task<string> FormatOcrResult(OcrResult ocrResult) { var sb = new StringBuilder(); foreach(OcrRegion region in ocrResult.Regions) { foreach (OcrLine line in region.Lines) { foreach (OcrWord word in line.Words) { sb.Append(word.Text); sb.Append(" "); } sb.Append("\r\n"); } sb.Append("\r\n\r\n"); } return sb.ToString(); }
The UploadAndRecognizeImageAsync method calls the HTTP REST OCR service (via the NuGet library extractions) and returns a strongly-typed object representing the results of that call. Replace the key and the endPoint in this method with those associated with your Computer Vision service.
The FormatOcrResult method loops through each region, line, and word of the service's return object. It concatenates the text of each word, separating words by spaces, lines by a carriage return and line feed, and regions by a double carriage return / line feed.
Add a Button and a TextBlock to the MainWindow.xaml form.
In the click event of that button add the following code.
Listing 2:
private async void GetText_Click(object sender, RoutedEventArgs e)
{
    string imagePath = @"xxxxxxx.jpg";
    OutputTextBlock.Text = "Thinking…";
    var language = OcrLanguages.En;
    OcrResult ocrResult =  await OCRServices.UploadAndRecognizeImageAsync(imagePath, language);
     string resultText = await OCRServices.FormatOcrResult(ocrResult);
    OutputTextBlock.Text = resultText;
 }
Replace xxxxxxx.jpg with the full path of an image file on disc that contains pictures of text.
You will need to add the following using statement to the top of MainWindow.xaml.cs.
using Microsoft.Azure.CognitiveServices.Vision.ComputerVision.Models;
If you like, you can add code to allow users to retrieve an image and display that image on your form. This code is in the sample application from my GitHub repository, if you want to view it.
Running the form should look something like Fig. 4.
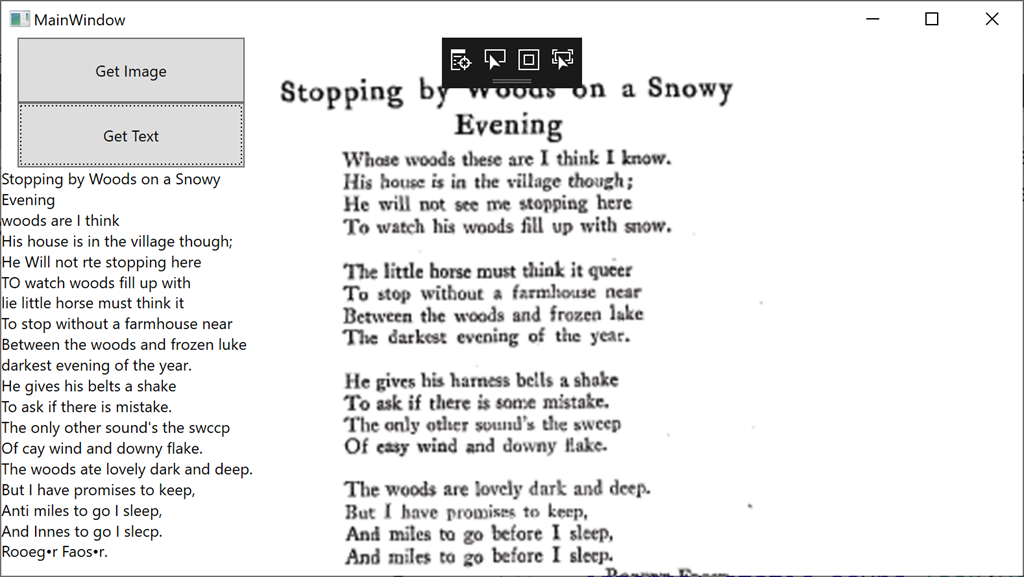
Fig. 4
In a previous article, I described the details of the OCR Service, which is part of the Microsoft Cognitive Services Computer Vision API.
To make this API useful, you need to write some code and build an application that calls this service.
In this article, I will show an example of a JavaScript application that calls the OCR web service.
If you want to follow along, you can find all the code in the "OCRDemo" project, included in this set of demos.
To use this demo project, you will first need to create a Computer Vision API service, as described here.
Read the project's read.me file, which explains the setup you need to do in order to run this with your account.
If you open index.html in the browser, you will see that it displays an image of a poem, along with some controls on the left:
Fig. 1 shows index.html when it first loads:
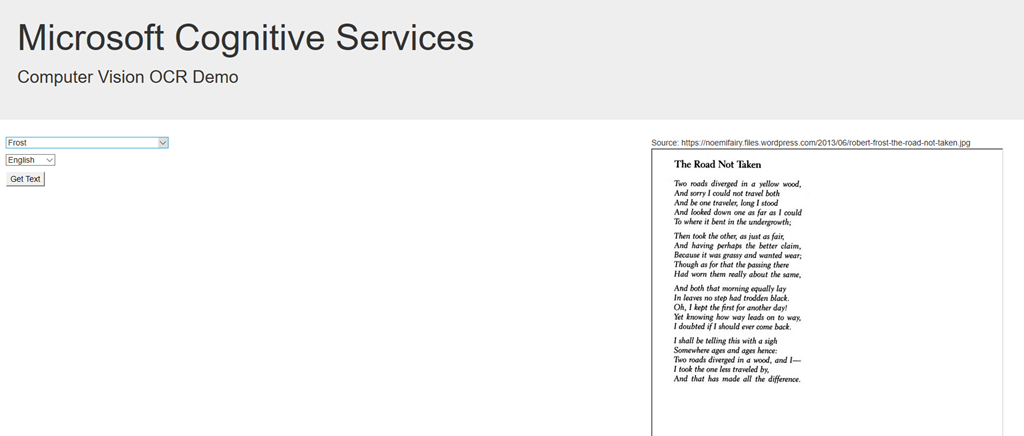
Fig. 1
Let's look at the JavaScript that runs when you click the [Get Text] button. You can find it in script.js
print 'hello world!'$("#GetTextFromPictureButton").click(function () { var outputDiv = $("#OutputDiv"); outputDiv.text("Thinking…"); var url = $("#ImageUrlDropdown").val(); var language = $("#LanguageDropdown").val(); try { var computerVisionKey = getKey(); } catch(err) { outputDiv.html(missingKeyErrorMsg); return; } var webSvcUrl = "https://westcentralus.api.cognitive.microsoft.com/vision/v2.0/ocr"; webSvcUrl = webSvcUrl + "?language=" + language; $.ajax({ type: "POST", url: webSvcUrl, headers: { "Ocp-Apim-Subscription-Key": computerVisionKey }, contentType: "application/json", data: '{ "Url": "' + url + '" }' }).done(function (data) { outputDiv.text(""); var regionsOfText = data.regions; for (var r = 0; r < regionsOfText.length; h++) { var linesOfText = data.regions[r].lines; for (var l = 0; l < linesOfText.length; l++) { var output = ""; var thisLine = linesOfText[l]; var words = thisLine.words; for (var w = 0; w < words.length; w++) { var thisWord = words[w]; output += thisWord.text; output += " "; } var newDiv = "" + output + ""; outputDiv.append(newDiv); } outputDiv.append("
"); } }).fail(function (err) { $("#OutputDiv").text("ERROR!" + err.responseText); });
This code uses jQuery to simplify selecting elements, but raw JavaScript would work just as well.
On the page is an empty div with the id="OutputDiv"
In the first two lines, we select this div and set its text to "Thinking…" while the web service is being called.
var outputDiv = $("#OutputDiv");
outputDiv.text("Thinking…");
Next, we get the URL of the image containing the currently displayed poem and the selected language. These both come from the selected items of the two dropdowns.
    var url = $("#ImageUrlDropdown").val();
    var language = $("#LanguageDropdown").val();
Then, we get the API key, which is in the getKey() function, which is stored in the getkey.js file. You will need to update this file yourself, adding your own key, as described in the read.me.
    try {
        var computerVisionKey = getKey();
    }
    catch(err) {
        outputDiv.html(missingKeyErrorMsg);
        return;
    }
Now, it's time to call the web service. My Computer Vision API service was created in the West Central US region, so I've hard-coded the URL. You may need to change this, if you created your service in a different region.
I add a querystring parameter to the URL to indicate the slected language.
Then, I call the web service by submitting an HTTP POST request to the web service URL, passing in the appropriate headers and constructing a JSON document to pass in the request body.
    var webSvcUrl = "https://westcentralus.api.cognitive.microsoft.com/vision/v2.0/ocr";
    webSvcUrl = webSvcUrl + "?language=" + language;
    $.ajax({
        type: "POST",
        url: webSvcUrl,
        headers: { "Ocp-Apim-Subscription-Key": computerVisionKey },
        contentType: "application/json",
        data: '{ "Url": "' + url + '" }'
Finally, I process the results when the HTTP response returns.
JavaScript is a dynamic language, so I don't need to create any classes to identify the structure of the JSON that is returned; I just need to know the names of each property.
The returned JSON contains an array of regions; each region contains an array of lines; and each line contains an array of words.
In this simple example, I simply loop through each word in each line in each region, concatenating them together and adding some HTML to format line breaks.
Then, I append this HTML to the outputDiv and follow it up with a horizontal rule to emphasize that it is the end.
}).done(function (data) { outputDiv.text(""); var regionsOfText = data.regions; for (var r = 0; r < regionsOfText.length; h++) { var linesOfText = data.regions[r].lines; for (var l = 0; l < linesOfText.length; l++) { var output = ""; var thisLine = linesOfText[l]; var words = thisLine.words; for (var w = 0; w < words.length; w++) { var thisWord = words[w]; output += thisWord.text; output += " "; } var newDiv = "" + output + ""; outputDiv.append(newDiv); } outputDiv.append("
"); }
I also, catch errors that might occur, displaying a generic message in the outputDiv, where the returned text would have been.
    catch(err) {
        outputDiv.html(missingKeyErrorMsg);
        return;
    }
Fig. 2 shows the results after a successful web service call.

Fig. 2
Try this yourself to see it in action. The process is very similar in other languages.
Episode 567
Elton Stoneman describes how to manage containers using Docker on a local machine and in the cloud.
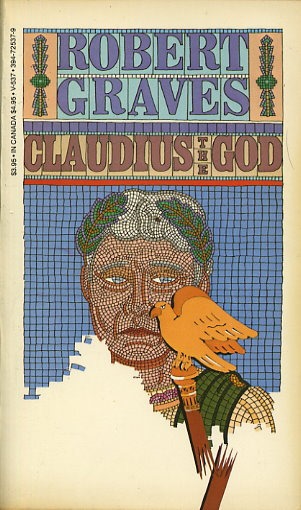 "Claudius the God" continues Robert Graves's fictional translation of the Roman Emperor Claudius's autobiography that he began in "I, Claudius".
The first novel ended with the assassination of Nero and with Claudius being unexpectedly and reluctantly elevated to Emperor.
Claudius was born handicapped and undersized and weak and stuttering, so he remained mostly overlooked during his pre-Emperor years, avoiding the (often fatal) power struggles exercised by his family. So, he seems completely unprepared and unqualified for his role as supreme leader. Despite his initial reluctance, Claudius embraces the role, implementing his policies to modernize the Empire and sometimes executing his enemies without trial. During his 13-year reign, he successfully undoes much of the damage caused by the mad Caligula. Overall, he performed better than almost anyone expected.
At first glance, this seems like a good deal for Claudius.
But his life is damaged by his relationships with women - particularly with Messalina - his young and beautiful wife - who conspires against him and is unfaithful with literally hundreds of other men. After four marriages, Claudius remains unhappy.
Once again, Graves does a good job of bringing to life the political intrigue and personal dramas of ancient Rome and her key players. Nearly everyone in this world with ambition is assassinated or plots assassinations or both. Claudius tries to stay above this and is mostly successful for most of his life.
Previous Roman Emperors had embraced their role as god-king; but Claudius resisted this idea, insisting that he was not a god. In fact, he dreams of Rome eventually rejecting its recent incarnation as a dictatorship and returning to a Republic. His childhood friend the Hebrew king Herod Agrippa takes a different approach, declaring himself to be the prophesied Messiah and is ultimately killed for his arrogance.
But, Claudius changes with time, as happens to so many with ultimate power. Near the end of his life, Claudius accepted his deification when he discovered the Britons were building temples to him. He begins plotting the succession of the throne - without the best interests of the Empire.
The full title of this book is "Claudius, the God and his wife, Messalina" and Claudius's full name is Tiberius Claudius Drusus Nero Germanicus. Much like these names, Robert Graves shortens and simplifies the 13-year reign of Emperor Claudius.
 In Things Fall Apart, Chinua Achebe introduced us to Okonkwo, a west African tribesman trying to preserve his people's culture as European colonialists invaded his homeland in the late 19th century.
Achebe's second novel - No Longer at Ease - follows the life and downfall of Okonkwo's grandson Obi decades later.
Obi returns from a college education in England to begin a life of civil service in his homeland of Nigeria. He returns with high expectations and high ideals, but he finds himself conflicted in every part of his life.
He wants to help his people, but he has seen the world and known many of its pleasures.
He wants to marry Clara, but his family and the rest of society disapproves because she is an osu - an inferior caste. And he is tempted by other beauties.
He resists the temptations of bribery, but many of his friends and colleagues are ready with rationalizations why bribes are acceptable.
He earns far more than most Nigerians, but he finds himself overwhelmed by his expenses and constrained by the salary of a civil servant.
Even his education presented conflict. The elders who loaned him for his education instructed him to study Law; but Obi decided he liked English better and switched majors during his tuition.
Worse, he discovers on his return that Lagos has changed - more modern and more corrupt - from his earlier days. It is the late 1950s and the colonial era is ending and countries like Nigeria are struggling to find their new, post-colonial identity.
Achebe brings to life the time and his characters in a lyrical, yet straightforward style. He peppers the speech of his character with frequent African proverbs.
I loved the reference back to the first novel: The rift between Obi's father and grandfather when his father converted to Christianity, rejecting the violence of the past and beginning the family's assimilation.
No Longer at Ease is a story of Local Culture vs Colonialism; of Idealism vs Practicality; of Individualism vs Duty; of Acceptance of Modern Christianity vs Adherence to an old caste system; and of Tradition vs Progress.
The reader struggles with these conflicts along with Obi.
The Microsoft Cognitive Services Computer Vision API contains functionality to infer a lot of information about a given image. One capability is to convert pictures of text into text, a process known as "Optical Characer Recognition" or "OCR".
Performing OCR on an image is simple and inexpensive. It is done through a web service call; but first, you must set up the Computer Vision Service, as described in this article.
In that article, you were told to save two pieces of information about the service: The API Key and the URL. Here is where you will use them.
The OCR service is a web service. To call it, you send an HTTP POST request to an HTTP endpoint. The endpoint consists of the URL copied above, followed by "vision/v2.0/ocr", followed by some optional querystring parameters (which we will discuss later).
So, if you create your service in the EAST US Azure region, the copied URL will be
https://eastus.api.cognitive.microsoft.com/
and the HTTP endpoint for the OCR service will be
https://eastus.api.cognitive.microsoft.com/vision/v2.0/ocr
The optional querystring parameters are
The 2-character language code of the text you are recognizing. This helps the service more accurately and quickly match pictures of words to the words they represent. If you omit this parameter, the system will analyze the text and guess an appropriate language. Currently, the service supports 26 languages. The 2-character code of each supported language is listed in Appendix 1 at the bottom of this article.
"true", if you want the service to adjust the orientation of the image before performing OCR. If you pass "false" or omitting this parameter, the service will assume the image is oriented correctly.
If you have an image with English text and you want the service to detect and adjust the image's orientation, the above URL becomes:
https://eastus.api.cognitive.microsoft.com/vision/v2.0/ocr?language=en&detectOrientation=true
In the header of the HTTP request, you must add the following name/value pairs:
The API key you copied above
The media type of the image you are passing to the service in the body of the HTTP request
Possible values are:
The value you pass must be consistent with the data in the body.
If you select "application/json", you must pass in the request body a URL pointing to the image on the public Internet.
If you select "application/json" or "application/octet-stream", you must pass the actual binary image in the request body.
In the body of the HTTP request, you pass the image you want the service to analyze.
If you selected "application/json" as the Content-Type in the header, pass a URL within a JSON document, with the following format:
{"url":"image_url"}
where image_url is a URL pointing to the image you want to recognize.
Here is an example:
{"url":"https://www.themeasuredmom.com/wp-content/uploads/2016/03/Slide11.png"}
If you selected "application/octet-stream" or "multipart/form-data" as the Content-Type in the header, pass the actual binary image in the body of the request.
The service has some restrictions on the images it can analyze.
It cannot analyze an image larger than 4MB.
The width and height of the image must be between 50 and 4,200 pixels
The image must be one of the following formats: JPEG, PNG, GIF, BMP.
Here is an example of a call to the service, using Curl:
curl -v -X POST "https://eastus.api.cognitive.microsoft.com/vision/v2.0/ocr?language=en&detectOrientation=true" -H "Content-Type: application/json" -H "Ocp-Apim-Subscription-Key: f27c7436c3a64d91a177111a6b594537" --data-ascii "{'url' : 'https://www.themeasuredmom.com/wp-content/uploads/2016/03/Slide11.png'}"
(NOTE: I modified the key, so it will not work. You will need to replace it with your own key if you want this to work.)
If all goes well, you will receive an HTTP 200 (OK) response.
In the body of that response will be the results of the OCR in JSON format.
At the top level is the language, textAngle, and orientation
Below that is an array of 0 or more text regions. Each region represents a block of text within the image.
Each region contains an array of 0 or more lines of text.
Each line contains an array of 0 or more words.
Each region, line, and word contains a bounding box, consisting of the left, top, width, and height of the word(s) within.
Here is a partial example of the JSON returned from a successful web service call:
{
    "language": "en",
    "textAngle": 0.0,
    "orientation": "Up",
    "regions": [
        {
            "boundingBox": "147,96,622,1095",
            "lines": [
                {
                    "boundingBox": "408,96,102,56",
                    "words": [
                        {
                            "boundingBox": "408,96,102,56",
                            "text": "Hey"
                        }
                    ]
                },
                {
                    "boundingBox": "282,171,350,45",
                    "words": [
                        {
                            "boundingBox": "282,171,164,45",
                            "text": "Diddle"
                        },
                        {
                            "boundingBox": "468,171,164,45",
                            "text": "Diddle"
                        }
                    ]
                },
                etc...
                 }
            ]
        }
    ]
}
The full JSON can be found in Appendix 2 below.
If an error occurs, the response will not by HTTP 200. It will be an HTTP Response code greater than 400. Additional error information will be in the body of the response.
Common errors include:
In this article, I showed how to call the Cognitive Services OCR Computer Vision Service.
zh-Hans (ChineseSimplified)
zh-Hant (ChineseTraditional)
cs (Czech)
da (Danish)
nl (Dutch)
en (English)
fi (Finnish)
fr (French)
de (German)
el (Greek)
hu (Hungarian)
it (Italian)
ja (Japanese)
ko (Korean)
nb (Norwegian)
pl (Polish)
pt (Portuguese,
ru (Russian)
es (Spanish)
sv (Swedish)
tr (Turkish)
ar (Arabic)
ro (Romanian)
sr-Cyrl (SerbianCyrillic)
sr-Latn (SerbianLatin)
sk (Slovak)
{
"language": "en",
"textAngle": 0.0,
"orientation": "Up",
"regions": [
{
"boundingBox": "147,96,622,1095",
"lines": [
{
"boundingBox": "408,96,102,56",
"words": [
{
"boundingBox": "408,96,102,56",
"text": "Hey"
}
]
},
{
"boundingBox": "282,171,350,45",
"words": [
{
"boundingBox": "282,171,164,45",
"text": "Diddle"
},
{
"boundingBox": "468,171,164,45",
"text": "Diddle"
}
]
},
{
"boundingBox": "239,336,441,46",
"words": [
{
"boundingBox": "239,336,87,46",
"text": "Hey"
},
{
"boundingBox": "359,337,144,35",
"text": "diddle"
},
{
"boundingBox": "536,337,144,35",
"text": "diddle"
}
]
},
{
"boundingBox": "169,394,576,35",
"words": [
{
"boundingBox": "169,394,79,35",
"text": "The"
},
{
"boundingBox": "279,402,73,27",
"text": "cat"
},
{
"boundingBox": "383,394,83,35",
"text": "and"
},
{
"boundingBox": "500,394,70,35",
"text": "the"
},
{
"boundingBox": "604,394,141,35",
"text": "fiddle"
}
]
},
{
"boundingBox": "260,452,391,50",
"words": [
{
"boundingBox": "260,452,79,35",
"text": "The"
},
{
"boundingBox": "370,467,80,20",
"text": "cow"
},
{
"boundingBox": "473,452,178,50",
"text": "jumped"
}
]
},
{
"boundingBox": "277,509,363,35",
"words": [
{
"boundingBox": "277,524,100,20",
"text": "over"
},
{
"boundingBox": "405,509,71,35",
"text": "the"
},
{
"boundingBox": "509,524,131,20",
"text": "moon."
}
]
},
{
"boundingBox": "180,566,551,49",
"words": [
{
"boundingBox": "180,566,79,35",
"text": "The"
},
{
"boundingBox": "292,566,103,35",
"text": "little"
},
{
"boundingBox": "427,566,82,49",
"text": "dog"
},
{
"boundingBox": "546,566,185,49",
"text": "laughed"
}
]
},
{
"boundingBox": "212,623,493,51",
"words": [
{
"boundingBox": "212,631,42,27",
"text": "to"
},
{
"boundingBox": "286,638,72,20",
"text": "see"
},
{
"boundingBox": "390,623,96,35",
"text": "such"
},
{
"boundingBox": "519,638,20,20",
"text": "a"
},
{
"boundingBox": "574,631,131,43",
"text": "sport."
}
]
},
{
"boundingBox": "301,681,312,35",
"words": [
{
"boundingBox": "301,681,90,35",
"text": "And"
},
{
"boundingBox": "425,681,70,35",
"text": "the"
},
{
"boundingBox": "528,681,85,35",
"text": "dish"
}
]
},
{
"boundingBox": "147,738,622,50",
"words": [
{
"boundingBox": "147,753,73,20",
"text": "ran"
},
{
"boundingBox": "255,753,114,30",
"text": "away"
},
{
"boundingBox": "401,738,86,35",
"text": "with"
},
{
"boundingBox": "519,738,71,35",
"text": "the"
},
{
"boundingBox": "622,753,147,35",
"text": "spoon."
}
]
},
{
"boundingBox": "195,1179,364,12",
"words": [
{
"boundingBox": "195,1179,45,12",
"text": "Nursery"
},
{
"boundingBox": "242,1179,38,12",
"text": "Rhyme"
},
{
"boundingBox": "283,1179,36,9",
"text": "Charts"
},
{
"boundingBox": "322,1179,28,12",
"text": "from"
},
{
"boundingBox": "517,1179,11,10",
"text": "C"
},
{
"boundingBox": "531,1179,28,9",
"text": "2017"
}
]
},
{
"boundingBox": "631,1179,90,12",
"words": [
{
"boundingBox": "631,1179,9,9",
"text": "P"
},
{
"boundingBox": "644,1182,6,6",
"text": "a"
},
{
"boundingBox": "655,1182,7,9",
"text": "g"
},
{
"boundingBox": "667,1182,7,6",
"text": "e"
},
{
"boundingBox": "690,1179,31,12",
"text": "7144"
}
]
}
]
}
]
}
GCast 51:
Creating an Azure Container Instance
Learn how to create an Azure Container instance from a container repository.
The Microsoft Cognitive Services Computer Vision API contains functionality to infer a lot of information about a given image.
As of this writing, the API is on version 2.0 and supports the following capabilities:
Get general information about an image, such as the objects found, what each object is and where it is located. It can even identify potentially pornographic images.
Find the location of each face in a video and determine information about each face, such as is age, gender, and type of facial hair or glasses.
Convert a picture of text into text
Recognize famous people from photos of their face
Recognize famous landmarks, such as the Statue of Liberty or Diamond Head Volcano.
Retrieve keywords to describe a video at different points in time as it plays.
Change the size and shape of an image, without cropping out the main subject.
To get started, you need to create a Computer Vision Service. To do this, navigate to the Azure Portal, login in, click the [Create a resource] button (Fig. 1) and enter "Computer Vision" in the Search box, as shown in Fig. 2.

Fig. 1
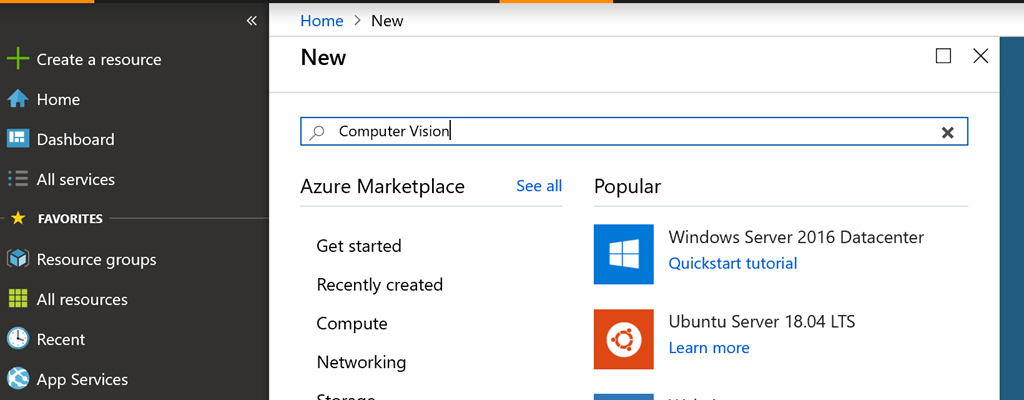
Fig. 2
A dialog displays, with information about the Computer Vision Service, as shown in Fig. 3.

Fig. 3
Click the [Create] button to display the Create Computer Vision Service blade, as shown in Fig. 4.
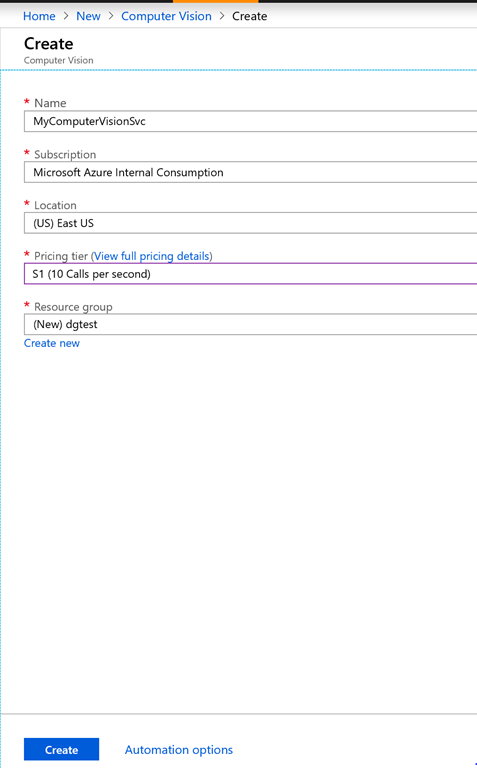
Fig. 4
At the "Name" field, enter a name by which you can easily identify this service. This name must be unique among your services, but need not be globally unique.
At the "Subscription" field, select the Subscription with which you want to associate this service. Most of you will only have one subscription.
At the "Location" field, select the Azure Region in which to store this service. Consider where the users of this service will be, so you can reduce latency.
At the "Pricing tier" field, select "F0" to use this service for free or "S1" to incur a small charge for each call to the service. If you select the free service, you will be limited in the number and frequency of calls that can be made.
At the "Resource group" field, select a resource group in which to store your service or click "Create new" to store it in a newly-created resource group. A resource group is a logical container for Azure resources.
Click the [Create] button to create the Computer Vision service.
Usually, it takes less than a minute to create a Computer Vision Service. When Azure has created this service, you can navigate to it by its name or the name of the resource group.
Two pieces of information are critical when using the service: The Endpoint and the API keys.
The Endpoint can be found on the service's Overview blade, as shown in Fig. 5.

Fig. 5
The API Keys can be found on the service's "Keys" blade, as shown in Fig. 6. There are 2 keys, in case one key is compromised; you can use the other key, while the first is regenerated, in order to minimize downtime.
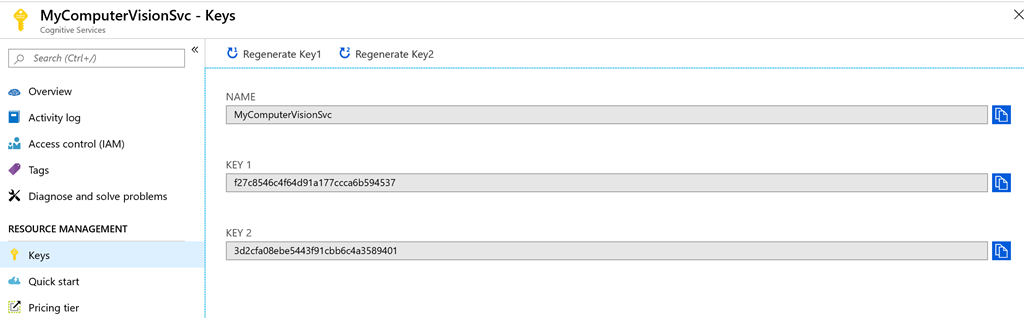
Fig. 6
Copy the URL and and one of the API keys. You will need it to call the web services. We will describe how to make specific calls in future articles.
 It's a good thing The Aragon Ballroom in Chicago's Uptown has such a large stage. They needed all of it to hold about 20 singers and dancers and rappers and guitarists and horns and drummers that make up George Clinton's Parliament Funkadelic.
But even with its large size, the Aragon stage could not contain the entire band for the entire concert Friday night. At least three musicians jumped over the front into the orchestra pit and ran out into the audience during the performance.
Many years ago, Parliament and Funkadelic were two separate bands (although with largely the same members), but today Clinton has combined them into a single entity - Parliament Funkadelic.
 Clinton conducted... no, that's not the right word... Directed...? No... He more or less presided over the band's performance, stepping forward occasionally to acknowledge a performer, deliver a few lyrics, or lead the audience in handclapping. In fact, the 77-year old spent much of the concert sitting on a chair in front of the drum set.
The show started slowly, not helped by failing sound systems and the poor acoustics of the Aragon; but Clinton gained energy as the night went on.
The crowd expressed most delight when the band broke into their old songs - "Give Up the Funk", "Flashlight", "One Nation Under Groove", ...)
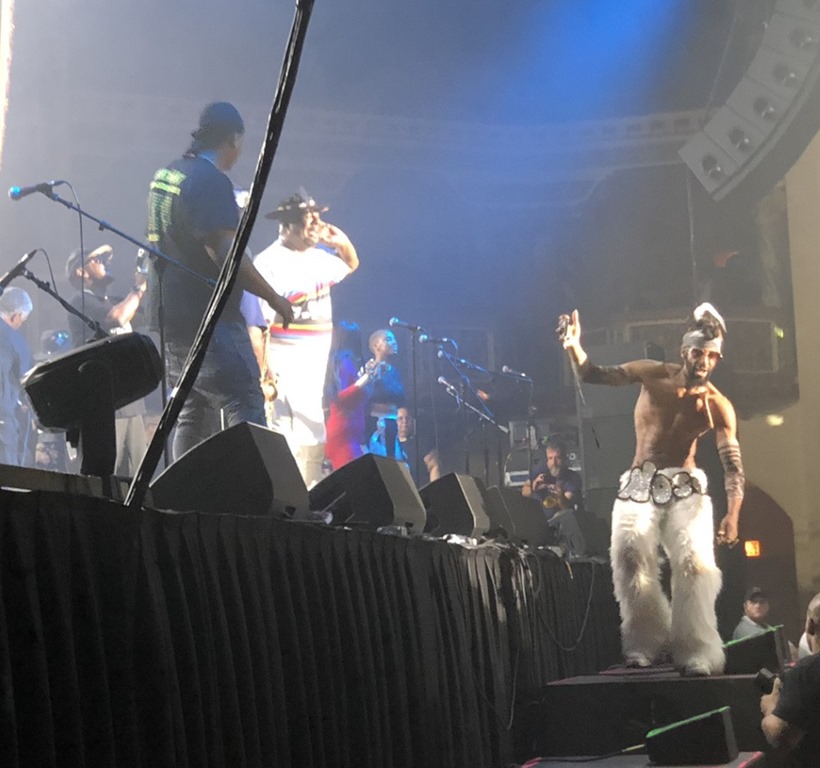 With no seats on the ground floor, the audience could not help but dance, clap, and wave their hands through much of the show. It wasn't perfect, but the crowded stage delivered enough to delight those who made it out for the night.
His health is failing, and his energy is waning, and this will likely be his last tour. But he gave what he could to the crowded ballroom audience, who waited through three warmup acts to see the Rock and Roll Hall of Famer.
Episode 566
Hattan Shobokshi describes how to use Terraform to implement Infrastructure As Code.
6/2
Today I am grateful for the newly-renovated hallways in my building.
6/1
Today I am grateful to see George Clinton and Parliament Funkadelic in concert last night.
5/31
Today I am grateful to attend the AWS Summit yesterday.
5/30
Today I am grateful for a fresh tune-up on my new (to me) bicycle.
5/29
Today I am grateful to get my son moved into a new home last night.
5/28
Today I am grateful for good health insurance.
5/27
Today I am grateful to sleep in my own bed last night.
5/26
Today I am grateful for 4 days in Stockholm, one of Europe's great cities.
5/25
Today I am grateful to be invited to speak at the DevSum conference in Stockholm for the third time.
5/24
Today I am grateful for dinner at a Viking restaurant and fancy drinks with friends last night in Stockholm's Old City.
5/23
Today I am grateful for dinner last night with Jay and Mike in Stockholm.
5/22
Today I am grateful for 2 days in Copenhagen - my first visit to Denmark.
5/21
Today I am grateful for dinner and a long walk through Copenhagen yesterday with Joseph and Deidre.
5/20
Today I am grateful for Sunday brunch with Dave, Sue, Gary, and Debora.
5/19
Today I am grateful for a full day at home.
5/18
Today I am grateful for a week in Germany.
5/17
Today I am grateful for a German dinner with my team last night.
5/16
Today I am grateful to learn and teach DevOps with Lufthansa this week.
5/15
Today I am grateful for my first time staying in Germany in 31 years.
5/14
Today I am grateful to experience an Escape Room for the first time yesterday.
5/13
Today I am grateful to finally meet my team members in person.
5/12
Today I am grateful for:
-the opportunity to speak at the Chicago Code Camp yesterday
-an upgrade to Business Class on my transatlantic flight last night.
5/11
Today I am grateful to Hattan and Dave for answering my stupid questions the last few days.
5/10
Today I am grateful for dinner with Gary last night.
5/9
Today I am grateful for Korean burgers and Kimchi fries with Tim last night.
5/8
Today I am grateful to see Rev. Al Green in concert last night.
5/7
Today I am grateful for a bike ride last night through Chinatown, Pilsen, and the Lower West Side.
5/6
Today I am grateful for a visit to the Skokie Northshore Sculpture Park.
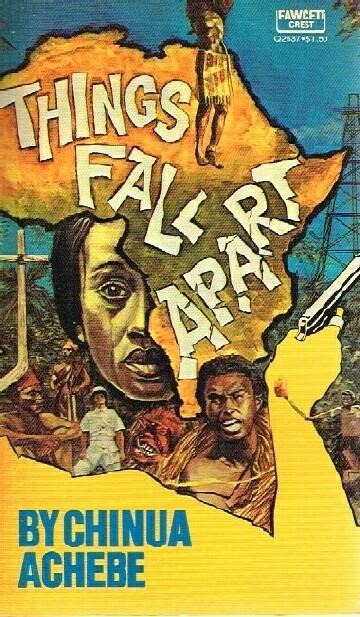 Things Fall Apart by Chinua Achebe tells the story of Okonkwo, a self-made man of the Umuofia clan in pre-colonial West Africa. Okonkwo worked hard to overcome the reputation of his lazy and cowardly father, who died with numerous debts. Okonkwo rose from poverty until he had acquired 3 wives, 10 children, a successful farm, and a position of respect and leadership among the clan.
But Okonkwo was also hot-tempered and violent: he would beat his wives and children when they displeased him, and his great strength made him feel he could and should use violence to settle disputes.
His rise to power was interrupted when he accidentally killed a fellow tribesman and was exiled for seven years for this crime. When he returned to the clan, everything had changed: British colonists have arrived, bringing with them their culture, their laws, and their religion. The society that Okonkwo knew began to disappear, as it was subsumed by the colonists.
Unlike many English novels of this period, Things Fall Apart tells the story of the colonization of Africa from the point of view of the Africans. We see the indigenous people's respect for their ancestors and their focus on doing what is best for the community as a whole; and we see the unpleasantness of their society, such as the killing of a youth to placate angry gods.
We learn about Okonkwo - his strengths and his weaknesses. He is admired for his hard work and his sense of duty; but we also witness his uncontrolled rage and his intolerance.
The point is that we see the complexity of their society - not the ignorant savages so often portrayed by Westerners to justify their methods of "education" and "liberation".
Okonkwo was not a likeable man. But he had his principles and stuck to them, until his world was turned upside down by outsiders. And Achebe leads us toward his inevitable destruction.
GCast 50:
Angular pt 9: Incremental Search
Implementing Incremental Search with Angular JavaScript framework
Episode 564
Eric Boyd describes the principles of Microservices and how he uses these principles to build better software.
Links:
 In the 1930s, the Communist Mexican government outlawed Catholicism and officials imprisoned or killed priests who refused to renounce their faith.
Graham Greene's The Power and the Glory chronicles the story of a Mexican priest on the run from a Mexican policeman.
We never learn the name of the priest or the policeman, but we learn much about the priest.
He is flawed in many ways and overwhelmed with guilt over the sins of his life. He drinks so much that he refers to himself as a "whiskey priest"; and he broke his vow of chastity years ago, resulting in an illegitimate daughter. But he clings to his faith, despite the risk to his life.
As the priest travels from town to town, the policeman pursues him, going so far as to execute those who did not turn in the priest when they had the chance.
Many characters come in and out of the story and nearly all are suffering from the poverty and/or from shame. Poor and weak and struggling with his faith, the priest's life is also filled with misery.
But The Power and the Glory still leaves us with a feeling of hope and a belief in redemption. For people and for the church.
 Jim Dixon is miserable.
He is petty and shallow; he is unqualified for his job; he is lazy and judgmental and sexist; he makes faces at people behind their back; and he is a drunk.
And he is miserable. Miserable because he is trapped in a job that he dislikes working for people he doesn't respect and he is convinced he will be fired soon. Almost everyone in his life is pretentious or boring or neurotic or arrogant. And most of them are trying to bully or manipulate him.
He is the title character of Kingsley Amis's first novel: Lucky Jim.
Lucky Jim is a farcical story filled with failure and petty revenge and self-destruction. But Amis's wit succeeds in making it enjoyable for the reader and even getting us to cheer for the novel's anti-hero.
The book is filled with excellent prose, like the following description of Jim's feelings the morning after a night of hard drinking.
"He lay sprawled, too wicked to move, spewed up like a broken spider-crab on the tarry shingle of morning. The light did him harm, but not as much as looking at things did; he resolved, having done it once, never to move his eyeballs again. A dusty thudding in his head made the scene before him beat like a pulse. His mouth had been used as a latrine by some small creature of the night, and then as its mausoleum. During the night, too, he’d somehow been on a cross-country run and then been expertly beaten up by secret police. He felt bad."
Read this silly book to laugh with and about an underdog, who somehow makes good, despite his best attempts not to do so.
GCast 49:
Angular pt 8: HTTPLearn how to make HTTP calls from within your Angular app.
Episode 564
David Makogon on Streaming Data
David Makogon talks about streaming data and the tools to help you make it happen.
 Oedipa Moss's life was uncomplicated until her former lover - millionaire Pierce Inverarity - passed away and she was named the executor of his estate.
She said goodbye to her husband Mucho Maase and traveled to San Narciso, CA to investigate Pierce's assets.
During her investigation, she encountered a plethora of bizarre characters with bizarre names (Dr. Hilarius, Genghis Cohen, Mike Fallopian, Stanley Koteks, …), along with an ancient secret society dedicated to providing an alternative mail delivery system, to break the monopoly of the U.S. Postal Service.
The Crying of Lot 49 by Thomas Pynchon is an absurd, satirical novel with a huge number of twists, considering its brief length.
On the surface, this is a detective story; but it leaves most questions unanswered and most mysteries unresolved.
Its strength is in its humor and in the creative way it bounces Oedipa from one situation to the next.
The story includes the following:
A lawyer happens to be a former child star with the stage name "Baby Igor". He seduces Oedipa by feeding her tequila and playing strip baccarat while one of his old movies plays on the TV.
Oedipa's psychiatrist is intent on providing hallucinogenic drugs to his patients and ultimately reveals his Nazi past during a violent, paranoid, nervous breakdown.
An American rock band dresses like the Beatles and sing all their songs with a British accent.
And the story of the secret society, rebelling against the government by subverting its monopoly of the postal system keeps coming back to the front. It seems such a bizarre form of protest. But appropriate to this novella.
The novella makes up for its brevity by packing a great deal of quirkiness into less than 200 pages.